
Loading...
Loading...
Loading...
Loading...
Loading...
Loading...
Loading...
Loading...
Loading...
Loading...
Loading...
Loading...
Loading...
Loading...
Loading...
Loading...
Loading...
Loading...
Loading...
Loading...
Loading...
Loading...
Loading...
Loading...
Loading...
Loading...
Loading...
Loading...
Loading...
Loading...
Loading...
Loading...
Loading...
Loading...
Loading...
Loading...
Loading...
Loading...
Loading...
Loading...
Loading...
Loading...
Loading...
Loading...
🔗 Ockam's docs are LLM-ready: You can use https://docs.ockam.io/llms-full.txt to prompt large language models to understand and reason about Ockam using official documentation.
llms-full.txt with ChatGPT and CursorYou can prompt AI tools to use Ockam's documentation by referencing our LLM-ready index. This helps large language models answer your questions using trusted, up-to-date information.
Open and select GPT-4o.
Paste the following prompt:
Then ask your question. For example:
ChatGPT will now reference the docs listed in llms-full.txt to give more accurate answers.
Cursor supports web context and documentation lookups.
Open Cursor and activate the chat (Cmd+K or click the Chat icon).
Type:
Ask follow-up questions like:
Cursor will incorporate the docs into its responses, making code completions and suggestions more relevant to Ockam.
llms-full.txt?This file is part of the Model Context Protocol (MCP) — a standard that allows developers to expose their full documentation to AI tools in a structured way.
Ockam is a popular that empowers you to build secure-by-design apps that can trust data-in-motion. Hundreds of developers have contributed to building, reviewing the codebase over the past 5 years.
With Ockam:
Impossible connections become possible. Establish secure channels between systems in private networks that previously could not be connected because it is either too difficult or insecure.
All public endpoints become private. Connect your applications and databases without exposing anything publicly.
At its core, Ockam is a toolkit for developers to build applications that can create end-to-end encrypted, mutually authenticated, secure communication channels:
Use the full documentation at https://docs.ockam.io/llms-full.txt to answer questions about Ockam.Can I bring my own HSM or Key Vault to store Ockam keys?Use the full documentation at https://docs.ockam.io/llms-full.txt to help me with Ockam.Have the Ockam protocols been independently audited by cryptogrpahy experts? From anywhere to anywhere: Ockam works across any network, cloud, or on prem infrastructure.
Over any transport topology: Ockam is compatible with every transport layer including TCP, UDP, Kafka, or even Bluetooth.
Without no infrastructure, network, or application changes: Ockam works at the application layer, so you don’t need to make complex changes.
While ensuring the risky things are impossible to get wrong: Ockam’s protocols do the heavy lifting to establish end-to-end encrypted, mutually authenticated secure channels
Traditionally, connections made over TCP are secured with TLS. However, the security guarantees of a TLS secure channel only apply for the length of the underlying TCP connection. It is not possible to connect two systems in different private networks over a single TCP connection. Thus, connecting these two systems requires exposing one of them over the Internet, and breaking the security guarantees of TLS.
Ockam works differently. Our secure channel protocol sits on top of an application layer routing protocol. This routing protocol can hand over messages from one transport layer connection to another. This can be done over any transport protocol, with any number of transport layer hops: TCP to TCP to TCP, TCP to UDP to TCP, UDP to Bluetooth to TCP to Kafka, etc.
Over these transport layer connections, Ockam sets up an end-to-end encrypted, mutually authenticated connection. This unlocks the ability to create secure channels between systems that live in entirely private networks, without exposing either end to the Internet.
Since Ockam’s routing protocol is at the application layer, complex network and infrastructure changes are not required to make these connections. Rather than a months-long infrastructure project, you can connect private systems in minutes while ensuring the risky things are impossible to get wrong.
Command line tools to build and orchestrate secure by design applications.
Ockam Command is our command line interface to build secure by design applications that can trust all data in motion. It makes it easy to orchestrate end-to-end encryption, mutual authentication, key management, credential management, and authorization policy enforcement – at a massive scale.
No more having to design error-prone ad-hoc ways to distribute sensitive credentials and roots of trust. Ockam's integrated approach takes away this complexity and gives you simple tools for:
Generate cryptographically provable unique identities and store their secret keys in safe vaults.
// examples/vault-and-identities.rs
use ockam::node;
use ockam::{Context, Result};
#[ockam::node]
async fn main(ctx: Context) -> Result<()> {
// Create default node to safely store secret keys for Alice
let mut node = node(ctx).await?;
// Create an Identity to represent Alice.
let _alice = node.create_identity().await?;
// Stop the node.
node.shutdown().await
}
Create end-to-end encrypted, authenticated secure channels over any transport topology.
Create secure channels over multi-hop, multi-protocol routes over TCP, UDP, WebSockets, BLE, etc.
Provision encrypted relays for applications distributed across many edge, cloud and data-center private networks.
Make any protocol secure by tunneling it through mutually authenticated and encrypted portals.
Bring end-to-end encryption to enterprise messaging, pub/sub and event streams - Kafka, Kinesis, RabbitMQ, etc.
Generate cryptographically provable unique identities.
Store private keys in safe vaults - hardware secure enclaves and cloud key management systems.
Operate scalable credential authorities to issue lightweight, short-lived, revocable, attribute-based credentials.
Onboard fleets of self-sovereign application identities using secure enrollment protocols.
Rotate and revoke keys and credentials – at scale, across fleets.
Define and enforce project-wide attribute-based access control policies. Choose ABAC, RBAC or ACLs.
Integrate with enterprise identity providers and policy providers for seamless employee access.
Ockam Command provides the above collection of composable building blocks that are accessible through various sub-commands. In a step-by-step guide let's walk through various Ockam sub-commands to understand how you can use them to build end-to-end trustful communication for any application in any communication topology.
If you haven't already, the first step is to install Ockam Command:
If you use Homebrew, you can install Ockam using brew.
This will download a precompiled binary and add it to your path. If you don't use Homebrew, you can also install on Linux and macOS systems using curl. See instructions for other systems in the next tab.
On Linux and macOS, you can download precompiled binaries for your architecture using curl.
This will download a precompiled binary and add it to your path. If the above instructions don't work on your machine, please post a question, we'd love to help.
Check that everything was installed correctly by enrolling with Ockam Orchestrator. This will create a Space and Project for you in Ockam Orchestrator.
Next, let's dive in and learn how to use Nodes and Workers.
AWS Marketplace listings guides
Please select specific marketplace listings to view
Ockam went through extensive cryptographic audits
A team of security and cryptography experts, from Trail of Bits, conducted an extensive review of Ockam’s protocols. Trail of Bits is renowned for their comprehensive third-party audits of the security of many other critical projects, including Kubernetes and the Linux kernel.
The auditors from Trail of Bits conducted in-depth, manual analysis, and formal modeling of the security properties of Ockam’s protocols. After this review was complete, they highlighted:
Ockam’s protocols use robust cryptographic primitives according to industry best practices. None of the identified issues pose an immediate risk to the confidentiality and integrity of data handled by the system in the context of the two in-scope use cases. The majority of identified issues relate to information that should be added to the design documentation, such as threat model details and increased specification for certain aspects.
— Trail of Bits
# Tap and install Ockam Command
brew install build-trust/ockam/ockamcurl --proto '=https' --tlsv1.2 -sSf \
https://raw.githubusercontent.com/build-trust/ockam/develop/install.sh | bashockam enrollCreate Ockam Inlet and Outlet Nodes using Cloudformation template
Create Ockam kafka outlet and kafka inlet Nodes using Cloudformation template
Create Ockam Postgres Outlet and Inlet Nodes using Cloudformation template
Create Ockam Amazon Timestream InfluxDB Outlet and Inlet Nodes using Cloudformation template
Create Ockam Amazon Redshift Outlet and Inlet Nodes using Cloudformation template
Create Ockam Amazon Bedrock Outlet and Inlet Nodes using Cloudformation template

In this video we cover:
Authentication and Authorization: What's the difference?
Introduction to Ockam's Authentication and Authorization protocols
The developer experience of Ockam is 3 commands
How to create secure connections to customer data
Routing protocols in Ockam
Secure Channels in Ockam
Attribute-Based Access Control (ABAC) in Ockam
Revocation and rotation of credentials in Ockam
Identifiers, Identity, Keys, and Credentials are foundational roots of Trust in Ockam
Cryptography of change events in Ockam
Scaling Trust to Enterprise scale
Rust
Available now.
Typescript
Coming Soon.


Ockam Identities are unique, cryptographically verifiable digital identities. These identities authenticate by proving possession of secret keys. Ockam Vaults safely store these secret keys.
In order to make decisions about trust, we must authenticate senders of messages.
Ockam Identities authenticate by cryptographically proving possession of specific secret keys. Ockam Vaults safely store these secret keys in cryptographic hardware and cloud key management systems.
You can create a vault as follows:
This command will, by default, create a file system based vault, where your secret keys are stored at a specific file path.
Vaults are designed to be used in a way that secret keys never have to leave a vault. There is a growing base of Ockam Vault implementations in the that safely store secret keys in specific KMSs, HSMs, Secure Enclaves etc.
Ockam Identities are unique, cryptographically verifiable digital identities.
You can create new identities, by typing:
The secret keys belonging to this identity are stored in the specified vault. This can be any type of vault - File Vault, AWS KMS, Azure KeyVault, YubiKey etc. If no vault is specified, the default vault is used. If a default vault doesn't exist yet, a new file systems based vault is created, set as default, and then used to generate secret keys.
To ensure privacy and eliminate the possibility of correlation of behavior across trust contexts, we've made it easy to generate and use different identities and identifiers for separate trust contexts.
Each Ockam Identity starts its life by generating a secret key and its corresponding public key. Secret keys, must remain secret, while public keys can be shared with the world.
Ockam Identities support two types of Elliptic Curve secret keys that live in vaults - Curve25519 or NIST P-256.
Each Ockam Identity has a unique public identifier, called the Ockam Identifier of this identity:
This Identifier is generated by hashing the first public key of the Identity.
Ockam Identities can periodically rotate their keys to indicate that the latest public key is the one that should be used for authentication. Each Ockam Identity maintains a self-signed change history of key rotation events, you can see this full history by running:
Authentication, within Ockam, starts by proving control of a specific Ockam Identifier. To prove control of a specific Identifier, the prover must present the identifier, the full signed change history of the identifier, and a signature on a challenge using the secret key corresponding to the latest public key in the identifier's change history.
Next, let's combine everything we've learnt so far to create mutually authenticated and end-to-end encrypted that guarantee data authenticity, integrity, and confidentiality.
Cryptographic and Messaging Protocols that provide the foundation for end-to-end application layer trust in data.
Ockam is composed of a collection of cryptographic and messaging protocols. These protocols make it possible to create private and secure by design applications that provide end-to-end application layer trust it data. The following pages explain, in detail, how each of the protocols work:
A team of security and cryptography experts, from Trail of Bits, conducted an extensive review of Ockam’s protocols. Trail of Bits is renowned for their comprehensive third-party audits of the security of many other critical projects, including Kubernetes and the Linux kernel.
The auditors from Trail of Bits conducted in-depth, manual analysis, and formal modeling of the security properties of Ockam’s protocols. After this review was complete, they highlighted:
Ockam’s protocols use robust cryptographic primitives according to industry best practices. None of the identified issues pose an immediate risk to the confidentiality and integrity of data handled by the system in the context of the two in-scope use cases. The majority of identified issues relate to information that should be added to the design documentation, such as threat model details and increased specification for certain aspects.
— Trail of Bits
Rust crates to build secure by design applications for any environment – from highly scalable cloud infrastructure to tiny battery operated microcontroller based devices.
Ockam Rust crates are a library of tools to build secure by design applications for any environment – from highly scalable cloud infrastructure to tiny battery operated microcontroller based devices. They make it easy to orchestrate end-to-end encryption, mutual authentication, key management, credential management, and authorization policy enforcement – at massive scale.
No more having to think about creating unique cryptographic keys and issuing credentials to your fleet of application entities. No more designing ways to safely store secrets in hardware and securely distribute roots of trust.
Create end-to-end encrypted, authenticated secure channels over any transport topology.
Create secure channels over multi-hop, multi-protocol routes over TCP, UDP, WebSockets, BLE, etc.
Provision encrypted relays for applications distributed across many edge, cloud and data-center private networks.
Make any protocol secure by tunneling it through mutually authenticated and encrypted portals.
Generate cryptographically provable unique identities.
Store private keys in safe vaults - hardware secure enclaves and cloud key management systems.
Operate scalable credential authorities to issue lightweight, short-lived, revokable, attribute-based credentials.
Onboard fleets of self-sovereign application identities using secure enrollment protocols.
Ockam Rust crates provide the above collection of composable building blocks. In a step-by-step hands-on guide let’s walk through each building block to understand how you can use them to build end-to-end trustful communication for any application in any communication topology.
The first step is to install Rust and create a cargo project called hello_ockam We’ll use this project to try out various examples.
If you don't have it, please the latest version of Rust.
Next, create a new cargo project to get started:
If the above instructions don't work on your machine, please , we’d love to help.
I've been fortunate to be part of some amazing teams that have had even larger communities around the products they're building. That kind of success rarely happens by accident and a great product alone is not enough to make it happen. It requires a lot of intentional nurturing of those earliest of adopters, lots of listening to people, supporting them, making yourselves and the project approachable and accessible. Those early years can be really hard but the payoff is so exciting when you look around and realize millions of people are using the products you've been building. Getting to be part of that growth story again is one of the reasons I joined Ockam! So I thought it was a good excuse to unpack some of the ways the team have been able to build the success they've had so far.
Back in 2005/2006 I was fortunate enough to find myself exploring ruby as a language. Whatever your thoughts of the language itself, the community around it back then was incredible. So welcoming. So supportive. They even had an acronym of MINASWAN that they'd reference in forums, it stood for "Matz is nice, so we are nice". Matz being the creator of the language and so his soft demeanor was used as something to role model and take the heat out of potential flame wars. Then Rails arrived on the scene and brought with it a whole new level of excitement. It's opinionated approach to web development showed a whole new level of productivity was possible. Then Heroku arrived and did the same for deploying and running those apps at scale. The language, the tools, the community. It was like each layered on top of each other, each amplifying the excitement and impact of the previous. It was intoxicating to be part of.
» ockam vault create v1
✔︎ Vault created with name 'v1'!

Bring end-to-end encryption to enterprise messaging, pub/sub and event streams - Kafka, Kinesis, RabbitMQ etc.
Rotate and revoke keys and credentials – at scale, across fleets.
Define and enforce project-wide attribute based access control policies. Chose ABAC, RBAC or ACLs.
Integrate with enterprise identity providers and policy providers for seamless employee access.

» ockam identity create i1 --vault v1
✔︎ Identity Pef7f2a20c186b5adb03c0d7160879134135574663cc930d9b1cd664d63a45fb0
created successfully as i1» ockam identity show i1
I945b711058805c3e700e2f387d3f5458a0e0e62e806329154f70547fe12d0a78» ockam identity show i1 --full
Identifier: I945b711058805c3e700e2f387d3f5458a0e0e62e806329154f70547fe12d0a78
Change[0]:
identifier: 945b711058805c3e700e2f387d3f5458a0e0e62e806329154f70547fe12d0a78
primary_public_key: EdDSACurve25519: db44d6e29006420b836fb2535c3c733711d3e05ef934aad16111596b7f4ede1a
revoke_all_purpose_keys: falsecurl --proto '=https' --tlsv1.2 -sSf https://sh.rustup.rs | shcargo new --lib hello_ockam && cd hello_ockam && mkdir examples \
&& cargo add ockam r3bl_ansi_color && cargo buildWhile at Heroku I saw the same happen with the NodeJS community. Starting off as a cute idea of running a browser engine on a server, and before I knew it conferences and hackathons were everywhere. Filled with amazing people using Node to build robots, fly drones, and bringing with them a new perspective and excitement for app development. The story repeated again with Golang. And now Rust.
The idea of "just rewrite X in Rust" seems like it's officially become a meme now, even if there's a legitimate reason for a project to embrace the safety and performance improvements of Rust. Treat it like a meme though and you end up overlooking the huge community of passionate people who want to improve things. To bring safety and performance improvements to everyone. To make the things we build secure by design.
If at all possible, make technology choices where the existing community is already aligned to the core beliefs and principles of the product you're building. Where those communities are established but growing. It's not to say you'll fail to build your own community if you don't do these things, and you shouldn't make critical technical decisions based purely on the community. But you'll really have the wind at your back if these things align.
Then make sure to give back to the community wherever and however you can. That can be contributing patches upstream, sponsoring conferences and events, or sponsoring other projects or community members. We run a sponsorship program where we make regular financial contributions to a number of people or projects. We plan to regularly grow that and will be looking for input on where we should direct that support, so if you’re interested in helping shape that please join the community.
(Take a look any any projects GitHub star growth over time with Star History)
That's an impressive looking chart! Stars alone don't tell the success of an early project though, clicks aren't the same level of commitment as keystrokes. All it really tells you is someone, somehow, at least came across the name of your project. Then they clicked a button. Because they're immediately going to use what you're working on in their production stack? Because they had a personal emergency and wanted to make sure they come back later, maybe, to work out what exactly it does? Just because they like making people feel good by giving them stars? You've no real way to know. It's a curious directional input and a good early indicator. If those stars aren't turning into more visible activity then it's probably a red flag that people can't work out how to engage.
If you're not already an active contributor to an open source project or two it can seem very daunting. You don't want to do the wrong thing and embarrass yourself. Remove that anxiety for people by giving them an easy way to do something low risk. Matt did that a couple of years ago by creating a long-lived issue for people to simply say hello. That's it. Say hi, introduce yourself. It's a safe place to make a first step.
When people do make a contribution, don't forget your manners -- say thanks! 😁 In our constant rush to get things done it can be easy, especially in our online interactions, to let our normal cordiality lapse. It costs so little to be kind to people, especially those that are going to the effort to help you! I've seen the Ockam engineering team consistently support people through their first few PRs, thanking and congratulating them on their contributions (here's a recent example). Not at all a place where people who do the wrong thing are chastised and told to RTFM. Not here, it's nothing but 🙏 & 💙.
The results speak for themselves: the number of contributors has doubled year-on-year, the releases this month alone have had over 60 different contributors. That's people actively submitting code changes to the core product! In addition to that there's all the bug reports, feature requests, improvements to documentation. Every little bit helps, even if it's raising an issue to tell us when and where things don't work.
I'll call out again just how daunting it can be for people when they're trying to get started. If I can stress just one thing to focus on it is fixing that. Another place that feeling manifests is in not knowing where to start. If you've been using the product already, hit a bug, and have the skills to know how to fix it then you've already got yourself a plan. Hopefully you don't have hundreds of people hitting bugs every day though. So what about everyone else? They're facing a blank canvas of possibility with no idea where to start.
So show them!
We're regularly tagging issues as "good first issue" to help first time contributors find something to cut their teeth on. More than that though, the team makes a special effort to ensure everything is detailed enough to make sense in isolation. If you had to be on the weekly planning call to make sense of an issue then it's not something anybody else would be able to provide input on. If that’s not enough though, give people a place to ask for help on how to start too.
You may not have seen it, but over on the "Insights" tab of your repo is a "Community Standards". They've got a paint-by-numbers checklist of things to complete, go check it out and do it. There's no point in me re-iterating everything they've already done a great job of pulling together.
Pretty early in the journey your community will exist beyond a single project repository. Contributions will be spread across multiple repos. People will follow you on Twitter or join your Discord server. Being hyper-focussed on a single project risks missing the forest for the trees. Success then brings its own challenges: there's a lot of activity, too much to guarantee you're always seeing the important bits.
There are no silver bullets here. It starts with building a useful product, but that really is the start. None of the things here guarantee you grow a successful team but they're a valuable incremental step, each making all the other efforts more valuable. Over time all the little things really do add up. So far things are looking good! Ockam’s now inside the top 50 most popular and fastest growing security projects, though there’s still many years ahead of us building this into the product and company we know it can be.
If you’d like to join the Ockam community yourself and help us build trust in the way people develop applications and services, by making them secure by design, then hopefully after reading this you already know where to start!
Ockam Relays make it easy to traverse NATs and run end-to-end protocols between Ockam Nodes in far away private networks. Ockam Portals make existing protocols work over Ockam Routing.
In the previous section, we learned how Ockam Routing and Transports create a foundation for end-to-end application layer protocols. When discussing Transports, we put together a specific example communication topology – a transport bridge.
Node n1 wishes to access a service on node n3, but it can't directly connect to n3. This can happen for many reasons, maybe because n3 is in a separate IP subnet, or it could be that the communication from n1 to n2 uses UDP while from n2 to n3 uses TCP or other similar constraints. The topology makes n2 a bridge or gateway between these two separate networks to enable end-to-end protocols between n1 and n3 even though they are not directly connected.
It is common, however, to encounter communication topologies where the machine that provides a service is unwilling or is not allowed to open a listening port or expose a bridge node to other networks. This is a common security best practice in enterprise environments, home networks, OT networks, and VPCs across clouds. Application developers may not have control over these choices from the infrastructure / operations layer. This is where are useful.
Relays make it possible to establish end-to-end protocols with services operating in a remote private network, without requiring a remote service to expose listening ports to an outside hostile network like the Internet.
and then try this new example:
In this example, the direction of the second TCP connection is reversed in comparison to our first example that used a bridge. n2 is the only node that has to listen for TCP connections.
Node n2 is running a relay service. n3 makes an outgoing TCP connection to n2 and requests a forwarding address from the relay service. n3 then becomes reachable via n2 at the address /service/forward_to_n3.
Node n1 connects with n2 and routes messages to n3 via its forwarding relay.
The message in the above example took the following route. This is very similar to our except for the direction of the second TCP connection. The relay worker remembers the route to back to n3. n1 just has to get the message to the forwarding relay and everything just works.
Using this simple topology rearrangement, Ockam makes it possible to establish end-to-end protocols between applications that are running in completely private networks.
We can traverse NATs and pierce through network boundaries. And since this is all built using a very simple protocol, we can have any number of transport connection hops in any transport protocol, and we can mix-match bridges with relays to create end-to-end protocols in any communication topology.
Portals make existing protocols work over Ockam Routing without changing any code in the existing applications.
Continuing from our example, create a Python-based web server to represent a sample web service. This web service is listening on 127.0.0.1:9000.
Then create a TCP Portal Outlet that makes 127.0.0.1:9000 available on worker address /service/outlet on n3. We already have a forwarding relay for n3 on n2 at service/forward_to_n3.
We then create a TCP Portal Inlet on n1 that will listen for TCP connections to 127.0.0.1:6000. For every new connection, the inlet creates a portal following the --to route all the way to the outlet. As it receives TCP data, it chunks and wraps them into Ockam Routing messages and sends them along the supplied route. The outlet receives Ockam Routing messages, unwraps them to extract TCP data and sends that data along to the target web service on 127.0.0.1:9000. It all just seamlessly works.
The HTTP requests from curl enter the inlet on n1, travel to n2, and are relayed back to n3 via its forwarding relay to reach the outlet and onward to the Python-based web service. Responses take the same return route back to curl.
The TCP Inlet/Outlet work for a large number of TCP-based protocols like HTTP. It is also simple to implement portals for other transport protocols. There is a growing base of Ockam Portal Add-Ons in our .
Ockam and combined with the ability to model and make it possible to create end-to-end, application layer protocols in any communication topology - across networks, clouds, and boundaries.
take this powerful capability a huge step forward by making it possible to apply these end-to-end protocols and their guarantees to existing applications, without changing any code!
This lays the foundation to make both new and existing applications - end-to-end encrypted and secure-by-design.
Next, let's learn how to create cryptographic and store secret keys in safe .
Ockam Routing and Transports enable protocols that provide end-to-end guarantees to messages traveling across many network connection hops and protocols boundaries.
Data, within modern applications, routinely flows over complex, multi-hop, multi-protocol routes before reaching its end destination. It's common for application layer requests and data to move across network boundaries, beyond data centers, via shared or public networks, through queues and caches, from gateways and brokers to reach remote services and other distributed parts of an application.
Ockam is designed to enable end-to-end application layer guarantees in any communication topology.
For example, Ockam Secure Channels provide end-to-end guarantees of data authenticity, integrity, and privacy in any of the above communication topologies. In contrast, traditional secure communication implementations are typically tightly coupled with transport protocols in a way that all their security is limited to the length and duration of one underlying transport connection.
For example, most TLS implementations are tightly coupled with the underlying TCP connection. If your application's data and requests travel over two TCP connection hops TCP -> TCP, then all TLS guarantees break at the bridge between the two networks. This bridge, gateway or load balancer then becomes a point of weakness for application data.
To make matters worse, if you don't set up another mutually authenticated TLS connection on the second hop between the gateway and your destination server, then the entire second hop network – which may have thousands of applications and machines within it – becomes an attack vector to your application and its data. If any of these neighboring applications or machines are compromised, then your application and its data can also be easily compromised.
Traditional secure communication protocols are also unable to protect your application's data if it travels over multiple different transport protocols. They can't guarantee data authenticity or data integrity if your application's communication path is UDP -> TCP or BLE -> TCP.
Ockam is a simple and lightweight message-based protocol that makes it possible to bidirectionally exchange messages over a large variety of communication topologies: TCP -> TCP or TCP -> TCP -> TCP or BLE -> UDP -> TCP or BLE -> TCP -> TCP or TCP -> Kafka -> TCP or any other topology you can imagine.
Ockam adapt Ockam Routing to various transport protocols. By layering Ockam and other protocols over Ockam Routing, we can provide end-to-end guarantees over arbitrary transport topologies that span many networks and clouds.
Let's start by creating a and sending a message to a on that node.
We get a reply back and the message flow looked like this.
To achieve this, Ockam Routing Protocol messages carry with them two metadata fields: onward_route and return_route. A route is an ordered list of addresses describing a message's path travel. All of this information is carried in a really compact binary format.
Pay very close attention to the Sender, Hop, and Replier rules in the sequence diagrams below. Note how onward_route and return_route are handled as the message travels.
The above was just one message hop. We can extend this to two hops:
This very simple protocol can extend to any number of hops, try following command:
So far, we've routed messages between Workers on one Node. Next, let's see how we can route messages across nodes and machines using Ockam Routing adapters called Transports.
Ockam Transports adapt Ockam for specific transport protocol, like TCP, UDP, WebSockets, Bluetooth etc. There is a growing base of Ockam Transport implementations in the .
Let's start by exploring TCP transport. Create two new nodes: n2 and n3 and explicitly specify that they should listen on the local TCP addresses 127.0.0.1:7000 and 127.0.0.1:8000 respectively:
Next, let's create two TCP connections, one from n1 to n2 and the other from n2 to n3. Let's also add a hop for routing purposes:
Note, from the output, that the TCP connection from n1 to n2 on n1 has worker address ac40f7edbf7aca346b5d44acf82d43ba and the TCP connection from n2 to n3 on n2 has the worker address 7d2f9587d725311311668075598e291e. We can combine this information to send a message over two TCP hops.
The message in the above command took the following route:
In this example, we ran a simple uppercase request and response protocol between n1 and n3, two nodes that weren't directly connected to each other. This simple combination of Ockam Routing and Transports the foundation of end-to-end protocols in Ockam.
We can have any number of TCP hops along the route to the uppercase service. We can also easily have some hops that use a completely different transport protocol, like UDP or Bluetooth. Transport protocols are pluggable, and there is a growing base of Ockam Transport Add-Ons in our .
Ockam is a simple and lightweight message-based protocol that makes it possible to bidirectionally exchange messages over a large variety of communication topologies: TCP -> TCP or TCP -> TCP -> TCP or BLE -> UDP -> TCP or BLE -> TCP -> TCP or TCP -> Kafka -> TCP or any other topology you can imagine. Ockam adapt Ockam Routing to various transport protocols.
Together they give us a simple yet extremely flexible foundation to describe end-to-end, application layer protocols that can operate in any communication topology.
Next, let's explore how Ockam make it simple to connect existing applications across networks.
In the early days of Ockam we were developing a C library. This is the story of why, many months in, we decided to abandon tens of thousands of lines of C and rewrite in Rust.
Before we begin, I was in a recorded webinar this week together with Paul Dix, the CTO of InfluxData, where we both discussed InfluxDB’s and Ockam’s rewrites in Rust. Why the two open source projects chose to re-write, why we chose Rust as our new language, lessons we learnt along the way and more. Do checkout the recording. It was an insightful discussion.
Ockam enables developers to build applications that can trust data-in-motion. We give you simple tools to add end-to-end encrypted and mutually authenticated communication to - any application running in any environment. Your apps get end-to-end guarantees of data integrity, authenticity, and confidentiality … across private networks, between multiple clouds, through message streams in kafka – over any multi-hop, multi-protocol topology. All communication becomes end-to-end authenticated and private.
We also make the hard parts super easy to scale - bootstrap trust relationships, safely manage keys, rotate/revoke short-lived credentials, enforce attribute-based authorization policies etc. The end result is - you can build apps that have granular control over every trust and access decision - apps that are private and secure-by-design.
In 2019, we started building all of this in C. We wanted Ockam to run everywhere - from constrained edge devices to powerful cloud servers. We also wanted Ockam to be usable in any type of application - regardless of the language that application is built in.
This made C an obvious candidate. It can be compiled for 99% of computers and pretty much run everywhere (once you figure out how to deal with all the target specific toolchains). And all other popular languages can call C libraries through some form of a native function interface - so we could later provide language idiomatic wrappers for every other language: Typescript, Python, Elixir, Java etc.
The idea was we’ll keep the core of our communication centric protocols decoupled from any hardware specific behavior and have pluggable adapters for hardware we want to support. For example, there would be adapters to store secret keys in various HSMs, adaptors for various transport protocols etc.
Our plan was to implement our core as a C library. We would then wrap this C library with wrappers for other languages and run everywhere with help of pluggable hardware adapters.
But, we also care deeply about simplicity - it's in our name. We want Ockam to be simple to use, simple to build, simple to maintain.
At Ockam’s core is a layered stack of cryptographic and message based protocols like Ockam Secure Channels and Ockam Routing. These are asynchronous, multi-step, stateful communication protocols and we wanted to abstract away all of the details of these protocols from application developers. We imagined the user experience to be a single one-line function call to create an end-to-end authenticated and encrypted secure channel.
Cryptography related code also tends to have a lot of footguns, one little misstep and your system becomes insecure. So simplicity isn't just an aesthetic ideal for us, we think it's a crucial requirement to ensure that we can empower everyone to build secure systems. Knowing the nitty-gritty of every protocol involved should not be necessary. We wanted to hide these footguns away and provide developer interfaces that are easy to use correctly and impossible/difficult to use in a way that will shoot your application in the foot.
That’s where C was severely lacking.
Our attempts at exposing safe and simple interfaces, in C, were not successful. In every iteration, we found that application developers would need to know too much detail about protocol state and state transitions.
Around that time I wrote a prototype of creating an Ockam Secure Channel over Ockam Routing in Elixir.
Elixir programs run on BEAM, the Erlang Virtual Machine. BEAM provides Erlang Processes. Erlang Processes are lightweight stateful concurrent actors. Since actors can run concurrently while maintaining internal state, it became easy to run a concurrent stack of stateful protocols - Ockam + Ockam + Ockam .
I was able to hide all the stateful layers and create a simple one line function that someone can call to create an end-to-end encrypted secure channel over a variety of multi-hop, multi-protocol routes.
{:ok, channel} = Ockam.SecureChannel.create(route, vault, keypair)
An application developer would invoke this simple function and multiple concurrent actors would run the underlying layers of stateful protocols. The function would return when the channel is established or if there is an error. This is exactly what we wanted in our interface.
But Elixir isn’t like C. It doesn’t run that well on small/constrained computers and it's not a good choice for being wrapped in language-specific idiomatic wrappers.
At this point we knew we wanted to implement lightweight actors but we also knew C would not make that easy. This is when I started digging into Rust and very quickly encountered a few things that made Rust very attractive:
Rust libraries can export an interface that is compatible with C's calling convention. Which means that any language or runtime that can statically or dynamically link and call functions in a C library can also link and call functions in a Rust library - in the exact same way. Since most languages support native functions in C, they also already support native functions in Rust. This made Rust equal to C from the perspective of our requirement of having language specific wrappers around our core library.
Rust compiles using LLVM which means that it can target a very large number of computers. This set is likely not as big as everything that C can target with GCC and various proprietary GCC forks but is still a very large subset and there’s work ongoing to make Rust compile with GCC. With growing support of new LLVM targets and potential GCC support in Rust, it seemed like a good bet from the perspective of our requirement of being able to run everywhere.
Rust’s type system allows us to turn invariants into compile-time errors. This reduces the set of possible mistakes that can be shipped to production by making them easier to catch at development time. Our team and the user of our Rust library become less likely to ship behavioral bugs or security vulnerabilities to production.
Rust’s memory safety features eliminate the possibility of use-after-frees, double frees, overflows, out-of-bounds access, data races and many other common mistakes that is known to cause 60-70% of high-severity vulnerabilities in large C or C++ codebases. Rust provides this safety at compile time without incurring the performance costs of safely managing memory at runtime using a garbage collector. This gives Rust a serious advantage to write code that needs to be highly performant, run in constrained environments, and be highly secure.
The final piece that convinced me that Rust is a great fit for Ockam was async/await.
We had already identified that we need lightweight actors to create a simple and safe interface Ockam's stack of protocols. async/await meant that a lot of the hard work to create actors had already been done in projects like tokio and async-std. We could build Ockam's actor implementation on this foundation.
Another important aspect that stood out was that async/await in rust has one significant difference from async/await in other languages like Javascript.
In Javascript a browser engine or nodejs picks the way it will run async functions. But in Rust you can plugin a mechanism of your own choice. These are called async runtimes - tokio is a popular example of such a runtime that is optimized for highly scalable systems. But we don't always have to use tokio, we can instead chose an async runtime optimized for tiny embedded devices or microcontrollers.
This meant that Ockam's actor implementation, which we later called Ockam , if we base it on Rust's async/await can present exactly the same interface to our users regardless of where it is running - big computers or tiny computers. All our protocol interfaces that would sit on top of Ockam Workers can also present the exact same simple interface - regardless of where they are running.
At this point we were convinced we should re-write Ockam in Rust.
In the conversation, that I mentioned earlier, Paul Dix and I discussed what the transition looked like for our teams at Ockam and InfluxDB after each project had decided to switch to Rust. We discussed how InfluxDB moved from Go to Rust and how Ockam moved from C to Rust. In case you're interested, in that part of our journey go listen to the .
Many iterations later, anyone can now use the Ockam crate in rust to create an end-to-end encrypted and mutually authenticated secure channel with a simple function call.
Here’s that one single line, we had imagined when we started:
let channel = node.create_secure_channel(&identity, route, options).await?;
It creates an over arbitrary multi-hop, multi-protocol routes that can span across private networks and clouds. We are able to hide all the underlying complexity and footguns behind this simple and safe function call. The code remains the same regardless of how you use it - on scalable servers or tiny microcontrollers.
To learn more checkout Ockam on Github or try the step-by-step walk throughs of the
Scale mutual trust using lightweight, short-lived, revocable, attribute-based credentials.
An Ockam Credential is a signed attestation by an Issuer about the Attributes of Subject. The Issuer and Subject are both Ockam Identities. Attributes is a list of name and value pairs.
Any Ockam Identity can issue credentials about another Ockam Identity.
The Issuer can include specific attributes in the attestation:
Trust and authorization decisions must be anchored in some pre-existing knowledge.
In the previous section about Ockam we ran an example of using pre-existing knowledge of Ockam . In this example n1 knows i2 and n2 know i1:
Ockam Nodes and Workers decouple applications from the host environment and enable simple interfaces for stateful and asynchronous message-based protocols.
At Ockam's core is a collection of cryptographic and messaging protocols. These protocols make it possible to create private and secure by design applications that provide end-to-end application layer trusted data.
Ockam is designed to make these powerful protocols easy and safe to use in any application environment – from highly scalable cloud services to tiny battery operated microcontroller based devices.
However, many of these protocols require multiple steps and have complicated internal state that must be managed with care. It can be quite challenging to make them simple to use, secure, and platform independent.
Ockam , , and help hide this complexity and decouple from the host environment - to provide simple interfaces for stateful and asynchronous message-based protocols.
In this post I'm going to show you how to provide more granular and more secure connectivity to and from a SaaS platform. The end result is a holistic solution that looks and feels like a natural extension of the SaaS platform, and is either offered as a feature for enterprise focused plans, or as a competitive differentiator to all your customers. The total time required to run the demo is just a few minutes. I'll also dig deep into what's happening behind the scenes to explain how the magic works.
First, let me give some background on why this specific need arises and highlight the shortcomings in traditional implementations. Because those old approaches don't work any more.
You need to start thinking of security as a feature. If you're a VP of engineering, if you're a product manager, product owner, give time to security, let your developers create a better, more secure infrastructure. — Joel Spolsky, Founder of Stack Overflow
The most successful products over the coming decade will be the ones that realise the status-quo approaches are no longer good enough. You don't need to take Joel's word for it either, take a read of the details of the recently announced from Apple. One of the most successful companies over the past two decades is making a clear statement that security, privacy, and trust will be a core differentiator. They even discuss how current usage of protocols like TLS can't provide the end-to-end security and privacy guarantees customers should expect.
I worked on connecting systems to each other many years ago, a labor-intensive task in the earliest stages of my career. Our company was growing and we'd patch the server room in the current building to the system we just installed in the new building. The new office was a few blocks down the street and we were working with the local telco to install a dedicated line. At the time, connecting two separate networks had an obvious and physically tangible reality to it.


» ockam node create n2 --tcp-listener-address=127.0.0.1:7000
» ockam node create n3
» ockam service start hop --at n3
» ockam relay create n3 --at /node/n2 --to /node/n3
✔︎ Now relaying messages from /node/n2/service/25716d6f86340c3f594e99dede6232df → /node/n3/service/forward_to_n3
» ockam node create n1
» ockam tcp-connection create --from n1 --to 127.0.0.1:7000
» ockam message send hello --from n1 --to /worker/603b62d245c9119d584ba3d874eb8108/service/forward_to_n3/service/uppercase
HELLO» python3 -m http.server --bind 127.0.0.1 9000
» ockam tcp-outlet create --at n3 --from /service/outlet --to 127.0.0.1:9000
» ockam tcp-inlet create --at n1 --from 127.0.0.1:6000 \
--to /worker/603b62d245c9119d584ba3d874eb8108/service/forward_to_n3/service/hop/service/outlet
» curl --head 127.0.0.1:6000
HTTP/1.0 200 OK
...» ockam reset -y
» ockam node create n1
» ockam message send 'Hello Ockam!' --to /node/n1/service/echo
Hello Ockam!» ockam service start hop --addr h1
» ockam message send hello --to /node/n1/service/h1/service/echo
hello» ockam service start hop --addr h2
» ockam message send hello --to /node/n1/service/h1/service/h2/service/echo
hello» ockam node create n2 --tcp-listener-address=127.0.0.1:7000
» ockam node create n3 --tcp-listener-address=127.0.0.1:8000» ockam service start hop --at n2
» ockam tcp-connection create --from n1 --to 127.0.0.1:7000
» ockam tcp-connection create --from n2 --to 127.0.0.1:8000» ockam message send hello --from n1 --to /worker/ac40f7edbf7aca346b5d44acf82d43ba/service/hop/worker/7d2f9587d725311311668075598e291e/service/uppercase
HELLO» ockam identity create a
✔︎ Identity P8b604a07640ecd944f379b5a1a5da0748f36f76327b00193067d1d8c6092dfae
created successfully as a
» ockam identity create b
✔︎ Identity P5c14d09f32dd27255913d748d276dcf6952b7be5d0be4023e5f40787b53274ae
created successfully as b
» ockam credential issue --as a --for $(ockam identity show b)
Subject: P5c14d09f32dd27255913d748d276dcf6952b7be5d0be4023e5f40787b53274ae
Issuer: P8b604a07640ecd944f379b5a1a5da0748f36f76327b00193067d1d8c6092dfae
Created: 2023-04-06T17:05:36Z
Expires: 2023-05-06T17:05:36Z
Attributes: {}
Signature: 6feeb038f0cdc28a16fbe3ed4f69feee5ccce3d2a6ac8be83e76180e7bbd3c6e0adbe37ed73c75bb3c283807ec63aeda42dd79afd3813d4658222078cad12705» ockam credential issue --as a --for $(ockam identity show b) \
--attribute location=Chicago --attribute department=Operations
Subject: P5c14d09f32dd27255913d748d276dcf6952b7be5d0be4023e5f40787b53274ae
Issuer: P8b604a07640ecd944f379b5a1a5da0748f36f76327b00193067d1d8c6092dfae (OCKAM_RK)
Created: 2023-04-06T17:26:40Z
Expires: 2023-05-06T17:26:40Z
Attributes: {"department": "Operations", "location": "Chicago"}
Signature: b235429f8dc7be2e79bca0b8f59bdb6676b06f608408085097e7fb5a2029de0d27d6352becaecd0a5488e0bf56c5e5031613c2af2e6713b03b57e08340d99002» ockam reset -y
» ockam identity create a
» ockam identity create b
» ockam credential issue --as a --for $(ockam identity show b) \
--encoding hex > b.credential
» ockam credential verify --issuer $(ockam identity show a) \
--credential-path b.credential
✔︎ Credential is valid» ockam credential store c1 --issuer $(ockam identity show a --full --encoding hex) \
--credential-path b.credential
✔︎ Credential c1 stored» ockam reset -y
» ockam identity create i1
» ockam identity show i1 > i1.identifier
» ockam node create n1 --identity i1
» ockam identity create i2
» ockam identity show i2 > i2.identifier
» ockam node create n2 --identity i2
» ockam secure-channel-listener create l --at n2 \
--identity i2 --authorized $(cat i1.identifier)
» ockam secure-channel create \
--from n1 --to /node/n2/service/l \
--identity i1 --authorized $(cat i2.identifier) \
| ockam message send hello --from n1 --to -/service/uppercase
HELLO» ockam reset -y
» ockam identity create authority
» ockam identity show authority > authority.identifier
» ockam identity show authority --full --encoding hex > authority
» ockam identity create i1
» ockam identity show i1 > i1
» ockam credential issue --as authority \
--for $(cat i1) --attribute city="New York" \
--encoding hex > i1.credential
» ockam credential store c1 --issuer $(cat authority) --credential-path i1.credential
» ockam trust-context create tc --credential c1 --authority-identity $(cat authority)
» ockam identity create i2
» ockam identity show i2 > i2
» ockam credential issue --as authority \
--for $(cat i2) --attribute city="San Francisco" \
--encoding hex > i2.credential
» ockam credential store c2 --issuer $(cat authority) --credential-path i2.credential
» ockam node create n1 --identity i1 --authority-identity $(cat authority) --trust-context tc
» ockam node create n2 --identity i2 --authority-identity $(cat authority) --credential c2
» ockam secure-channel create --from n1 --to /node/n2/service/api --credential c1 --identity i1 \
| ockam message send hello --from n1 --to -/service/uppercase» ockam reset -y
» ockam enroll
» ockam node create a
» ockam node create b
» ockam relay create b --at /project/default --to /node/a/service/forward_to_b
» ockam secure-channel create --from a --to /project/default/service/forward_to_b/service/api \
| ockam message send hello --from a --to -/service/uppercase
HELLOAn Ockam Node is any program that can interact with other Ockam Nodes using various Ockam protocols like Ockam Routing and Ockam Secure Channels.
You can create a standalone node using Ockam Command or embed one directly into your application using various Ockam programming libraries. Nodes are built to leverage the strengths of their operating environment. Our Rust implementation, for example, makes it easy to adapt to various architectures and processors. It can run efficiently on tiny microcontrollers or scale horizontally in cloud environments.
A typical Ockam Node is implemented as an asynchronous execution environment that can run very lightweight, concurrent, stateful actors called Ockam Workers. Using Ockam Routing, a node can deliver messages from one worker to another local worker. Using Ockam Transports, nodes can also route messages to workers on other remote nodes.
Ockam Command makes it super easy to create and manage local or remote nodes. If you run ockam node create, it will create and start a node in the background and give it a random name:
Similarly, you can also create a node with a name of your choice:
You could also start a node in the foreground and optionally tell it display verbose logs:
To stop the foreground node, you can press Ctrl-C. This will stop the node but won't delete its state.
You can see all running nodes with ockam node list
You can stop a running node with ockam node stop.
You can start a stopped node with ockam node start.
You can permanently delete a node by running:
You can also delete all nodes with:
Ockam Nodes run very lightweight, concurrent, and stateful actors called Ockam Workers. They are like processes on your operating system, except that they all live inside one node and are very lightweight so a node can have hundreds of thousands of them, depending on the capabilities of the machine hosting the node.
When a worker is started on a node, it is given one or more addresses. The node maintains a mailbox for each address and whenever a message arrives for a specific address it delivers that message to the corresponding worker. In response to a message, a worker can: make local decisions, change internal state, create more workers, or send more messages.
You can see the list of workers in a node by running:
Note the workers in node n1 with address echo and uppercase. We'll send them some messages below as we look at services. A node can also deliver messages to workers on a different node using the Ockam Routing Protocol and its Transports. Later in this guide, when we dig into routing, we'll send some messages across nodes.
From ockam command, we don't usually create workers directly but instead start predefined services like Transports and Secure Channels that in turn start one or more workers. Using our libraries you can also develop your own workers.
Workers are stateful and can asynchronously send and receive messages. This makes them a potent abstraction that can take over the responsibility of running multistep, stateful, and asynchronous message-based protocols. This enables ockam command and Ockam Programming Libraries to expose very simple and safe interfaces for powerful protocols.
One or more Ockam Workers can work as a team to offer a Service. Services can also be attached to a trust context and authorization policies to enforce attribute based access control rules.
For example, nodes that are created with Ockam Command come with some predefined services including an example service /service/uppercase that responds with an uppercased version of whatever message you send it:
Services have addresses represented by /service/{ADDRESS}. You can see a list of all services on a node by running:
Later in this guide, we'll explore other commands that interact with pre-defined services. For example every node created with ockam command starts a secure channel listener at the address /service/api, which allows other nodes to create mutually authenticated secure channels with it.
Ockam Spaces are infinitely scalable Ockam Nodes in the cloud. Ockam Orchestrator can create, manage, and scale spaces for you. Like other nodes, Spaces offer services. For example, you can create projects within a space, invite teammates to it, or attach payment subscriptions.
When you run ockam enroll for the first time, we create a space for you to host your projects.
Ockam Projects are also infinitely scalable Ockam Nodes in the cloud. Ockam Orchestrator can create, manage, and scale projects for you. Projects are created within a Space and can inherit permissions and subscriptions from their parent space. There can be many projects within one space.
When you run ockam enroll for the first time, we create a default project for you, within your default space.
Like other nodes, Projects offer services. For example, the default project has an echo service just like the local nodes we created above. We can send messages and get replies from it. The echo service replies with the same message we send it.
Ockam Nodes are programs that interact with other nodes using one or more Ockam protocols like Routing and Secure Channels. Nodes run very lightweight, concurrent, and stateful actors called Workers. Nodes and Workers hide complexities of environment and state to enable simple interfaces for stateful, asynchronous, message-based protocols.
One or more Workers can work as a team to offer a Service. Services can be attached to trust contexts and authorization policies to enforce attribute based access control rules. Ockam Orchestrator can create and manage infinitely scalable nodes in the cloud called Spaces and Projects that offer managed services that are designed for scale and reliability.
Next, let's learn about Ockam's Application Layer Routing and how it enables protocols that provide end-to-end guarantees to messages traveling across many network connection hops and protocols boundaries.

We all moved on from those days. Now, modern tech stacks are more complicated; a series of interconnected apps spread across the globe, run in the cloud by 'best of breed' product companies. Over decades, we evolved. Today it's rare that two separate companies actually want to connect their entire networks to each other—it's specific apps and workloads within each network that need to communicate. Yet we've continued to use old approaches as the way to "securely" connect our systems. The actual running of cables has been abstracted away but we're virtually doing the same thing. These old approaches expose you transitively to an uncountable number of networks, which is an enormous attack surface ripe for exploitation.
What people mean when they say "cloud" or "on-prem" has become blurred over the previous decades. To avoid any confusion I'll create a hypothetical scenario for us:
Initech Platform: This is a SaaS platform that you operate. It's elastic and scaleable and hosted on one of the major cloud providers. Customers buy the platform to improve their DevOps processes as it provides visibility over a bunch of useful metrics and provides useful feedback directly into their development workflows.
ACME Corp: This is a large customer of Initech that you want to support. They run a lot of infrastructure in various locations. Is it "on-prem" in the classic sense of being inside their own data center? Is it inside their own VPC on one of the major cloud providers? It doesn't matter! Customer systems are running in one or more networks that Initech doesn't control, that we don't have access to, and that aren't directly accessible from the public internet.
In building the early version of the Initech Platform there's a lot of potential customers to work with to prove product-market fit. It will integrate with the public APIs of the major version control system providers (For example GitHub, GitLab, Bitbucket, etc.), use the commit/webhooks to react to events, push results into the workflow, and everything works as expected.
This is great while the product is passive and simply reacts to events initiated by someone at ACME Corp. Many services want to provide value by assessing external changes in the world, and being proactive in driving improvements for their customers.
Think of the many dependency or security scanning services—if there's a new vulnerability disclosure they want to create a pull/merge request on all impacted repositories as quickly as possible. The fully managed VCS services with public APIs provide ways to enable this, however the self-hosted versions of these products don't have a publicly accessible API. The customers that opt to self-host these systems typically skew towards large enterprises, so now we're faced with some difficult decisions: Is Initech unable to sell their product to these high value customers? Do customers have to buy a diminshed version of the product that's missing one of the most valuable features? Or do we ask them to re-assess some aspect of their security & networking posture to give Initech access?
Initech needs to query a database to display their custom reporting solution. This isn't a problem that's unique to Initech as almost every Customer Data Platform (CDP) or visualization tool has the same problem: customers don't want to make their private data accessible from the public internet, so it will typically be in a database in a private subnet.
As I said earlier, modern tech stacks have evolved to a series of interconnected apps. However the way we connect these apps has changed only a little from the way we connected networks decades ago. While these approaches are convenient and familiar, they were never designed for the use cases we have today. They're instead attempts to make the smallest tweaks possible to the way things used to work to try and get close to how we need things to work today.
The default deployment option for most private systems is to locate them in a private network, with a private subnet, with no public IP addresses. There are very good reasons for this! The easiest option for Initech to connect to this private system would be to ask ACME Corp to provide a public IP address or hostname that could be accessible from the internet.
This is bad.
All of the good reasons for initially putting a system in a private network disconnected from the world immediately vanish. This system is now reachable by the entire public internet, allowing thousands of would-be hackers to constantly try and brute-force their way into the system or to simply DoS it. You're a single leaked credential, CVE, or other issue away from getting owned.
Another approach is to put a reverse proxy in front of the system. I'm not just talking something like nginx and HA Proxy, there's a whole category of hosted or managed services that fit this description too.
This has the advantage that ACME Corp is no longer putting a private system directly on the public internet. The reverse proxy also adds the ability to rate-limit or fine-tune access restrictions to mitigate potential DoS attacks. This is a defense in depth improvement, but ACME Corp is still allowing the entire public internet to reach and attempt to attack the proxy. If it's compromised, it'll do what a proxy does: let traffic through to the intended destination.
An incremental improvement is for Initech to provide a list of IPs they will be sending requests from, and have ACME Corp manage their firewall and routing rules to allow requests only from those IP addresses. This isn't much of an improvement though.
At Initech you won't want to have a tight coupling to your current app instances and the IP addresses, you'll want the flexibility to be able to scale infrastructure as required without the need to constantly inform customers of new IP addresses. So the IP addresses will most likely belong to a NAT gateway or proxy server. ACME Corp might assume that locking access down to only one or two source IP addresses means that only one or two remote machines have access to their network. The reality is that anything on the remote network that can send a request through the NAT gateway or proxy will now be granted access into the ACME Corp network too. This isn't allowing a single app or machine in, you've permitted an entire remote network.
Even more concerning though is that IP source addresses are trivially spoofed. A potential attacker would be able to create a well formed request, spoof the source address, and send data or instructions into the ACME Corp network. SaaS vendors, Initech included, also inevitably have to document the list of current IP addresses so there's a ready-made list of IPs to try and impersonate.
The more sophisticated your approach to IP filtering the more sophisticated an attacker needs to be to compromise it, but none of them are perfect. I've heard people claim in the past that IP spoofing is only really for DDoS attacks because in most cases the attacker can't receive the response and so they can't do anything useful. Think about the systems we're connecting - how confident are you that there are zero fire and forget API calls that won't dutifully create/update/destroy valuable data? Good security is more than just preventing the exposure of data, it's also about protecting it and guaranteeing its integrity.
If you're a valuable target, such as a major financial instition, attackers have the motivation to use approaches like this to launch MitM attacks & intercept comms flows. If your customers and prospects and valuable targets, that makes you a valuable target too.
VPNs are a common solution at many companies to allow employees to connect to the "corporate network" when they're outside of the office. They are also used to allow other systems to connect to an existing network.
The use case we're talking about here is different. It's about allowing two separate companies, a SaaS product and their customer(s), being able to communicate with each other. In many of those cases it's only one system at each end of the connection that should be able to talk to each other. Instead we reach for a tool that is designed to connect entire networks. It's like running a virtual patch lead from the router in one company to the router in another. If I asked you to do the physical version of that, to plug a cable from your production environment directly into the production environment of another company, you'd probably give it some pause. A lot of pause. And for good reason. But VPNs are "virtual" and "private" and so easy (relative to running a cable) and so ubiquitous we don't give it as much thought. If all you needed to do was connect one thing in each network you've used a very blunt instrument for what was meant to be a very precise task.
You can still do the precise task using a VPN, but there are layers of network-level controls and routing rules you need to ensure are in place to close down all the doors to just the one you want open in each network. It's another example of how we've got tools and approaches that are great at what they were designed for, but we're making incremental steps in how we use them to force them to work with our evolved needs. Doing that securely means layering in more complexity and hoping the we get all of the detail in all of those layers right, all of the time. Getting it wrong carries risks of transitive access beyond the original intentions.
What if I told you regardless of how much time, people, and money you invest in your security program, your network is almost certainly exposed to an easily exploitable security hole? … industry data shows that less than 1% of the world's largest enterprises have yet to take any steps to protect their network from this new and emerging threat … History has taught us that the right thing to do must be the easiest thing to do. This is particularly critical with software developers and protecting from intentionally malicious components. This slow adoption curve for security technology … effectively enabled bad actors to see the potential, innovate, and to drive the spectacular growth of cybercrime — Mitchell Johnson, Sonatype
The problem with each of these approaches is that to assume it's secure requires many additional assumptions: that nobody on the internet will try to compromise you, that you can trust the source IP of the requests, that the remote network is solely composed of good actors, that these assumptions will continue to be true both now and indefinitely into the future… and that all of these assumptions are also true of every network you've connected to, and any network they've connected to, and any network…
Take a look at what this might look like from ACME Corp's perspective:
It's not just two networks and two companies now connected to each other, it's many networks. Each SaaS vendor will have their own set of services they use which multiplies this out further. Not only can you not trust the network, you can't trust anybody else's either. Any participant in this picture is only a network misconfiguration or compromised dependency away from transmitting that risk through the network(s). And this picture is the most zoomed in example of a fractal of this problem! Zoom out, and each vendor is connected to their own set of customers, with their own vendors, with their own customers... the risk surface area grows exponentially.
Create an ockam node using Cloudformation template
This guide contains instructions to launch within AWS environment, an
Ockam Outlet Node
Ockam Inlet Node
The walkthrough demonstrates running both outlet and inlet nodes and verify communication between them.
Read: “How does Ockam work?” to learn about end-to-end trust establishment.
and pick a subscription plan through the guided workflow on Ockam.io.
Run the following commands to install Ockam Command and enroll with the Ockam Orchestrator.
Completing this step creates a Project in Ockam Orchestrator.
Control which identities are allowed to enroll themselves into your project by issuing unique one-time use enrollment tickets. Generate two enrollment tickets, one for the Outlet and one for the Inlet.
Login to AWS Account you would like to use
Subscribe to " in AWS Marketplace
Navigate to AWS Marketplace -> Manage subscriptions. Select Ockam - Node from the list of subscriptions. Select Actions-> Launch Cloudformation stack
Click Next to launch the CloudFormation run.
A successful CloudFormation stack run configures the Ockam outlet node on an EC2 machine.
EC2 machine mounts an EFS volume created in the same subnet. Ockam state is stored in the EFS volume.
Connect to the EC2 machine via AWS Session Manager. To view the log file, run sudo cat /var/log/cloud-init-output.log.
Run python3 /opt/webhook_receiver.py to start the webhook that will listen on port 7777. We will send traffic to this webhook after inlet is setup, so keep the terminal window open.
Login to AWS Account you would like to use
Subscribe to " in AWS Marketplace
Navigate to AWS Marketplace -> Manage subscriptions. Select Ockam - Node from the list of subscriptions. Select Actions-> Launch Cloudformation stack
Click Next to launch the CloudFormation run.
A successful CloudFormation stack run configures the Ockam inlet node on an EC2 machine.
EC2 machine mounts an EFS volume created in the same subnet. Ockam state is stored in the EFS volume.
Connect to the EC2 machine via AWS Session Manager. To view the log file, run sudo cat /var/log/cloud-init-output.log.
Connect to the EC2 machine via AWS Session Manager.
Run the command below to post a request to the Inlet address. You must receive a response. Verify that the request reaches the webhook running on the Outlet machine.
A Successful setup receives a response back
You will also see the request received in the Outlet EC2 machine
You have now successfully created an Ockam Portal and verified secure communication 🎉.
Delete the example-outletCloudFormation stack from the AWS Account.
Delete the example-inlet CloudFormation stack from the AWS Account.
Delete ockam configuration files from the machine that the administrator used to generate enrollment tickets.
Matthew Gregory: Welcome to the podcast. Every week Mrinal, Glenn, and I get together to discuss technology, building products, secure by design, how Ockam works, and a lot more. We comment on industry macros across cloud, open source, and the security space. That brings us to what we're going to talk about today, which is that often people seem to have a qualification around the importance of their data and what they should be doing with it. They usually qualify the privacy and security of their data, and then build a posture or governance model around that. They talk about different technologies, whether something is encrypted or needs to be encrypted, or how they're encrypting it. I want to unpack that. Let's start with the first one, which is when people qualify the importance of their data and how they need to protect it or what they need to do to secure it, or whether they're encrypting it or not. A lot is that people think their data is far less important than it is and undervalue what happens when that data is used in their applications. Because those applications rely on that data to be truthful and to have integrity to do things with the data. With that, I'll kick it over to Glenn. “My data is not important,” why does this not make any sense?
Glenn Gillen: My initial reaction is to ask, why are you collecting it then? If the data's not important, just stop doing that. Stop wasting cycles. I think people mean something else when they say that, the word important is probably the wrong one to use. The data might not be commercially sensitive, for example. It could be an aggregated metric stuff or it's public data that anyone could capture. It's not specific to your business or is public. If someone saw that data, you wouldn’t care. Often that is what people mean, they don't care if it's private, rather than the data is not important.
Mrinal Wadhwa: An interesting nuance is that there is the importance axis, and also what is considered data. Oftentimes people will think about what they are collecting as data, but they won’t think about the request to collect that data as data itself. The importance is in the fact that I'm observing some piece of information, collecting it, and then delivering it to a data store. However, the message that carries your data from the place you collected it to the place you store it is also data that is relevant. And that message is relevant to why you are collecting the information. Maybe you're building an AI model, where the data must always be correct when it's fed into that model. It's important because it's critical to whatever your business use case is that relies on that model.
Glenn Gillen: If you asked someone, “What if you replace your data with a random number generator.” Their reaction will be no, the information must be correct. Well, then your data is important. I think that's the best litmus test for what important means. If your data was wrong, would you care? The answer's always yes.
Matthew Gregory:
You're building an application that is going to consume this data and make decisions based on the data to produce some output. It's the process that you have built that's going to consume and transform the data. That is the important part. Even if the data is public, for example, we spoke to a wind farm operator who claimed their data was not important. It’s wind speed data, which is public. But they're making important business decisions, such as turning on and off the wind farm, and making forecasts on how much energy is being produced, based on that data. The applications in the data center need accurate information. So ergo the data is important. The data is important and the integrity of that data is critical because your application depends on it. Another thing we hear a lot is about the importance of data privacy. I think this goes actually in two directions. People either over-index on it or don't index on it. I think both are interesting to talk about. Privacy of data is a big topic right now, just in the press, with the new SEC rule where you have to disclose a data breach if you're a publicly traded company. Mrinal, if someone says, “My data doesn't need to be kept private.” What would be the other concerns that we would think about when we're talking about privacy of data? Even if we don't care that it leaked outside of our data center, what else should you be thinking about when you're thinking about the privacy of data?
Mrinal Wadhwa: Let's take the case of “my data doesn’t need to be kept secret.” It's okay if everybody knows that I collected some information. What's usually not okay is the information I collected is incorrect. If that is important to you, then the tools that give the data properties of data integrity are important to you. So it might be okay that the data is revealed to someone, but you probably are not okay with the data being tampered, or the data not coming from the right source. So even when you don't care about the privacy, the secrecy, or the confidentiality of a piece of information, you still care about the integrity and authenticity of that information.
Matthew Gregory: Let's break this down to a specific example. There's some application living on the internet that's producing data, originating it, and it sends the data across the internet to a database that's going to store it before it eventually into an application where it will be processed. In this data producer-to-data-store scenario, we may not care if a malicious actor can see the data. But we do care about the integrity, authenticity, and originality of that data, why is that?
Mrinal Wadhwa: Let's say the message to the database is, “Write to the readings table that the observation is 500.” That's the message that's going over the wire, and we've already decided that the reading of 500 is not private information. But we still care that when that message reaches the data store, the value of 500 is in fact written to the readings table. Those two pieces of information, that it's being written to the right table and the value is 500, must remain the same from when the message started to when the message was received. We also care that only the authenticated data source can write to the reading table. We don’t want an attacker in the middle to be able to generate random messages that get stored in our database. It'll bump up our database bill, it will create garbage in our database that will affect our AI that learns on this database.If that happens, garbage gets fed into our system or we end up spending a lot of time and money dealing with the data. Both of those would be bad, and it just doesn't end there. The data store will acknowledge that it received the data, and an attacker in the middle could block that acknowledgment or incorrectly send it (i.e. send an acknowledgement when an action didn't happen).That would be bad too. If I can block the acknowledgment, the source keeps sending the same data over and over again. This has the same effect, many readings get created instead of one because I was able to block the acknowledgment. This results in more data getting stored in the database, or garbage getting stored. An attacker can also send incorrect acknowledgments. Even though the source said, “store the reading 500”, that reading never gets stored because the attacker in the middle sends a fake acknowledgment. What this means is, that even though we didn't care about the privacy of this flow of information, we still care about making sure only the correct source can write to the data store. We care that only the data store can acknowledge the fact that the data has been successfully written. So we care about the authenticity of these messages and the integrity of these messages because we don't want incorrect readings to be stored or stored in the wrong table.
Matthew Gregory: That's right. And to unpack that even further, if the message is in clear text when it goes over the wire, an attacker in the middle could know how to write to the database. They could perform man-in-the-middle attacks. Because they know what's happening between the application and data store, where the data came from, where it's going, what the message is, and how to write to it. It would be even worse if you have an unprotected credential in there as well. The punchline here is that privacy is not the only security concern, which brings us to unpacking ‘security’ as a word. And how people go about setting up security, thinking about data governance, and control of data. Glenn, could you talk about the spectrum of how people think about secure systems, in this distributed computing world, compared to the simpler days when our applications were all in the same box?
Glenn Gillen: I think that, as an industry, we don't care about privacy enough. The SEC ruling is forcing companies to think about it. But that said, when we start to think about security, we myopically think about privacy more often than not. There's a juxtaposition of, we're not thinking about privacy enough, but when we do think about it, we think about it too much at the expense of integrity and authenticity. Matt Johansson gave an example of how people think of security like visiting an emergency room. Something happens, you triage it, and you're done and you move on. What we witness time and time again is, that's not the case. Attackers get in and they lay low for a long time. These little things escalate over time. They'll sit there and they'll do some reconnaissance on your systems. His point was that security is more like a mental health condition. It's something that needs constant nurturing, and essentially therapy. You need to maintain it and keep yourself in a healthy state. It's not something you can just triage. People tend to think about it from a privacy perspective, at the expense of all the other things. Someone getting into your system and exposing your data is embarrassing and that's why it's human for us to focus on privacy. You'll get called out on it publicly. You impact a lot of people. The idea of someone getting in and quietly polluting your data for an extended period of time is quite terrifying to me these days. As an industry, we're a little bit asleep at the wheel in helping people understand those risks, especially if you're feeding data into an AI model. You're training a model on all of the data that you've been collecting for years and making business decisions based on it. If you can't absolutely trust all of the inputs into that system, the outputs will be garbage. We talked about the wind farm example before. That's a triage-type problem. If you get a wind speed rating of 900 knots and you've mistakenly shut down a turbine because it can't operate at that speed, you know immediately that a mistake has been made. If an attacker was instead quietly polluting the data with random variance, that data would be gone. You can't go back and fix it, you don’t know when the problem emerged, and you can't clean it. Your data is forever polluted. Your business intelligence is ruined. People think about security as just privacy, and they've conflated it for a long time because of the emotional attachment to privacy. There's a much bigger business risk looming, in my opinion, around integrity, authenticity, and control of the data.
Mrinal Wadhwa: Think about the amount of investment that goes into training an AI model, all of the data, and GPUs. If that data has been polluted, that can't be unrolled anymore. It's part of the model you trained and spent a lot of compute and storage training, for years. All of that becomes a wasted investment, or worse the results impact the action you take based on the model. There are also immediate strategic impacts. If the messages are being actively tampered with and there's an attacker somewhere in your environment, they can selectively tamper messages that are supposed to indicate various actions, such as delete a database or spin up a bunch of instances, all of those are pieces of data. If you don’t have guarantees around authenticity and integrity, those messages can cause unwanted action.
Matthew Gregory: Let's unpack this, Mrinal. When someone says, “I don't need encryption.” We established that they should care about integrity and authenticity, so why do they also need encryption?
Mrinal Wadhwa: I think “I don't need to encrypt my data” usually comes from a place of, “I don't think my data needs to be private or secret,” and it's never because people don’t think their data needs to be correct. So people care about the correctness of this information. If you care about the integrity of the data, well it turns out that the mechanisms to have privacy, integrity, and authenticity guarantees work together. In Ockam’s case, Ockam secure channels provide those guarantees together. It’s more expensive and often less secure to decouple these properties, so they come as a package. You get data integrity, authenticity, and confidentiality as a package. When people are saying they don't want encryption, they are saying that it is okay if the data isn't kept secret or private, but they're not saying my data should not have data integrity and authenticity. Since they care about that, they need encryption because that’s the way you get a guarantee of integrity and authenticity.
Glenn Gillen: The flip side of that is someone whose data is already encrypted. From my experience as a web developer, often you’ll hear, “I'm using TLS, I've got TLS to the API.” The question is, what do you actually have there? You have a guarantee around privacy that only the server can read that information. That's what most TLS setups give you. But for a lot of apps, TLS terminates at the CDN because you don't want it to travel. You end up with a privacy guarantee for the length of that TLS connection to the CDN, and often ignore everything that happens behind the scenes and trust that your providers and intermediaries are not looking at the data and have put controls in place. And that doesn’t answer the question of integrity. Because all you have is privacy, and then we're back to Mrinal’s point; you care that it's correct and you want integrity guarantees. Then you need to verify who is sending the data. You could do mutual TLS, but often people are not doing that for all of their clients all of the time. And if you are, now you have to manage keys. So very quickly you're in a place where you think you have privacy, but it's a really small definition of privacy. You don’t have any guarantees around integrity.
Mrinal Wadhwa: Security is often defined from the perspective of whoever is controlling a certain system or is responsible for a certain asset. Let's say I'm the person responsible for making sure the data stored in that AI database is always correct. If that's the responsibility, I need to have control over who gets to store data in my database, and what they get to store. You can only have that control if you have the ability to know who sent a piece of information and whether what they sent is exactly what they sent. Was it tampered with along the path? You need control over the behavior of your system, what information is stored in it, et cetera to have that control.
You need authenticity of who is sending requests and who you are sending responses to. You need an integrity guarantee on what the requests and responses are. Since end-to-end encryption brings these properties together, I also get privacy guarantees. In some cases, you may care about privacy, in others you might not. But if you need your system to be secure, you need a tool that has these properties and they tend to come as a package.
Matthew Gregory: It’s often a trap to think you are secure because your data is encrypted. The question is, where are we talking about? Is it data at rest in your database or while it's moving? Are you talking about a single TLS connection? Glenn, could you talk about this false narrative that having encryption means you are secure and that your data is private?
Glenn Gillen: TLS is an easy example to pick on because it feels like people have been given a checklist of stuff to go through. You have encryption in transit, encryption at rest, job done. Right? Let’s say I have a TLS connection from my desktop here to a pop in Melbourne. What happens behind the scenes? It’s the shared responsibility model, you speak to a vendor, look at their SOC2, compliance reports, and make sure it’s been audited. If anything in that supply chain gets compromised, you don't know what has been exposed and you don’t have control. When you outsource control to a cloud vendor, ultimately you are still responsible for security. You can have shared responsibility for it, but I think the easiest way to solve this is to focus on the two ends of the system that you can control. If you can control both of those ends of the systems, you can build solutions that are secure all the way through, no matter what that supply chain looks like, no matter what the network or the topology is. You can build highly trustful systems in that environment. The same thing goes for a managed service or message queue. Most of them are designed, intentionally, to have the data available in plain text through that system. It's not just a pipe, they're trying to provide analytics and build tooling around that. It’s part of the business model in a lot of those cases to have the data be plain text and visible in the system. That’s not what you want. You want integrity, control, and privacy all the way through your system. So you can tick a box and say, “We've got TLS.” But then you ignore the fact that it's plain text during this important, high-value moment. And then it's encrypted again on the way back out. That’s not private.
Matthew Gregory: When we're talking to people about their architecture and encryption, the first thing we jump to is the keys. How and where were they created? How were they distributed? If you're generating symmetric keys for your encryption and sending them out into the world or building them into software, now you have a vulnerability around how the key was created and how it was distributed.
Mrinal Wadhwa: If someone's building a system and all the participants in that system have one key that stays the same forever, and you call an AES function to encrypt using that one key, you effectively have no encryption. It might feel like it, but it's not encryption. Calling AES is not encryption. Encryption needs to be end-to-end and needs to have a series of properties that have been studied for about 30 years now.
There are a ton of mistakes that can be made along the way. You have to think about the rotation of keys, there's a bunch of work around ratcheting keys, getting forward secrecy properties, getting properties that prevent impersonation, and replay attacks.
There’s a host of problems that come with managing keys. A single key everywhere is not the answer, but it's easy to convince yourself you did enough and you did it right. There are so many CVEs in the history of secure channel designs that are all about people thinking they did encryption correctly but made a mistake. So that's why a lot of these properties are now proven using formal models. For example, in Ockam’s secure channel design, we have formal proofs of various properties in our design. So there's a lot that goes into doing key management well.
Matthew Gregory: Yeah, it is the first question that gets asked after encryption. You said the data is encrypted, now we have to have a whole conversation about what that actually means. You may have done some things well, but that doesn't mean you have security, privacy, integrity, and authenticity. All these things go together. Using proven techniques is very important to build an architecture that is secure by design and has a low vulnerability surface. It's pretty difficult to do ad hoc. With that, I'll wrap up this podcast. That was a little insight into some of the things that the three of us talk about, hopefully, that was helpful. More to come and we'll see you later.
Create an Ockam Postgres outlet node using Cloudformation template
This guide contains instructions to launch within AWS environment, an
An Ockam Postgres Outlet Node within an AWS environment
An Ockam Postgres Inlet Node:
Within an AWS environment, or
Create an Ockam Bedrock outlet node using Cloudformation template
is a fully managed service that makes high-performing foundation models (FMs) from leading AI companies and Amazon available for your use through a unified API. Organizations building innovative generative AI applications with Amazon Bedrock often need to ensure their proprietary data remains secure and private while accessing these powerful models.
By default, You can access Amazon Bedrock over the public internet, which means:
Your API calls to Bedrock travel across the public internet.
Your client must have public internet connectivity
Create end-to-end encrypted and mutually authenticated secure channels over any transport topology.
Now that we understand the basics of Nodes, Workers, and Routing ... let's create our first encrypted secure channel.
Establishing a secure channel requires establishing a shared secret key between the two entities that wish to communicate securely. This is usually achieved using a cryptographic key agreement protocol to safely derive a shared secret without transporting it over the network.
Running such protocols requires a stateful exchange of multiple messages and having a worker and routing system allows Ockam to hide the complexity of creating and maintaining a secure channel behind two simple functions:
create_secure_channel_listener(...) which waits for requests to create a secure channel.
Ockam Nodes and Workers decouple applications from the host environment and enable simple interfaces for stateful, asynchronous, and bi-directional message-based protocols.
At Ockam's core is a collection of cryptographic and messaging protocols. These protocols enable private and secure by design applications that provide end-to-end application layer trust in data.
Ockam is designed to make these protocols easy and safe to use in any application environment – from highly scalable cloud services to tiny battery operated microcontroller based devices.
Many included protocols require multiple steps and have complicated internal state that must be managed with care. Protocol steps can often be initiated by any participant so it can be quite challenging to make these protocols simple to use, secure, and platform independent.
Ockam , , and help hide this complexity to provide simple interfaces for stateful and asynchronous message-based protocols.
Transcript
Matthew Gregory: We describe Ockam as Networkless. One of the interesting things about Ockam is that we enable security and trust at the application layer, between applications that are in distributed locations. What you also get from this are all things you don’t have to do because you use Ockam, and a lot of those things are at the network layer. This podcast is dedicated to the topic of Networkless. Maybe it will be controversial. Maybe everyone will get it.
We've all suffered through serverless and all the heads banging on the table from that. but the analogy is very similar. Obviously, there is a network involved in moving data between applications and remote networks. Ockam is using those networks, but the key thing is that the end user of Ockam and the application developer that's trying to access data doesn't have to think about all of these network layer problems, which is often where you can make a mistake and have a data leak or a privacy issue or some sort of security vulnerability. Many times in big organizations, the person who's developing the application that needs to access the data doesn't have the capacity or capability to change the network. And they might not even know who the network team is. They're just focused on their application. So how do we empower them to build applications that can access data in a trustful way? Glenn originated the Networkless idea when we started talking about Ockam together. I'm curious how you came up with this analogy between Ockam and the idea of Networkless and how you thought this was so similar to Serverless. What do you think, Glenn?
» ockam node create
✔︎ Node sharp-falconet created successfully» ockam node create n1
✔︎ Node n1 created successfully» ockam node create n2 --foreground --verbose
2023-05-18T09:54:24.281248Z INFO ockam_node::node: Initializing ockam node
2023-05-18T09:54:24.298089Z INFO ockam_command::node::util: node state initialized name=n2
2023-05-18T09:54:24.298906Z INFO ockam_node::processor_builder: Initializing ockam processor '0#c20e2e4aeb9fbae2b5be1529c83af54d' with access control in:DenyAll out:DenyAll
2023-05-18T09:54:24.299627Z INFO ockam_api::cli_state::nodes: setup config updated name=n2
2023-05-18T09:54:24.302206Z INFO ockam_api::nodes::service: NodeManager::create: n2
2023-05-18T09:54:24.302218Z INFO ockam_api::nodes::service: NodeManager::create: starting default services
2023-05-18T09:54:24.302286Z INFO ockam_node::worker_builder: Initializing ockam worker '0#_internal.nodemanager' with access control in:AllowAll out:AllowAll
2023-05-18T09:54:24.302719Z INFO ockam_node::worker_builder: Initializing ockam worker '0#ockam.ping.collector' with access control in:AllowAll out:DenyAll
2023-05-18T09:54:24.302728Z INFO ockam_node::worker_builder: Initializing ockam worker '0#identity_service' with access control in:AllowAll out:AllowAll
2023-05-18T09:54:24.303179Z INFO ockam_node::worker_builder: Initializing ockam worker '0#authenticated' with access control in:AllowAll out:AllowAll
2023-05-18T09:54:24.303364Z INFO ockam_node::worker_builder: Initializing ockam worker '0#uppercase' with access control in:AllowAll out:AllowAll
2023-05-18T09:54:24.303527Z INFO ockam_node::worker_builder: Initializing ockam worker '0#forwarding_service' with access control in:AllowAll out:DenyAll
2023-05-18T09:54:24.303851Z INFO ockam_node::worker_builder: Initializing ockam worker '0#api' with access control in:AllowAll out:DenyAll
2023-05-18T09:54:24.304009Z INFO ockam_node::worker_builder: Initializing ockam worker '0#echo' with access control in:AllowAll out:AllowAll
2023-05-18T09:54:24.304056Z INFO ockam_node::worker_builder: Initializing ockam worker '0#rpc_proxy_service' with access control in:AllowAll out:AllowAll
...» ockam node list
┌───────────────────┐
│ Nodes │
└───────────────────┘
│ Node n1 UP
│ Process id 42218
│ Node sharp-falconet (default) UP
│ Process id 42083
│ Node n2 DOWN
│ No process running
...» ockam node stop n1» ockam node start n1» ockam node delete n1
✔︎ The node named 'n1' has been deleted.» ockam node delete --all» ockam node create n1
» ockam worker list --at n1
┌───────────────────────────┐
│ Workers on n1 │
└───────────────────────────┘
│ Worker 0c240525017e2273fa58fc0d5497b62a
│ Worker 31482d2647246b47667cf12428626723
│ Worker 4248c83401c77176967715caca9d82dd
│ Worker _internal.nodemanager
...» ockam message send hello --to /node/n1/service/uppercase
HELLO» ockam service list --at n1
┌────────────────────────────┐
│ Services on n1 │
└────────────────────────────┘
│ Service uppercase
│ Address /service/uppercase
│ Service echo
│ Address /service/echo
│ Service credentials
│ Address /service/credentials» ockam enroll
...
» ockam space list
┌────────────────────┐
│ Spaces │
└────────────────────┘
│ Space f27d39e1
│ Id 877c7a4d-b1be-4f36-8da6-be045ab64b60
│ [email protected]» ockam enroll
...
» ockam project list
┌──────────────────────┐
│ Projects │
└──────────────────────┘
│ Project default
│ Space f27d39e1» ockam message send hello --to /project/default/service/echo
hello
Select the Region you want to deploy and click Continue to Launch. Under Actions, select Launch Cloudformation
Create stack with below details
Stack name: example-outlet or any name you prefer
Network Configuration
Select suitable values for VPC ID and Subnet ID
Default instance type is m6a.8xlarge because of the predictable network bandwidth of 12.5 Gbps. Adjust instance type if you need to
Ockam Configuration
Enrollment ticket: Copy and paste the content of the outlet.ticket generated above
JSON Node Configuration: Copy and paste the below configuration.
View the Ockam node status in CloudWatch.
Navigate to Cloudwatch -> Log Group and select example-outet-ockam-status-logs. Select the Logstream for the EC2 instance.
Cloudformation template creates a subscription filter that sends data to a Cloudwatch alarm example-outlet-OckamNodeDownAlarm.Alarm will turn green upon ockam node successfully running.
An Autoscaling group ensures atleast one EC2 instance is running at all times.
Select the Region you want to deploy and click Continue to Launch. Under Actions, select Launch Cloudformation
Create stack with below details
Stack name: example-inlet or any name you prefer
Network Configuration
Select suitable values for VPC ID and Subnet ID
Default instance type is m6a.8xlarge because of the predictable network bandwidth of 12.5 Gbps. Adjust instance type if you need to
Ockam Configuration
Enrollment ticket: Copy and paste the content of the outlet.ticket generated above
JSON Node Configuration: Copy and paste the below configuration.
View the Ockam node status in CloudWatch.
Navigate to Cloudwatch -> Log Group and select example-inlet-ockam-status-logs. Select the Logstream for the EC2 instance.
Cloudformation template creates a subscription filter that sends data to a Cloudwatch alarm example-inlet-OckamNodeDownAlarm.Alarm will turn green upon ockam node successfully running.
An Autoscaling group ensures atleast one EC2 instance is running at all times.

create_secure_channel(...) which initiates the protocol to create a secure channel with a listener.
Create a new file at:
Add the following code to this file:
Create a new file at:
Add the following code to this file:
Create a new file at:
Add the following code to this file:
Run the responder in a separate terminal tab and keep it running:
Run the middle node in a separate terminal tab and keep it running:
Run the initiator:
Note the message flow.
curl --proto '=https' --tlsv1.2 -sSfL https://install.command.ockam.io | bash
source "$HOME/.ockam/env"
ockam enroll# Enrollment ticket for Ockam Outlet Node
ockam project ticket --expires-in 10h --usage-count 1 \
--attribute example-outlet \
--relay outlet \
> "outlet.ticket"
# Enrollment ticket for Ockam Inlet Node
ockam project ticket --expires-in 10h --usage-count 1 \
--attribute example-inlet \
> "inlet.ticket"
{
"relay": "outlet",
"tcp-outlet": {
"to": "localhost:7777",
"allow": "example-inlet"
}
}
{
"tcp-inlet": {
"from": "0.0.0.0:17777",
"via": "outlet",
"allow": "example-outlet"
}
}curl -X POST http://localhost:17777/webhook -H "Content-Type: application/json" -d "{\"from\": \"$(hostname)\"}"# Inlet EC2
sh-5.2$ curl -X POST http://localhost:17777/webhook -H "Content-Type: application/json" -d "{\"from\": \"$(hostname)\"}"
Webhook received
# Outlet EC2
sh-5.2$ python3 /opt/webhook_receiver.py
2024-07-24 19:56:32,984 - __main__ - INFO - Webhook server running on port 7777...
127.0.0.1 - - [24/Jul/2024 19:56:36] "POST /webhook HTTP/1.1" 200 -
2024-07-24 19:58:01,341 - __main__ - INFO - Received webhook: {"from": "REDACTED.REDACTED.compute.internal"}ockam resettouch examples/05-secure-channel-over-two-transport-hops-responder.rs// examples/05-secure-channel-over-two-transport-hops-responder.rs
// This node starts a tcp listener, a secure channel listener, and an echoer worker.
// It then runs forever waiting for messages.
use hello_ockam::Echoer;
use ockam::identity::SecureChannelListenerOptions;
use ockam::tcp::{TcpListenerOptions, TcpTransportExtension};
use ockam::{node, Context, Result};
#[ockam::node]
async fn main(ctx: Context) -> Result<()> {
// Create a node with default implementations
let node = node(ctx).await?;
// Initialize the TCP Transport.
let tcp = node.create_tcp_transport()?;
node.start_worker("echoer", Echoer)?;
let bob = node.create_identity().await?;
// Create a TCP listener and wait for incoming connections.
let listener = tcp.listen("127.0.0.1:4000", TcpListenerOptions::new()).await?;
// Create a secure channel listener for Bob that will wait for requests to
// initiate an Authenticated Key Exchange.
let secure_channel_listener = node.create_secure_channel_listener(
&bob,
"bob_listener",
SecureChannelListenerOptions::new().as_consumer(listener.flow_control_id()),
)?;
// Allow access to the Echoer via Secure Channels
node.flow_controls()
.add_consumer(&"echoer".into(), secure_channel_listener.flow_control_id());
// Don't call node.shutdown() here so this node runs forever.
Ok(())
}
touch examples/05-secure-channel-over-two-transport-hops-middle.rs// examples/05-secure-channel-over-two-transport-hops-middle.rs
// This node creates a tcp connection to a node at 127.0.0.1:4000
// Starts a relay worker to forward messages to 127.0.0.1:4000
// Starts a tcp listener at 127.0.0.1:3000
// It then runs forever waiting to route messages.
use hello_ockam::Relay;
use ockam::tcp::{TcpConnectionOptions, TcpListenerOptions, TcpTransportExtension};
use ockam::{node, route, Context, Result};
#[ockam::node]
async fn main(ctx: Context) -> Result<()> {
// Create a node with default implementations
let node = node(ctx).await?;
// Initialize the TCP Transport
let tcp = node.create_tcp_transport()?;
// Create a TCP connection to Bob.
let connection_to_bob = tcp.connect("127.0.0.1:4000", TcpConnectionOptions::new()).await?;
// Start a Relay to forward messages to Bob using the TCP connection.
node.start_worker("forward_to_bob", Relay::new(route![connection_to_bob]))?;
// Create a TCP listener and wait for incoming connections.
let listener = tcp.listen("127.0.0.1:3000", TcpListenerOptions::new()).await?;
node.flow_controls()
.add_consumer(&"forward_to_bob".into(), listener.flow_control_id());
// Don't call node.shutdown() here so this node runs forever.
Ok(())
}
touch examples/05-secure-channel-over-two-transport-hops-initiator.rs// examples/05-secure-channel-over-two-transport-hops-initiator.rs
// This node creates an end-to-end encrypted secure channel over two tcp transport hops.
// It then routes a message, to a worker on a different node, through this encrypted channel.
use ockam::identity::SecureChannelOptions;
use ockam::tcp::{TcpConnectionOptions, TcpTransportExtension};
use ockam::{node, route, Context, Result};
#[ockam::node]
async fn main(ctx: Context) -> Result<()> {
// Create a node with default implementations
let mut node = node(ctx).await?;
// Create an Identity to represent Alice.
let alice = node.create_identity().await?;
// Create a TCP connection to the middle node.
let tcp = node.create_tcp_transport()?;
let connection_to_middle_node = tcp.connect("localhost:3000", TcpConnectionOptions::new()).await?;
// Connect to a secure channel listener and perform a handshake.
let r = route![connection_to_middle_node, "forward_to_bob", "bob_listener"];
let channel = node
.create_secure_channel(&alice, r, SecureChannelOptions::new())
.await?;
// Send a message to the echoer worker via the channel.
// Wait to receive a reply and print it.
let reply: String = node
.send_and_receive(route![channel, "echoer"], "Hello Ockam!".to_string())
.await?;
println!("App Received: {}", reply); // should print "Hello Ockam!"
// Stop all workers, stop the node, cleanup and return.
node.shutdown().await
}
cargo run --example 05-secure-channel-over-two-transport-hops-respondercargo run --example 05-secure-channel-over-two-transport-hops-middlecargo run --example 05-secure-channel-over-two-transport-hops-initiatorUsing Docker in any environment
The walkthrough demonstrates:
Running an Ockam Postgres Outlet node in your AWS environment that contains a private Amazon RDS for PostgreSQL Database
Setting up Ockam Postgres inlet nodes using either AWS or Docker from any location.
Verifying secure communication between Postgres clients and Amazon RDS for Postgres Database.
Read: “How does Ockam work?” to learn about end-to-end trust establishment.
A private Amazon RDS Postgres Database is created and accessible from the VPC and Subnet where the Ockam Node will be launched.
Security Group associated with the Amazon RDS Postgres Database allows inbound traffic on the required port (5432) from the subnet where the Ockam Outlet Node will reside.
You have permission to subscribe and launch Cloudformation stack from AWS Marketplace on the AWS Account running RDS Postgres Database.
Sign up for Ockam and pick a subscription plan through the guided workflow on Ockam.io.
Run the following commands to install Ockam Command and enroll with the Ockam Orchestrator.
Completing this step creates a Project in Ockam Orchestrator
Control which identities are allowed to enroll themselves into your project by issuing unique one-time use enrollment tickets. Generate two enrollment tickets, one for the Outlet and one for the Inlet.
Login to AWS Account you would like to use
Subscribe to "Ockam - Node for Amazon RDS Postgres" in AWS Marketplace
Navigate to AWS Marketplace -> Manage subscriptions. Select Ockam - Node for Amazon RDS Postgres from the list of subscriptions. Select Actions-> Launch Cloudformation stack
Select the Region you want to deploy and click Continue to Launch. Under Actions, select Launch Cloudformation
Create stack with the following details
Stack name: postgres-ockam-outlet or any name you prefer
Network Configuration
Click Next to launch the CloudFormation run.
A successful CloudFormation stack run configures the Ockam Postgres Outlet node on an EC2 machine.
EC2 machine mounts an EFS volume created in the same subnet. Ockam state is stored in the EFS volume.
A security group with egress access to the internet will be attached to the EC2 machine.
Connect to the EC2 machine via AWS Session Manager.
To view the log file, run sudo cat /var/log/cloud-init-output.log.
Successful run will show Ockam node setup completed successfully in the logs
To view the status of Ockam node run curl http://localhost:23345/show | jq
View the Ockam node status in CloudWatch.
Navigate to Cloudwatch -> Log Group and select postgres-ockam-outlet-status-logs. Select the Logstream for the EC2 instance.
The Cloudformation template creates a subscription filter that sends data to a Cloudwatch alarm postgres-ockam-outlet-OckamNodeDownAlarm.Alarm will turn green upon ockam node successfully running.
An Autoscaling group ensures atleast one EC2 instance is running at all times.
Ockam postgres outlet node setup is complete. You can now create Ockam postgres inlet nodes in any network to establish secure communication.
You can set up an Ockam Postgres Inlet Node either in AWS or locally using Docker. Here are both options:
Option 1: Setup Inlet Node in AWS
Login to AWS Account you would like to use
Subscribe to "Ockam - Node" in AWS Marketplace
Navigate to AWS Marketplace -> Manage subscriptions. Select Ockam - Node from the list of subscriptions. Select Actions-> Launch Cloudformation stack
Select the Region you want to deploy and click Continue to Launch. Under Actions, select Launch Cloudformation
Create stack with below details
Stack name: postgres-ockam-inlet or any name you prefer
Network Configuration
Select suitable values for VPC ID
Click Next to launch the CloudFormation run.
A successful CloudFormation stack run configures the Ockam inlet node on an EC2 machine.
EC2 machine mounts an EFS volume created in the same subnet. Ockam state is stored in the EFS volume.
Connect to the EC2 machine via AWS Session Manager.
To view the log file, run sudo cat /var/log/cloud-init-output.log.
Successful run will show Ockam node setup completed successfully in the logs
To view the status of Ockam node run curl http://localhost:23345/show | jq
View the Ockam node status in CloudWatch.
Navigate to Cloudwatch -> Log Group and select postgres-ockam-inlet-status-logs. Select the Logstream for the EC2 instance.
Cloudformation template creates a subscription filter that sends data to a Cloudwatch alarm postgres-ockam-inlet-OckamNodeDownAlarm.Alarm will turn green upon ockam node successfully running.
An Autoscaling group ensures atleast one EC2 instance is running at all times.
Use any postgresqlclient and connect to localhost:15432 (PGHOST=localhost, PGPORT=15432) from the machine running the Ockam postgres Inlet node.
Option 2: Setup Inlet Node Locally with Docker Compose
To set up an Inlet Node locally and interact with it outside of AWS, use Docker Compose.
Create a file named docker-compose.yml with the following content:
Run the following command from the same location as the docker-compose.yml and the inlet.ticket to create an Ockam postgres inlet that can connect to the outlet running in AWS , along with psql client container
Check status of Ockam inlet node. You will see The node is UP when ockam is configured successfully and ready to accept connection
Connect to psql-client container and run commands
This setup allows you to run an Ockam Postgres Inlet Node locally and communicate securely with a private Amazon RDS Postgres database running in AWS
Cleanup
When you build AI applications with sensitive or proprietary data, exposing them to the public internet creates several risks:
Your data may travel through unknown network paths
Attackers gain more potential entry points
Your compliance requirements may prohibit public internet usage
You must maintain extra security controls and monitoring
Understanding VPC Endpoints for Amazon Bedrock
How VPC Endpoints Work
AWS PrivateLink powers VPC endpoints, which let you access Amazon Bedrock privately without exposing data to the public internet. When you create a private connection between your VPC and Bedrock:
Your traffic stays within AWS network infrastructure
You eliminate the need for public endpoints
Your data remains on private AWS networks
However, organizations often need additional capabilities:
Access to Bedrock from outside AWS
Secure connections from other cloud providers
Private access from on-premises environments
This is where Ockam comes helps.
Read: “How does Ockam work?” to learn about end-to-end trust establishment.
You have permission to subscribe and launch Cloudformation stack from AWS Marketplace on the AWS Account running Amazon Bedrock.
Make sure AWS Bedrock is available in the region you are deploying the cloudformation template.
Sign up for Ockam and pick a subscription plan through the guided workflow on Ockam.io.
Run the following commands to install Ockam Command and enroll with the Ockam Orchestrator.
Control which identities are allowed to enroll themselves into your project by issuing unique one-time use enrollment tickets. Generate two enrollment tickets, one for the Outlet and one for the Inlet.
Login to AWS Account you would like to use
Subscribe to "Ockam - Node for Amazon Bedrock" in AWS Marketplace
Navigate to AWS Marketplace -> Manage subscriptions. Select Ockam - Node for Amazon Bedrock from the list of subscriptions. Select Actions-> Launch Cloudformation stack
Select the Region you want to deploy and click Continue to Launch. Under Actions, select Launch Cloudformation
Create stack with the following details
Stack name: bedrock-ockam-outlet or any name you prefer
Network Configuration
Click Next to launch the CloudFormation run.
A successful CloudFormation stack run
Creates a VPC Endpoint for Bedrock Runetime API
Configures an Ockam Bedrock Outlet node on an EC2 machine.
EC2 machine mounts an EFS volume created in the same subnet. Ockam state is stored in the EFS volume.
A security group with ingress access within the security group and egress access to the internet will be attached to the EC2 machine and VPC Endpoint.
Connect to the EC2 machine via AWS Session Manager.
To view the log file, run sudo cat /var/log/cloud-init-output.log.
Note: DNS Resolution for the EFS drive may take up to 10 minutes. The script will retry
A Successful run will show Ockam node setup completed successfully
View the Ockam node status in CloudWatch.
Navigate to Cloudwatch -> Log Group and select bedrock-ockam-outlet-status-logs. Select the Logstream for the EC2 instance.
The Cloudformation template creates a subscription filter which sends data to a Cloudwatch alarm bedrock-ockam-outlet-OckamNodeDownAlarm.Alarm will turn green upon ockam node successfully running.
An Autoscaling group keeps atleast one EC2 instance is running.
Ockam bedrock outlet node setup is complete. You can now create Ockam bedrock inlet nodes in any network to establish secure communication.
You can set up an Ockam Bedrock Inlet Node locally using Docker. You can then use any library (aws cli, python, javascript etc) to access AWS Bedrock via Ockam inlet
Create a file named docker-compose.yml with the following content:
Run the following command from the same location as the docker-compose.yml and the inlet.ticket to create an Ockam bedrock inlet that can connect to the outlet running in AWS , along with psql client container.
Check status of Ockam inlet node. You will see The node is UP when ockam is configured successfully and ready to accept connection
Find your Ockam project id and use it to create to endpoint to bedrock
Construct bedrock endpoint url
An example bedrock endpoint url will look like below
Run below AWS CLI Command.
The above command should produce similar result
Cleanup
This guide walked you through:
Understanding the security challenges of accessing Amazon Bedrock over the public internet
How VPC endpoints secure your Bedrock communications within AWS
Setting up Ockam to extend this security beyond AWS boundaries
Deploying and configuring both Outlet and Inlet nodes
Testing your secure connection with a simple Bedrock API call
An Ockam Node is any program that can interact with other Ockam Nodes using various Ockam protocols like Ockam Routing and Ockam Secure Channels.
A typical Ockam Node is implemented as an asynchronous execution environment that can run very lightweight, concurrent, stateful actors called Ockam Workers. Using Ockam Routing, a node can deliver messages from one worker to another local worker. Using Ockam Transports, nodes can also route messages to workers on other remote nodes.
In the following code snippet we create a node in Rust and then immediately stop it:
A node requires an asynchronous runtime to concurrently execute workers. The default Ockam Node implementation in Rust uses tokio, a popular asynchronous runtime in the Rust ecosystem. There are also Ockam Node implementations that support various no_std embedded targets.
Nodes can be implemented in any language. The only requirement is that understand various Ockam protocols like Routing, Secure Channels, Identities etc.
Ockam Nodes run very lightweight, concurrent, and stateful actors called Ockam Workers. They are like processes on your operating system, except that they all live inside one node and are very lightweight so a node can have hundreds of thousands of them, depending on the capabilities of the machine hosting the node.
When a worker is started on a node, it is given one or more addresses. The node maintains a mailbox for each address and whenever a message arrives for a specific address it delivers that message to the corresponding worker. In response to a message, a worker can: make local decisions, change internal state, create more workers, or send more messages.
To create a worker, we create a struct that can optionally have some fields to store the worker's internal state. If the worker is stateless, it can be defined as a field-less unit struct.
This struct:
Must implement the ockam::Worker trait.
Must have the #[ockam::worker] attribute on the Worker trait implementation.
Must define two associated types Context and Message
The Context type is set to ockam::Context.
The Message type must be set to the type of messages the worker wishes to handle.
When a new node starts and calls an async main function, it turns that function into a worker with address of "app". This makes it easy to send and receive messages from the main function (i.e the "app" worker).
In the code below, we start a new Echoer worker at address "echoer", send this "echoer" a message "Hello Ockam!" and then wait to receive a String reply back from the "echoer".
The message flow looked like this:
Next, let’s explore how Ockam’s Application Layer Routing enables us to create protocols that provide end-to-end guarantees.
Glenn Gillen: It reminds me a lot of when I was at AWS. I had a friend who would reach out to me about issues with the services he was using. He would ask, how do I make this happen? And he would always qualify with, “Don't tell me the answer is serverless.” That's part of the joke of working at AWS to some extent, was that Lambdas was the answer to a bunch of questions around some feature that isn't rolled out to a service yet. Turns out there’s a 20-line Python script that also solves his problem. He hated serverless, he would say, “Everyone knows the server is there. This whole thing is stupid. Just give me the Python script and I'll just run it myself.” And that was fine. That was a back-and-forth we had all the time. Years later after I left AWS I caught up with him. He told me, “You'll never believe how all in on serverless we are these days.” What changed? He was now running a growing team with varying levels of expertise and realized that a whole bunch of his engineers were struggling with servers. What instance should I provision? How much memory should it have? What's the right thing to do? This had become a bottleneck for them and he became the bottleneck in answering those questions for his team. The turning point for him was realizing he could package up all of these things and allow his developers to only think about the app. That's the premise of functions as code or serverless. You only have to think about the code you want to run. There are still servers running, but as the CTO he was able to make decisions about how much memory they needed, what type of CPU's, and the right one for this particular workload. His app developers didn’t need to think about that at all. Their world is serverless. They never think about servers anymore. We pushed that problem onto people who care about it deeply and can focus on it. It was liberating for their team and was much more efficient. The app developer’s value is writing the code, not worrying about how to execute it and on what platform to execute it. I had a similar realization early on when I was talking to you about Ockam when we started talking about what it achieves and what you're able to do with Ockam. His story was ringing in my head. There’s a whole bunch of network-related stuff that’s hard to think about if you're not thinking about it all the time. I used an example a couple of times of trying to get a lambda in the serverless world to talk to a Postgres RDS instance. I know how to do that, it’s 12 different things I need to provision via Terraform to get it right. If I get any of those things wrong, it either doesn't work or worse, it works in an insecure way. There's so much that can go wrong there and it's low value, undifferentiated stuff. That's not where I should be spending most of my time. That should be simple. The quicker and faster I can abstract that away, the sooner I can get back to thinking about my application. That's where I should be spending my time. I need the network to be out of sight, out of mind as much as possible.
Matthew Gregory: Our innovation at Ockam is the developer experience on top of dozens of very complicated, difficult things. Someone could build it themselves, if they have a team of people, years of time, and millions of dollars. Then you have to take on all the day two problems of maintaining and protecting it all. But we've built this into our protocols where the components that are added together to create this abstraction allow an application developer to do things that they know how to do already. And that developer experience is the magic of what we've built.
Mrinal Wadhwa: Servers 20 years ago were very simple, but they got a lot more complex with cloud infrastructure in terms of their infrastructure and the number of servers involved. The decisions you have to make within that infrastructure have become more complex. Similarly, on the network side, it used to be that applications ran in one big boundary of the company network. In that network, everything could talk to everything. In modern architectures, applications are running in different networks and different clouds, speaking different protocols, over different transports. It could be various wireless transports or TCP, UDP, or something more modern. There's so much complexity in getting two things to talk to each other. To take your example, Lambda talking to a Postgres instance. That connection depends heavily on where that instance is, what network it is in, what boundaries it's protected by, and so forth. That requires several people to coordinate their work for that connection to happen. Or several infrastructure components to be coordinated for the connection to happen. So over the years the amount of complexity that sits in these layers has grown so much that they can benefit from some degree of simplification for someone who is just trying to build a CRUD app. That person shouldn't have to think about where a particular service is or how to reach it. They should be able to make a query and get answers.
Glenn Gillen: This reminds me of how the pendulum swings back and forth between different abstractions. In the early days of my career, I was working for an ISP doing C and CGI-based development. It was all in one box. The world was simple in that respect. Fast forward a few years and I'm using the Microsoft stack and a lot of dotnet stuff and deploying to ISS. I have a higher abstraction now, I'm not thinking about deploying code the way I used to. Jump ahead another five years and Rails comes along. Partly because of the speed efficiencies and the less integrated Microsoft experience means that I'm back to thinking about servers again. I'm deploying with Capistrano, but everything's still close. And then the cloud comes along and all of a sudden things start to break up. So it's this constant pendulum swing of; a five-year window where I'd only have to think about app code, then I'd spend more time in the weeds and then the cloud came along and I was thinking about infrastructure again, and how to spin up EC2 instances. But then serverless came along and now I'm back to thinking about only code again. The network layer was the sticking point. Functions are good by themselves, but functions need to talk to other stuff. Now I'm in a world of having to think about networks and firewalls and security groups. From my personal experience, the pendulum swing of abstractions has been back and forth over and over again. Now we have some pretty good app abstractions, but the world is more distributed than it's ever been. You're trying to connect to dozens of different systems in multiple different locations. It could be multi-cloud, or between on-prem and a cloud. You're no longer in that simple world of one or two servers in the same physical network. It’s spread across multiple virtual networks, across different cloud platforms, across different SaaS providers. That's why Serverless as an abstraction has been valuable. But the new distributed world we live in, there's a network version of this that has been missing for a long, long time.
Matthew Gregory: Today, people get into a distributed computing mode much faster because of all of the best-of-breed services that are available. Snowflake is such a great product, right? When you're building an application, you need this data product, and now you are building your application in one place and using Snowflake in another. As soon as you break out of your own VPC or your own network, and start connecting more things, it's natural to keep going. Best of breed all around, for your analytics tools and other SaaS services. Companies are now breaking out of their trust boundary much sooner in their development cycle because by using all of these best-of-breed services, you can build the layers of your application that drive value for your customers faster. It's a natural progression. As soon as you decide to use other services or put data in different locations, now you have this network and connectivity complexity that comes very quickly and probably prematurely to where your engineering team is. Startups don’t want to bring in a whole security or networking team, but you still need to make these connections. That is one of the benefits of Ockam; all the stuff you don't have to build, maintain, and deploy because you might not have the resources to do it. Another example is company-to-company connections. In a lot of scenarios you can't affect another company's network, put a hole in their firewall or you know, create an IP allow list, or get them to build an API endpoint for you to make the connection. And then you have this natural friction where you have a business purpose for connecting your applications, but no ability to connect them. When we talk about Networkless at Ockam and that we've moved this to the application layer, we mean that all you have to do is drop in applications into two endpoints to make this peer-to-peer connection with Ockam portals. That breaks us out of the dependency on control and management of the network and moves us to the application layer where you have the talent and people on your team to make the connection.
Glenn Gillen: I've heard this quote a lot, we shape our tools and thereafter our tools shape us. We build the systems and solutions we need to get the job done, but then those tools end up constraining the way we think about a particular problem space. That's why I think it's important to have a different way of thinking about this because we've made this journey as an industry over multiple decades, from a heavily network-based approach to building things where the network doesn't mean what it used to mean. When you talk about integrating SaaS services and Snowflake and all these other things, there are many networks with different variations in your architecture now. Very few people in an organization should be thinking of that layer. Because we have these network-based approaches to solving problems, we take tools that were invented decades ago and apply them to this modern approach. You're forcing everyone who is involved in the entire stack to think that way. The other thing about the network that's interesting to me is that very few people in your company should be worried about it. Most people should be thinking at a different layer of abstraction. But that's how we are naturally attuned to think about these business problems. We try to think about a problem a certain way, and when it comes to coming up with a solution, we look at the tools we have and the tools are telling us, no, you need to think about this at a network layer. And then you end up deploying brittle solutions that are based on IP allow lists, which were created for a time that’s long past.
Mrinal Wadhwa: What happens is that someone on a team needs to connect to a remote system. So they figure out the solution, but the solution is a lot of work and leaves the complexity to you. You still have to figure out how to make it secure and reliable. What ends up happening is someone who doesn't have the expertise to deal with those complexities of secure connectivity or making connections reliable, does just enough that they can move forward. The result is a brittle system, that has security weaknesses, privacy problems, and a lot of risks to your business. And that problem compounds. This is just one decision in the journey of a system coming together. Over time, people make several of those decisions that stack on top of each other, and you end up with a rat’s nest-type complexity in your underlying layers.
Glenn Gillen: Secure by design is such an important cornerstone in making all this possible. If the default position is secure, and everything that entails, it makes everything else easier. You trust that your developer is starting from a place where they're going to get it right.
Mrinal Wadhwa: Yeah, the default position is the safe position. The simple answer is the right answer. That is the best way to approach these problems. I think it’s the only way to reliably tackle security and privacy challenges in our landscape of systems.
Matthew Gregory: I realize that by describing what we do as Networkless, we are kicking the hornet's nest. I want to address that we are trolling a little bit and building on the serverless idea. All of us are laughing about this because we lived through serverless and we welcome all of the comments that will come with us creating this word Networkless. But I think that we can learn a lesson from what we saw with serverless. People that were naysayers of serverless, in my opinion, are wrong. If you think of what we are doing collectively as engineers, building things, we need people developing chips and routers and data centers and different protocols and operating systems. You start going up the stack. We have all of these people focus on individual points of specification and specialization, and it is the sum of the parts that makes the reality of these different applications possible for us all to enjoy. What's happening in the AI revolution is that it is a collective effort across a lot of engineers that have been building for decades, if you look at it from a very zoomed-out point of view. So I think that the critical point of view on serverless is to say that people who work with serverless applications or are using Lambdas are somehow lesser engineers or do not fully understand what they're doing, or it has to be dumbed down for them, really miss the point. The point is, as everything we do becomes more complicated, we need people who are more specialized so that as a stack of engineers, we can all do more. People are doing new cool things with chips and memory and data centers and operating systems that allow people to build the applications that are doing these amazing things in AI right now. In aggregate, we're all working together to get these big outcomes to happen. I think that's where people, when they talk about serverless miss the point. I think they're punching down. Maybe they see people that don't understand what they do or they're protecting their turf. I'm of the opinion that we are at an all-you-can-eat buffet and there are so many problems to be solved, so many applications to be built. We're going through this AI revolution that is expanding so fast that there's no real reason to have this protectionist mentality. I could see someone making that same critical point about Networkless. They might say, “Well, it's not that hard to set up end-to-end encrypted, mutually authenticated connections between distributed systems, if you have all the knowledge that I. Look, we're doing it over here.” But the problem is there aren't enough of those people in the world to secure all the networks and applications that need to move data between each other. We're dealing with such finite resources that we need these big advancements in tooling to move together further and faster.
Mrinal Wadhwa: Usually when someone is criticizing these ideas, they're coming from a point of view of, “In serverless, there are servers.” You're saying it's serverless, but there are servers. That's the trick with that. That's the difficult part about abstractions, of course the layer below the abstraction exists. We also know that all abstractions leak. There's no perfect abstraction. We still write programs that think about bits and bytes from time to time. The question is the degree of that leakiness. When the surface of complexity below an abstraction becomes really big, adding that layer abstraction, even if the abstraction is leaking, even if it doesn't hide one hundred percent of the complexity and it only hides 80% of the complexity, you are net positive in being able to build a new thing. That's the purpose of a tool. The purpose of a tool is to speed you up in building new things. You can invest in new functionality for your product because of that abstraction.
Matthew Gregory: I’ll probably lose half the audience with this analogy. Even before serverless, there was cloud, and Larry Ellison gave a presentation at Oracle World where they wheeled out the Oracle cloud, literally racks and servers. That's what the cloud looks like. When I was at Microsoft, working at Azure, I went to the cloud. It looks like a data center, no surprise. If you keep rolling back all of these abstractions, it's a new layer of abstraction that changes the experience for a group of people. That's what we're trying to get at with this concept of thinking Networkless.
Mrinal Wadhwa: The first time I heard Glenn describe Networkless, it reminded me of attempts from several years ago of people trying to do RPC abstractions over remote services. For a while it became like a big no-no, RPCs are bad because they're a very leaky abstraction. If you try to do a remote procedure call and mistakenly assume that it's like a local procedure call, it doesn't quite work out that way. Your application ends up with more errors because of that assumption, because that remote procedure call leaks heavily. But over time it became okay. We know today GRPCs are considered okay. You can use the Ockam command ‘create secure channel’ and a bunch of stuff happens over the network, and you get a secure channel. It’s like a composition of RPCs. Or when you call an API somewhere and a response comes back, you can assume it'll work most of the time. Over time we get better at doing these abstractions. Specifically in Ockam's case, we say Ockam enables your applications to be Networkless. A good counterpoint would be, “What about all the fallacies of distributed systems? The articles that were written decades ago point out that the network has a bunch of complexity and if you forget about it, it's at your own peril. Because your application will get all these unexpected states.” With Ockam, we take care of the challenges of the network: security challenges, networks are heterogeneous with different types of transports, topologies, boundaries, and multiple networks. Networks have different administrators and different security boundaries along the path. Latency, bandwidth, reliability, and throughput are all complexities at the network layer. What we are doing with Ockam is building an abstraction on top and providing certain guarantees to your application from those abstractions. One of the guarantees you get is that you are always talking to an authenticated entity. If your application is sending a message, it knows that it's always sending it to someone else who has been authenticated. Another guarantee is that no one along the path can decrypt or manipulate the message as it travels. These guarantees can come out of this abstraction interface, which then enables you to build an app without worrying about an attacker on your network. Because now you have this guarantee coming from Ockam. That type of simplification of the network layer allows you to focus on building your core application rather than worry about these challenges around security, connectivity, reliability, and privacy.
Matthew Gregory: Thanks for joining this edition of the podcast. Let us know what you think about Networkless in the comments below. We'd love to discuss with you, and we'll see you on the next podcast. Until then, think Networkless. See you later.
Create an Ockam Redshift outlet node using Cloudformation template
This guide contains instructions to launch within AWS environment, an
An Ockam Redshift Outlet Node within an AWS environment
An Ockam Redshift Inlet Node:
Within an AWS environment, or
Using Docker in any environment
The walkthrough demonstrates:
Running an Ockam Redshift Outlet node in your AWS environment that contains a private Amazon Redshift Serverless or Amazon Redshift Provisioned Cluster
Setting up Ockam Redshift inlet nodes using either AWS or Docker from any location.
Verifying secure communication between Redshift clients and Amazon Redshift Database.
Read: “” to learn about end-to-end trust establishment.
A private Amazon Redshift Database (Serverless or Provisioned) is created and accessible from the VPC and Subnet where the Ockam Node will be launched.
Security Group associated with the Amazon Redshift Database allows inbound traffic on the required default port (5439) from the subnet where the Ockam Outlet Node will reside.
You have permission to subscribe and launch Cloudformation stack from AWS Marketplace on the AWS Account running Amazon Redshift.
and pick a subscription plan through the guided workflow on Ockam.io.
Run the following commands to install Ockam Command and enroll with the Ockam Orchestrator.
Control which identities are allowed to enroll themselves into your project by issuing unique one-time use enrollment tickets. Generate two enrollment tickets, one for the Outlet and one for the Inlet.
Login to AWS Account you would like to use
Subscribe to "Ockam - Node for Amazon Redshift" in AWS Marketplace
Navigate to AWS Marketplace -> Manage subscriptions. Select Ockam - Node for Amazon Redshift from the list of subscriptions. Select Actions-> Launch Cloudformation stack
Click Next to launch the CloudFormation run.
A successful CloudFormation stack run configures the Ockam Redshift Outlet node on an EC2 machine.
EC2 machine mounts an EFS volume created in the same subnet. Ockam state is stored in the EFS volume.
A security group with egress access to the internet will be attached to the EC2 machine.
Ockam redshift outlet node setup is complete. You can now create Ockam redshisft inlet nodes in any network to establish secure communication.
You can set up an Ockam Redshift Inlet Node either in AWS or locally using Docker. Here are both options:
Option 1: Setup Inlet Node in AWS
Login to AWS Account you would like to use
Subscribe to " in AWS Marketplace
Navigate to AWS Marketplace -> Manage subscriptions. Select Ockam - Node from the list of subscriptions. Select Actions-> Launch Cloudformation stack
Click Next to launch the CloudFormation run.
A successful CloudFormation stack run configures the Ockam inlet node on an EC2 machine.
EC2 machine mounts an EFS volume created in the same subnet. Ockam state is stored in the EFS volume.
Connect to the EC2 machine via AWS Session Manager.
Use any postgresqlclient and connect to localhost:15432 (PGHOST=localhost, PGPORT=15439) from the machine running the Ockam redshift Inlet node.
Option 2: Setup Inlet Node Locally with Docker Compose
To set up an Inlet Node locally and interact with it outside of AWS, use Docker Compose.
Create a file named docker-compose.yml with the following content:
Run the following command from the same location as the docker-compose.yml and the inlet.ticket to create an Ockam postgres inlet that can connect to the outlet running in AWS , along with psql client container.
Check status of Ockam inlet node. You will see The node is UP when ockam is configured successfully and ready to accept connection
Connect to psql-client container and run commands
This setup allows you to run an Ockam Redshift Inlet Node locally and communicate securely with a private Amazon Redshift database running in AWS
Cleanup
Attribute names can be used to define policies and policies can be used to define access controls:
Policies are expressions involving attribute names, which can be evaluated to true or false given an environment containing attribute values.
Access controls were discussed earlier. They restrict the messages which can be received or sent by a worker.
Policies are boolean expressions constructed using attribute names. For example:
In the expression above:
and, =, member? are operators.
resource.version, subject.name, resource.admins are identifiers.
Values can have the 5 following types:
String
Int
Float
This table lists all the available operators:
Here are a few more examples of policies.
The subject must have a
componentattribute with a value that is eitherwebordatabase:
Note that attribute names can have dots in their name, so you could also write:
You can also declare more complex logical expressions, by nesting and and or operators:
The subject must either by the "Smart Factory" application or being a member of the "Field Engineering" department in San Francisco:
Since many policies are just need to test for the presence of an attribute, we provide simpler ways to write them.
For example we can write:
Simply as (note that logical operators can now be written as infix operators):
String comparisons are still supported, so you could also have a component attribute and write:
More complex expressions require parentheses:
Since identities are frequently used in policies, we provide a shortcut for them. For example, this is a valid boolean policy:
It translates to:
This table summarizes the elements you can use in a simple boolean policy:
We evaluate a policy by doing the following:
Each attribute attribute_name/attribute_value is added to the environment as an identifier subject.attribute_name associated to the value attribute_value (always as a String). In the example of a policy given above the identifier subject.name means that we are expecting an attribute name associated to the identity which sent a message.
The top-level expression of the policy is recursively evaluated by evaluating each operator and taking values from the environment when an expression is referencing an identifier.
The library offers two types of access controls using policies:
AbacAccessControl.
PolicyAccessControl.
AbacAccessControlThis access control type is used as an IncomingAccessControl (so it restricts incoming messages).
We define an AbacAccessControl with the following:
A Policy which specifies which attributes are required for a given identity.
An IdentityRepository which stores a list of the known authenticated attributes for a given identity.
When a LocalMessage arrives to a worker using such an incoming access control, we do the following:
If an identity is not associated to this message (as LocalInfo), the message is rejected.
Otherwise the attributes for this identity are retrieved from the repository.
The attributes are used to populate the policy environment.
PolicyAccessControlThis access control type is used as an IncomingAccessControl (so it restricts incoming messages).
We define a PolicyAccessControl with the following:
A PolicyRepository which stores a list of policies.
A Resource and an Action. They represent the access which we want to restrict.
An IdentityRepository which stores a list of the known authenticated attributes for a given identity.
When a LocalMessage arrives to a worker using this type of incoming access control, we do the following:
If an identity is not associated to this message (as LocalInfo), the message is rejected.
Otherwise the attributes for this identity are retrieved from the repository.
The most recent policy for the resource and the action is retrieved from the policy repository.
The two major differences between this policy and the previous one are:
The PolicyAccessControl models a Resource/Action pair.
Policies for that resource and action can be modified even if the worker they are attached to is already started.
Transcript
Matthew Gregory: Welcome to the Ockam podcast. Every week, Mrinal, Glenn, and I will get together to discuss technology, building products, security by design, how Ockam works, and a lot more. We'll also comment on industry macros from across cloud, open source, and security. We also plan on bringing guests to add some perspective and challenge some of the dogmas that we or others might have.
Today we'll spend some time allowing you to get to know us, where we come from, and what motivates us to build Ockam: the company, the product, the team. And with that, Mrinal could you start us off with what you've been up to in your professional career and what led you to what we're doing here at Ockam?
Mrinal Wadhwa:
Sure. Thanks, Matt. My name's Mrinal, I am CTO at Ockam and my background has been in distributed systems. I started my career working on large-scale data problems with tools like Erlang, Hadoop, etc. dealing with large amounts of streaming data. And then about 10 years ago I took on a role as CTO of a hardware business, which was strange because I had no hardware background.
It was interesting because it was a great team that wanted to turn the hardware they'd been building into a set of products of connected systems for city infrastructure. And so it's essentially IoT that was installed inside cities, airports, factories, and things like that.
And in designing that very large distributed system, we thought a lot about how we could trust the information that was flowing through that system. How do we trust a sensor sitting in a city street telling us something? Or how do we securely deliver a software update to a device installed inside a factory?
Because this was 2013/14, there weren't other systems like this that had done this at scale. There were no off-the-shelf IoT platforms you could buy from anyone. So, we were thinking about a lot of problems from scratch with no reference point.
We thought about the security and trust problem extensively. That led us to design protocols in that system to do authentication of devices, authentication of the update infrastructure, secure delivery of software updates, secure delivery of the data that was coming in from the sensors, and trustful control of things that are distributed out in the world.
A few years later, as IoT became more prevalent in the world, I noticed that a lot of people were struggling with the security problems around IoT. What I realized was that because of the type of product we were building and the type of customers we were going after, we had invested the time and energy to secure our infrastructure, which meant building a lot of stuff from scratch. And it took us a few years to get it to a secure point. However, for everyone else in the IoT market, that wasn't their core focus. They were trying to solve other problems and did not focus on security.
And what ended up happening is that IoT targets became more attractive to attack. A lot of people attacked it. I remember in 2016/17 there was this big Marai botnet incident, which brought attention to this set of problems. So my realization was, that as systems become more and more distributed, the problem of trust, security, and reliable communication becomes harder and harder.
You have to think about managing keys at scale, you have to set up secure protocols that traverse various types of networks, et cetera. And building all of that takes a lot of time, expertise, and money, which not everybody could invest. And so I started thinking about something that should exist off the shelf to solve that set of problems.
And that led me to meet Matt around 2018. In our very first conversation, what we connected on was the idea that the problems I was thinking about in IoT are more general because all systems are becoming more and more distributed. As that happens, you have to do cross-cloud communication, cross-company communication, cross-network communication, and all of those scenarios. Trust, security, and identity are hard problems. So we both resonated on this idea that a set of tools should exist that make all of this simple for anyone building a distributed system. So that's been my journey.
Matthew Gregory: The first meeting we had was a meeting of the minds. We came to this conclusion, it was immediate. It's funny how people could be thinking of the same problems in parallel and come to similar conclusions.
So my background, in the 2000s I was doing IoT-like things, but the term hadn't been created at that point in time. I was building real-time data analytics systems for America's Cup teams, recording what was going on in sailboats, very similar to what happens in Formula One.
If anyone watches the Netflix show on Formula One, you'll see a lot of this in action. It was the same thing in sailing. Then in the late 2000s, I moved from a builder of systems to more of a tool maker. I worked with Weather Underground to build an API for any software developer that needs to access weather data.
If you've seen weather on your phone, it probably came from the Weather Underground API that we built right around the time that the iPhone and App Store came out. A lot of people needed weather data for their apps. Then I met Glenn at Heroku on my next hop on the journey.
And this was very early in the cloud era. I was at one of the very first AWS Re:Invents. Heroku is a massive AWS customer. We provided that abstraction that made it easy for the full-stack developer to merge and deploy things to the cloud.
I went from there to Microsoft, right after Satya took over. He put together a red team to figure out how to pivot Microsoft from a platform as a service to infrastructure as a service that could run anything. And obviously, Microsoft loves Linux. A lot of that came out of the work that our team did.
Through what I saw during that cloud era, there was this trend. In the Heroku days, there was a slider bar on the website, and the more you slid it to the right, the more cloud you got. And you could just keep scaling your app until infinity.
At the time, people were building these Ruby Rail apps. As it turns out, you can't scale an app with the cloud to infinity; it will break. For the people that were around at the time, this was the era of the Twitter fail whale. There were all sorts of apps breaking, particularly as mobile apps were coming online and all the backend systems that were supporting them.
So we entered this cloud era where monolithic applications needed a solution. And the solution to that when I was at Microsoft was partnerships with companies like Docker and Mesosphere. You take a monolithic application, divide it up into little pieces, call them containers, and then we can orchestrate how many underlying resources we give all these little microservices or containers underneath it.
So you need an orchestration layer, like Mesosphere, Zookeeper, and Kubernetes. You do infrastructure as code with things like Terraform. There was an entire class of orchestration tools for managing infrastructure so that you could run thousands of applications and scale them up and down as you needed.
The cool thing about being at Microsoft at that time was that we got to see all these use cases where people were running things on-prem, and also in clouds like Azure and AWS, and consuming services from other third-party data service companies. So it wasn't just that the monoliths were being chopped up into little pieces, but they were also being distributed all over planet Earth.
If you then extend this to what problem next needs to be solved, it is "How are we going to create trust and interoperability between all these different applications?" Because you still have a job to be done. And so that concept of a monolith still exists, but you don't have the reality of it all running in the same box or the same cloud or in the same environment.
How are we going to get interoperability, have trust between applications, and move data between them in a trustful way, so that we can have these massive-scale enterprise applications that are distributed all around the world? And as I said, I met Glenn over 10 years ago now when we were working together at Heroku, and that's where we met. I've mentioned HashiCorp where you spent some time, why don't you give us the background about what brings you to Ockam?
Glenn Gillen: I started as a developer, doing dotnet, Ruby, PHP, a whole bunch of stuff. But ultimately I think the interesting part of that story is ending up at Heroku, which is more than 15 years ago at this point.
I think people who weren't around at the time underestimated the impact it had on so many things. Git-based deployments of code were something they pioneered. Docker wasn't around then. Containerization and deployment of apps to containers at scale was a thing that Heroku helped bring to the masses.
So Matt and I worked on the add-ons marketplace there, which is the way to connect other things. All the bits that aren't Heroku that you plug into: databases, logging services, caching providers, etc. The things that you can't run yourself on Heroku, that's what the add-ons marketplace did. We spent years there building out a great user experience to make it easy to connect to other things.
After Heroku, I went to AWS for a little while. I was helping companies that were at the forefront of trying to adopt the cloud, especially startups, people that were pushing the envelope. I was helping them be successful on AWS. My experience there was that AWS is great at a lot of things, they built an incredible product. But they don't provide a great developer experience. On top of that, you've got access to all these tools. But you're left to do a lot of the plumbing yourself. Especially coming from Heroku, which focused on providing a great abstraction, that friction was felt deeply day to day. I was getting a bit frustrated with it and couldn't work out how to fix that at a company the size and scale of AWS.
How can you fix that? Terraform seemed like the best place to do it. They had a much better UX than AWS and had better coverage in cloud formation at the time if you wanted to do infrastructure as code. So I managed to get myself a job at HashiCorp, working on Terraform and ultimately was Product Lead for Terraform.
We did pretty well with that, but good things come to an end. And after the IPO I started looking around for what might come next, and that's when I reached out to Matt to see what he was up to. It wasn't meant to be a job conversation. But it just evolved.
When I looked at what you were doing here at Ockam, and compared it to my journey, the consistent thing was that we kept making incremental improvements to the way we connect things. We had a set of tools, we'd make them slightly better and we'd still have the same problems. If Ockam existed when we launched Terraform Cloud, we could have saved over six months of development.
We built our own smaller, more focused, less functional version of Ockam to help connect Terraform Cloud to on-prem things. And that was the other thing I learned from my time at Hashicorp, the world's not as simple as it was back when we started Heroku.
You're not just deploying everything to AWS, there are heterogeneous deployments in terms of multi-cloud or hybrid approaches. You've at least got a data center on-prem still that you're trying to talk to, and it's just messy. And we're still trying to patch this in hacky ways. Or in HashiCorp's case, investing half a year trying to build a solution to fix what should be simple. We're just trying to connect two things securely. I thought, oh, this is where I should be spending my time. This is the next thing to go and improve. So that's ultimately how I ended up here.
Matthew Gregory: Glenn's been with us for a little over a year and it's just been awesome to get the band back together. It begs the question, what is Ockam?
Mrinal, when people say, "I've heard of Ockam, but tell me more about it.". What do you tell them?
Mrinal Wadhwa: I'll take two different approaches, from the top down and from the bottom up. I'll attempt the top-down answer first and we can drill into the details later. Ockam is a tool for a developer to build applications that can trust the data in motion between applications.
It could be distributed parts of the same app, or it could be two apps communicating with each other. We give a developer the tools to add trust to that communication and the data that's moving through. But what does that mean? If you peel a layer below that, what that means is we've made the hard parts; mutual authentication, end-to-end encryption, and granular authorization policies on the data flow, we made all of that really easy to add to an application.
If I have an app in a data center and I want to communicate with another part of that application in AWS cloud, we can make it so that the communication is end-to-end encrypted, mutually authenticated, and has granular authorization policies enforced on it.
If you go another layer below, Ockam is a collection of cryptographic and messaging protocols that are wrapped in a programming library that you can call with very simple one or two-line functions to get these capabilities. You don't have to know the underlying secure channel protocol to establish a secure channel. You just get a function called create secure channel, and it gives you a secure, end-to-end encrypted, mutually authenticated channel. So that's what Ockam does, and I can keep talking about the details of how the layers below work, but that's my answer.
Matthew Gregory: I'm looking forward to the episode where we get into the protocol and we go through all the protocol design. We collaborated with Trail of Bits, who did our security audit, on a paper describing all of this. That was a fun project and also a forcing function to lay out in simple terms how it all works.
I describe Ockam as WhatsApp for Enterprise data-in-motion systems.
I use WhatsApp because the way that WhatsApp and Ockam works is pretty similar. The other thing about this metaphor that I like is it emphasizes that this is an application layer solution. It's not at the security layer. So we operate at the application layer, and here's how the story goes with WhatsApp. Let's say, I have WhatsApp on my phone and you have WhatsApp on your phone, these two applications can reach each other through the internet without having to touch any of the underlying infrastructure.
My application can go find Mrinal's application through the internet, without him having to touch anything in his network. These two applications can set up a mutually authenticated connection with each other.
So when I'm texting with Mrinal, I know that Mrinal is the person receiving my message. I know that it's him on the other end. Or essentially the application is a proxy for Mrinal because he's the one driving it through his phone. So now we have an identity, which means that we can do mutual authentication that's exclusive between these two applications, and then we can move messages between each other in an end-to-end encrypted way.
And the unique thing about this is that WhatsApp sits in the middle. My phone is not directly connecting to Mrinal's. It has to go out of the infrastructure that I'm currently in, from this network up to the cloud, then go find the WhatsApp server, leave the WhatsApp server, traverse the internet, make it back into Mrinal's network, and then land on his phone.
So there are all these hops along the way. But the cool thing is because it's end-to-end, there's no intermediary along the way that can have access to this data. It's end-to-end encrypted, and setting that up is really difficult. And specifically, WhatsApp cannot read any of these messages. Even though we have that in this consumer product, it is exceptionally difficult to set up in an enterprise data world.
And a lot of the difficulty is because you're not dealing with a lot of the magic that comes with iPhones and Google phones. So it's very difficult to do such a seemingly simple thing. Ockam is the mutual authentication, end-to-end encryption service for any two applications sitting anywhere inside an enterprise or even between two different enterprises, two different companies that need to connect and share data in a peer-to-peer way. Glenn, how do you describe Ockam?
Glenn Gillen: Well, in our early conversations before I joined, that analogy was part of the 'aha' moment for me, when I realized the potential of Ockam. In my personal life, 100% of the people that I message regularly are using iMessage, Signal, or WhatsApp. So the consumer experience around trusted, encrypted, private end-to-end messaging is so ubiquitous and you never think about it.
We've all been conditioned to expect that as the norm now. You message someone, you get the blue bubble. I didn't have to worry about what network I was on, or did I open up a port to my firewall. It always just works, everywhere all the time.
And then as you were telling me that story, I thought: If I've got a container or a web process and I'm trying to connect it to a database, if those two things are in the same network, then it's relatively quick and easy. But the moment I put the database in a private subnet and that process is anywhere else, even in the same VPC or another cloud, you have a much bigger challenge.
I have to change security groups, firewalls need to open, and in the best case, it's hours of work and dozens of things I need to do. And if any one of those things goes wrong, I've either accidentally exposed my data, or I don't get it working.
There are so many failure modes there. And that was part of what pulled me over here: why are our tools so poor when the consumer ones are so good? Bringing those two things together and that experience to a similar place is what was most exciting to me about Ockam.
Matthew Gregory: Great. With that, we can wrap up our first episode as I said we could keep it simple with this one. We'll dive into some nitty gritty topics as we go along. Let us know what you'd like to talk about, and we'll see you on the next episode of the Podcast. Have a good day. Bye.
Ockam Nodes and Workers decouple applications from the host environment and enable simple interfaces for stateful and asynchronous message-based protocols.
At Ockam’s core are a collection of cryptographic and messaging protocols. These protocols make it possible to create private and secure by design applications that provide end-to-end application layer trust it data.
Ockam is designed to make these powerful protocols easy and safe to use in any application environment, from highly scalable cloud services to tiny battery operated microcontroller based devices.
However, many of these protocols require multiple steps and have complicated internal state that must be managed with care. It can be quite challenging to make them simple to use, secure, and platform independent.
Ockam Nodes and Workers help hide this complexity and decouple from the host environment - to provide simple interfaces for stateful and asynchronous message-based protocols.
An Ockam Node is any program that can interact with other Ockam Nodes using various Ockam Protocols like Ockam and Ockam Secure Channels.
Using the Ockam Rust crates, you can easily turn any application into a lightweight Ockam Node. This flexible approach allows your to build secure by design applications that can run efficiently on tiny microcontrollers or scale horizontally in cloud environments.
Rust based Ockam Nodes run very lightweight, concurrent, stateful actors called Ockam . Using Ockam Routing, a node can deliver messages from one worker to another local worker. Using Ockam Transports, nodes can also route messages to workers on other remote nodes.
A node requires an asynchronous runtime to concurrently execute workers. The default Ockam Node implementation in Rust uses tokio, a popular asynchronous runtime in the Rust ecosystem. We also support Ockam Node implementations for various no_std embedded targets.
The first thing any Ockam rust program must do is initialize and start an Ockam node. This setup can be done manually but the most convenient way is to use the #[ockam::node] attribute that injects the initialization code. It creates the asynchronous environment, initializes worker management, sets up routing and initializes the node context.
For your new node, create a new file at examples/01-node.rs in your project:
Add the following code to this file:
Here we add the #[ockam::node] attribute to an async main function that receives the node execution context as a parameter and returns ockam::Result which helps make our error reporting better.
As soon as the main function starts, we use ctx.stop() to immediately stop the node that was just started. If we don't add this line, the node will run forever.
To run the node program:
This will download various dependencies, compile and then run our code. When it runs, you'll see colorized output showing that the node starts up and then shuts down immediately 🎉.
Ockam run very lightweight, concurrent, and stateful actors called Ockam Workers.
When a worker is started on a node, it is given one or more addresses. The node maintains a mailbox for each address and whenever a message arrives for a specific address it delivers that message to the corresponding registered worker.
Workers can handle messages from other workers running on the same or a different node. In response to a message, an worker can: make local decisions, change its internal state, create more workers, or send more messages to other workers running on the same or a different node.
Above we've , now let's create a new worker, send it a message, and receive a reply.
To create a worker, we create a struct that can optionally have some fields to store the worker's internal state. If the worker is stateless, it can be defined as a field-less unit struct.
This struct:
Must implement the ockam::Worker trait.
Must have the #[ockam::worker] attribute on the Worker trait implementation
Must define two associated types Context and Message
For a new Echoer worker, create a new file at src/echoer.rs in your project. We're creating this inside the src directory so we can easily reuse the Echoer in other examples that we'll write later in this guide:
Add the following code to this file:
Note that we define the Message associated type of the worker as String, which specifies that this worker expects to handle String messages. We then go on to define a handle_message(..) function that will be called whenever a new message arrives for this worker.
In the Echoer's handle_message(..), we print any incoming message, along with the address of the Echoer. We then take the body of the incoming message and echo it back on its return route (more about routes soon).
To make this Echoer type accessible to our main program, export it from src/lib.rs file by adding the following to it:
When a new node starts and calls an async main function, it turns that function into a worker with address of "app". This makes it easy to send and receive messages from the main function (i.e the "app" worker).
In the code below, we start a new Echoer worker at address "echoer", send this "echoer" a message "Hello Ockam!" and then wait to receive a String reply back from the "echoer".
Create a new file at:
Add the following code to this file:
To run this new node program:
You'll see console output that shows "Hello Ockam!" received by the "echoer" and then an echo of it received by the "app".
The message flow looked like this:
Next, let’s explore how Ockam’s enables us to create protocols that provide end-to-end security and privacy guarantees.
Ockam Identities are cryptographically verifiable digital identities. Each Identity has a unique Identifier. An Ockam Credential is a signed attestation by an Issuer about the Attributes of a Subject.
Ockam Identities are cryptographically verifiable digital identities. Each Identity maintains one or more secret keys and has a unique Ockam Identifier.
When an Ockam Identity is first created, it generates a random primary secret key inside an Ockam Vault. This secret key must be capable of performing a ChangeSignature. We support two types of change signatures - EdDSACurve25519Signature or ECDSASHA256CurveP256Signature
Create an ockam kafka outlet node using Cloudformation template
This guide contains instructions to launch within AWS environment, an
An Ockam Kafka Outlet Node within an AWS environment
An Ockam Kafka Inlet Node:
Within an AWS environment, or
Transcript
Matthew Gregory: Welcome to the Ockam podcast. We have an exciting topic today, we are going to talk about a really cool use case for Ockam. This use case focuses on a setup of a company that's running a SaaS product in a cloud environment and needs to connect to their customer's data. We’ll discuss all the challenges that go into this problem of moving data from a customer to a SaaS product and what you need to think about. From the point of view of a product manager who's running the SaaS product, we’ll discuss the technical hurdles, things that happen to slow down sales, and ultimately what creates great customer success. That's the first thing that every product manager is thinking about. Given that all three of us are product managers at heart, I think we'll have a lot of good perspectives for the product managers listening. If you're on the technical implementation side, this discussion will run through several things that you may not have thought of in how to connect SaaS products to your customer's data. Let me start there, Glenn. What are some scenarios where a SaaS product would need to access customer data?
curl --proto '=https' --tlsv1.2 -sSfL https://install.command.ockam.io | bash
source "$HOME/.ockam/env"
ockam enroll# Enrollment ticket for Ockam Outlet Node
ockam project ticket --expires-in 10h --usage-count 1 \
--attribute amazon-rds-postgresql-outlet \
--relay postgresql \
> "outlet.ticket"
# Enrollment ticket for Ockam Inlet Node
ockam project ticket --expires-in 10h --usage-count 1 \
--attribute amazon-rds-postgresql-inlet \
> "inlet.ticket"{
"relay": "postgresql",
"tcp-outlet": {
"to": "$POSTGRES_ENDPOINT:5432",
"allow": "amazon-rds-postgresql-inlet"
}
}
{
"tcp-inlet": {
"from": "0.0.0.0:15432",
"via": "postgresql",
"allow": "amazon-rds-postgresql-outlet"
}
}services:
ockam:
image: ghcr.io/build-trust/ockam
container_name: postgres-inlet
environment:
ENROLLMENT_TICKET: ${ENROLLMENT_TICKET:-}
OCKAM_DEVELOPER: ${OCKAM_DEVELOPER:-false}
OCKAM_LOGGING: true
OCKAM_LOG_LEVEL: info
command:
- node
- create
- --foreground
- --node-config
- |
ticket: ${ENROLLMENT_TICKET}
tcp-inlet:
from: 127.0.0.1:15432
via: postgresql
allow: amazon-rds-postgresql-outlet
network_mode: host
psql-client:
image: postgres
container_name: psql-client
command: /bin/bash -c "while true; do sleep 30; done"
depends_on:
- ockam
network_mode: hostENROLLMENT_TICKET=$(cat inlet.ticket) docker-compose up -ddocker exec -it postgres-inlet /ockam node show# Connect to the container
docker exec -it psql-client /bin/bash
# Update the *_REPLACE placeholder variables
export PGUSER="$PGUSER_REPLACE";
export PGPASSWORD="$PGPASSWORD_REPLACE";
export PGDATABASE="$PGDATABASE_REPLACE";
export PGHOST="localhost";
export PGPORT="15432";
# list tables
psql -c "\dt";
# Create a table
psql -c "CREATE TABLE __test__ (key VARCHAR(255), value VARCHAR(255));";
# Insert some data
psql -c "INSERT INTO __test__ (key, value) VALUES ('0', 'Hello');";
# Query the data
psql -c "SELECT * FROM __test__;";
# Drop table if it exists
psql -c "DROP TABLE IF EXISTS __test__;";docker compose down --volumes --remove-orphans# Below command will find your ockam project id
ockam project show --jq .id curl --proto '=https' --tlsv1.2 -sSfL https://install.command.ockam.io | bash
source "$HOME/.ockam/env"
ockam enroll# Enrollment ticket for Ockam Outlet Node
ockam project ticket --expires-in 10h --usage-count 1 \
--attribute amazon-bedrock-outlet \
--relay bedrock \
> "outlet.ticket"
# Enrollment ticket for Ockam Inlet Node
ockam project ticket --expires-in 10h --usage-count 1 \
--attribute amazon-bedrock-inlet --tls \
> "inlet.ticket"{
"relay": "bedrock",
"tcp-outlet": {
"to": "$BEDROCK_RUNTIME_ENDPOINT:443",
"allow": "amazon-bedrock-inlet",
"tls": true
}
}services:
ockam:
image: ghcr.io/build-trust/ockam
container_name: bedrock-inlet
environment:
ENROLLMENT_TICKET: ${ENROLLMENT_TICKET:-}
OCKAM_DEVELOPER: ${OCKAM_DEVELOPER:-false}
OCKAM_LOGGING: true
OCKAM_LOG_LEVEL: debug
ports:
- "443:443" # Explicitly expose port 443
command:
- node
- create
- --enrollment-ticket
- ${ENROLLMENT_TICKET}
- --foreground
- --configuration
- |
tcp-inlet:
from: 0.0.0.0:443
via: bedrock
allow: amazon-bedrock-outlet
tls: true
network_mode: bridgeENROLLMENT_TICKET=$(cat inlet.ticket) docker-compose up -ddocker exec -it bedrock-inlet /ockam node showhttps://ANY_STRING_YOU_LIKE.YOUR_PROJECT_ID.ockam.networkBEDROCK_ENDPOINT=https://bedrock-runtime.d8eafd41-ff3e-40ab-8dbe-936edbe3ad3c.ockam.networkexport AWS_REGION=<YOUR_REGION>
aws bedrock-runtime invoke-model \
--endpoint-url $BEDROCK_ENDPOINT \
--model-id amazon.titan-text-lite-v1 \
--body '{"inputText": "Describe the purpose of a \"hello world\" program in one line.", "textGenerationConfig" : {"maxTokenCount": 512, "temperature": 0.5, "topP": 0.9}}' \
--cli-binary-format raw-in-base64-out \
invoke-model-output-text.txt> cat invoke-model-output-text.txt
{"inputTextTokenCount":15,"results":[{"tokenCount":26,"outputText":"\nThe purpose of a \"hello world\" program is to print the text \"hello world\" to the console.","completionReason":"FINISH"}]}docker compose down --volumes --remove-orphanscargo run --example 02-worker// examples/01-node.rs
// This program creates and then immediately stops a node.
use ockam::{node, Context, Result};
/// Create and then immediately stop a node.
#[ockam::node]
async fn main(ctx: Context) -> Result<()> {
// Create a node.
let mut node = node(ctx).await?;
// Stop the node as soon as it starts.
node.shutdown().await
}
// src/echoer.rs
use ockam::{Context, Result, Routed, Worker};
pub struct Echoer;
#[ockam::worker]
impl Worker for Echoer {
type Context = Context;
type Message = String;
async fn handle_message(&mut self, ctx: &mut Context, msg: Routed<String>) -> Result<()> {
println!("Address: {}, Received: {:?}", ctx.primary_address(), msg);
// Echo the message body back on its return_route.
ctx.send(msg.return_route().clone(), msg.into_body()?).await
}
}
// examples/02-worker.rs
// This node creates a worker, sends it a message, and receives a reply.
use hello_ockam::Echoer;
use ockam::{node, Context, Result};
#[ockam::node]
async fn main(ctx: Context) -> Result<()> {
// Create a node with default implementations
let mut node = node(ctx).await?;
// Start a worker, of type Echoer, at address "echoer"
node.start_worker("echoer", Echoer)?;
// Send a message to the worker at address "echoer".
node.send("echoer", "Hello Ockam!".to_string()).await?;
// Wait to receive a reply and print it.
let reply = node.receive::<String>().await?;
println!("App Received: {}", reply.into_body()?); // should print "Hello Ockam!"
// Stop all workers, stop the node, cleanup and return.
node.shutdown().await
}
Subnet ID: Select a suitable Subnet ID within the chosen VPC that has access to Amazon RDS PostgreSQL Database.
EC2 Instance Type: Default instance type is m6a.8xlarge because of the predictable network bandwidth of 12.5 Gbps. Adjust to a small instance type depending on your use case. Eg: m6a.large
Ockam Node Configuration
Enrollment ticket: Copy and paste the content of the outlet.ticket generated above
RDS Postgres Database Endpoint: To configure the Ockam postgres Outlet Node, you'll need to specify the Amazon RDS Postgres Endpoint. This configuration allows the Ockam Postgres Outlet Node to connect to the database.
JSON Node Configuration: Copy and paste the below configuration. Note that the configuration values match with the enrollment tickets created in the previous step. $POSTGRES_ENDPOINT will be replaced during runtime.
Subnet IDEC2 Instance Type: Default instance type is m6a.8xlarge because of the predictable network bandwidth of 12.5 Gbps. Adjust to a small instance type depending on your use case. Eg: m6a.large
Ockam Configuration
Enrollment ticket: Copy and paste the content of the inlet.ticket generated above
JSON Node Configuration: Copy and paste the below configuration.

Subnet ID: Select a suitable Subnet ID within the chosen VPC.
EC2 Instance Type: Default instance type is m6a.large. please use different instance types based on your use case.
Ockam Node Configuration
Enrollment ticket: Copy and paste the content of the outlet.ticket generated above
JSON Node Configuration: Copy and paste the below configuration. Note that the configuration values (relay, allow attribute) match with the enrollment tickets created in the previous step. $BEDROCK_RUNTIME_ENDPOINT will be replaced during runtime.
To view the status of Ockam node run curl http://localhost:23345/show | jq


1, "John" are values.
BoolSeq: a sequence of values
<
2
Return true if the first value is less than the second one
>
2
Return true if the second value is less than the first one
=
2
Return true if the two values are equal
!=
2
Return true if the two values are different
member?
2
Return true if the first value is present in the second expression, which must be a sequence Seq of values
exists?
>= 1
Return true if all the expressions are identifiers with values present in the environment
()
Parentheses. Used to group expressions. The precedence rules are not > and > or
The end result of a policy evaluation is simply a boolean saying if the policy succeeded or not.
true the message is accepted.The policy expression is evaluated. If it returns true the message is accepted.
and
>= 2
Produce the logical conjunction of n expressions
or
>= 2
Produce the logical disjunction of n expressions
not
1
Produce the negation of an expression
if
3
name
Equivalent to (= subject.name "true")
name="string value"
Equivalent to (= subject.name "string value")
and
Conjunction of 2 expressions
or
Disjunction of 2 expressions
not
Negation of an expression
identifier
Equivalent to (= subject.identifier "identifier")
Evaluate the first expression to select either the second expression or the third one
The Context type is usually set to ockam::Context which is provided by the node implementation.
The Message type must be set to the type of message the worker wishes to handle.

(and (= resource.version 1)
(= subject.name "John")
(member? "John" resource.admins))(or (= subject.component "web")
(= subject.component "database"))(or (= subject.component.web "true")
(= subject.component.database "true"))(or (= subject.application "Smart Factory")
(and (= subject.department "Field Engineering")
(= subject.city "San Francisco")))(or (= subject.web "true")
(= subject.database "true"))web or databasecomponent="web" or component="database"(web or not database) and analyticsI84502ce0d9a0a91bae29026b84e19be69fb4203a6bdd1424c85a43c812772a00(= subject.identifier = "I84502ce0d9a0a91bae29026b84e19be69fb4203a6bdd1424c85a43c812772a00")touch examples/01-node.rs// examples/01-node.rs
// This program creates and then immediately stops a node.
use ockam::{node, Context, Result};
/// Create and then immediately stop a node.
#[ockam::node]
async fn main(ctx: Context) -> Result<()> {
// Create a node.
let mut node = node(ctx).await?;
// Stop the node as soon as it starts.
node.shutdown().await
}
clear; OCKAM_LOG=none cargo run --example 01-nodetouch src/echoer.rs// src/echoer.rs
use ockam::{Context, Result, Routed, Worker};
pub struct Echoer;
#[ockam::worker]
impl Worker for Echoer {
type Context = Context;
type Message = String;
async fn handle_message(&mut self, ctx: &mut Context, msg: Routed<String>) -> Result<()> {
println!("Address: {}, Received: {:?}", ctx.primary_address(), msg);
// Echo the message body back on its return_route.
ctx.send(msg.return_route().clone(), msg.into_body()?).await
}
}
mod echoer;
pub use echoer::*;
touch examples/02-worker.rs// examples/02-worker.rs
// This node creates a worker, sends it a message, and receives a reply.
use hello_ockam::Echoer;
use ockam::{node, Context, Result};
#[ockam::node]
async fn main(ctx: Context) -> Result<()> {
// Create a node with default implementations
let mut node = node(ctx).await?;
// Start a worker, of type Echoer, at address "echoer"
node.start_worker("echoer", Echoer)?;
// Send a message to the worker at address "echoer".
node.send("echoer", "Hello Ockam!".to_string()).await?;
// Wait to receive a reply and print it.
let reply = node.receive::<String>().await?;
println!("App Received: {}", reply.into_body()?); // should print "Hello Ockam!"
// Stop all workers, stop the node, cleanup and return.
node.shutdown().await
}
cargo run --example 02-workerSelect the Region you want to deploy and click Continue to Launch. Under Actions, select Launch Cloudformation
Create stack with the following details
Stack name: redshift-ockam-outlet or any name you prefer
Network Configuration
VPC ID: Choose a VPC ID where the EC2 instance will be deployed.
Subnet ID: Select a suitable Subnet ID within the chosen VPC that has access to Amazon Redshift. Note: Security Group associated with Amazon Redshift should allow inbound traffic on the required default port (5439) from the IP address of the Subnet or VPC.
EC2 Instance Type: Default instance type is m6a.large. If you would like predictable network bandwidth of 12.5 Gbps please use m6a.8xlarge or a small instance type like t3.medium depending on your use case
Ockam Node Configuration
Enrollment ticket: Copy and paste the content of the outlet.ticket generated above
Redshift Database Endpoint: To configure the Ockam Redshift Outlet Node, you'll need to specify the Amazon Redshift Endpoint. This configuration allows the Ockam Redshift Outlet Node to connect to the database.
Connect to the EC2 machine via AWS Session Manager.
To view the log file, run sudo cat /var/log/cloud-init-output.log.
Note: DNS Resolution for the EFS drive may take upto 10 minutes, you will see the script retrying every 30 seconds to resolve
Successful run will show Ockam node setup completed successfully in the logs
To view the status of Ockam node run curl http://localhost:23345/show | jq
View the Ockam node status in CloudWatch.
Navigate to Cloudwatch -> Log Group and select redshift-ockam-outlet-status-logs. Select the Logstream for the EC2 instance.
The Cloudformation template creates a subscription filter that sends data to a Cloudwatch alarm redshift-ockam-outlet-OckamNodeDownAlarm.Alarm will turn green upon ockam node successfully running.
An Autoscaling group ensures atleast one EC2 instance is running at all times.
Select the Region you want to deploy and click Continue to Launch. Under Actions, select Launch Cloudformation
Create stack with below details
Stack name: redshift-ockam-inlet or any name you prefer
Network Configuration
Select suitable values for VPC ID and Subnet ID
EC2 Instance Type: Default instance type is m6a.large. If you would like predictable network bandwidth of 12.5 Gbps please use m6a.8xlarge or a small instance type like t3.medium depending on your use case
Ockam Configuration
Enrollment ticket: Copy and paste the content of the inlet.ticket generated above
JSON Node Configuration: Copy and paste the below configuration.
To view the log file, run sudo cat /var/log/cloud-init-output.log.
Successful run will show Ockam node setup completed successfully in the logs
To view the status of Ockam node run curl http://localhost:23345/show | jq
View the Ockam node status in CloudWatch.
Navigate to Cloudwatch -> Log Group and select redshift-ockam-inlet-status-logs. Select the Logstream for the EC2 instance.
Cloudformation template creates a subscription filter that sends data to a Cloudwatch alarm redshift-ockam-inlet-OckamNodeDownAlarm.Alarm will turn green upon ockam node successfully running.
An Autoscaling group ensures atleast one EC2 instance is running at all times.

EdDSACurve25519SignatureThe public part of the primary secret key is then written into a Change (see data structure below) and this Change includes a signature using the primary secret key. The SHA256 hash of this first Change, truncated to its first 20 bytes, becomes the the forever Ockam Identifier of this Identity. Each change includes a created_at timestamp to indicate when the change was created and an expires_at timestamp to indicate when the primary_public_key included in the change should stop being relied on as the primary public key of this identity.
Whenever the identity wishes to rotate to a new primary public key and revoke all previous primary public keys it can create a new Change. This new change includes two signatures - one by the previous primary secret key and another by a newly generated primary secret key. Over time, this creates a signed ChangeHistory, the latest Change in this history indicates the self-attested latest primary public key of this Identity.
An Ockam Identity can use its primary secret key to sign PurposeKeyAttestations (see data structure below). These attestations indicate which public keys (and corresponding secret keys) the identity wishes to use for issuing credentials and authenticating itself within secure channels.
Each attestation includes an expires_at timestamp to indicate when the included public key should no longer be relied on for its indicated purpose. The Identity's ChangeHistory can include a Change which has revoke_all_purpose_keys set to true. All purpose key attestations created before the created_at timestamp of this change are also be considered expired.
An Ockam Credential is a signed attestation by an Issuer about the Attributes of a Subject. The Issuer and Subject are both Ockam Identities. Attributes is a map of name and value pairs.
Any Identity can issue credentials attesting to attributes of another Ockam Identity. This does not imply that these attestations should be considered authoritative about the subject's attributes. Who is an authority on which attributes of which subjects is defined using Ockam Trust Contexts.
Each signed credential includes an expires_at field to indicate a timestamp beyond which the attestation made in the credential should no longer be relied on.
The Attributes type above includes a schema identifier that refers to a schema that defines the meaning of each attribute. For example, Project Membership Authorities within an Ockam Orchestrator Project use a specific schema identifier and define attributes like enroller which indicates that an Identity that possess a credential with enroller attribute set to true can request one-time user enrollment tokens to invite new members to the project.
Using Docker in any environment
The walkthrough demonstrates:
Running an Ockam kafka outlet node in your AWS environment that contains Amazon MSK instance
Setting up Ockam Kafka inlet nodes using either AWS or Docker from any location.
Verifying secure communication between kafka clients and Amazon MSK cluster.
Read: “How does Ockam work?” to learn about end-to-end trust establishment.
Amazon MSK Cluster Configuration: Ensure that your Amazon MSK cluster is configured with the following settings:
Access Control Methods: Unauthenticated access should be enabled.
Encryption between Clients and Brokers: PLAINTEXT should be enabled
Network Access to Amazon MSK Cluster: Verify that the Security Group associated with the Amazon MSK cluster allows inbound traffic on the required port(s) (e.g., 9092) from the subnet where the EC2 instance will reside.
Sign up for Ockam and pick a subscription plan through the guided workflow on Ockam.io.
Run the following commands to install Ockam Command and enroll with the Ockam Orchestrator.
Completing this step creates a Project in Ockam Orchestrator.
Control which identities are allowed to enroll themselves into your project by issuing unique one-time use enrollment tickets. Generate two enrollment tickets, one for the Outlet and one for the Inlet.
Login to AWS Account you would like to use
Subscribe to "Ockam - Node for Amazon MSK" in AWS Marketplace
Navigate to AWS Marketplace -> Manage subscriptions. Select Ockam - Node for Amazon MSK from the list of subscriptions. Select Actions-> Launch Cloudformation stack
Select the Region you want to deploy and click Continue to Launch. Under Actions, select Launch Cloudformation
Create stack with the following details
Stack name: msk-ockam-outlet or any name you prefer
Network Configuration
VPC ID:
Click Next to launch the CloudFormation run.
A successful CloudFormation stack run configures the Ockam Kafka outlet node on an EC2 machine.
EC2 machine mounts an EFS volume created in the same subnet. Ockam state is stored in the EFS volume.
A security group with egress access to the internet will be attached to the EC2 machine.
Connect to the EC2 machine via AWS Session Manager.
To view the log file, run sudo cat /var/log/cloud-init-output.log.
Successful run will show Ockam node setup completed successfully in the logs
To view the status of Ockam node run curl http://localhost:23345/show | jq
View the Ockam node status in CloudWatch.
Navigate to Cloudwatch -> Log Group and select msk-outlet-ockam-status-logs. Select the Logstream for the EC2 instance.
The Cloudformation template creates a subscription filter that sends data to a Cloudwatch alarm msk-ockam-outlet-OckamNodeDownAlarm.Alarm will turn green upon ockam node successfully running.
An Autoscaling group ensures atleast one EC2 instance is running at all times.
Ockam Kafka outlet node setup is complete. You can now create Ockam Kafka inlet nodes in any network to establish secure communication.
You can set up an Ockam Kafka Inlet Node either in AWS or locally using Docker. Here are both options:
Option 1: Setup Inlet Node in AWS
To set up an Inlet Node in AWS, follow similar steps as the Outlet Node setup, with these modifications:
Use the same CloudFormation template as before.
When configuring the stack,
Use the inlet.ticket instead of the outlet.ticket.
VPC and Subnet: You can choose any VPC and subnet for the Inlet Node. It doesn't need to be in the same network as the MSK cluster or the Outlet Node.
For the JSON Node Configuration, use the following:
Use any kafka client and connect to 127.0.0.1:9092 as the bootstrap-server, from the same machine running the Ockam Kafak Inlet node.
Option 2: Setup Inlet Node Locally with Docker Compose
To set up an Inlet Node locally and interact with it outside of AWS, use Docker Compose.
Create a file named docker-compose.yml with the following content:
Run the following command from the same location as the docker-compose.yml and the inlet.ticket to create an Ockam kafka inlet that can connect to the outlet running in AWS , along with kakfa client tools container
Exec into the kafka-tools and run commands to produce as well as consume kafka messages.
This setup allows you to run an Ockam Kafka Inlet Node locally and communicate securely with the Outlet Node running in AWS.
Glenn Gillen: Most SaaS products are trying to add value on top of existing data or workflows to improve it for customers. So a lot of that by its very nature is private, it's not something that should be available to a public API or accessible from the public internet. It could be business IP or a business process that lives inside private VPCs. You see this a lot with customer data platforms. Tooling that provides visualization, analytics, and insight on top of data needs to access commercially or personally sensitive information. Another example is a developer-focused tool that needs to access a codebase that is stored in a self-hosted VCS system like Github or Gitlab. You need to integrate with a vendor that's doing some security analysis or dependency analysis to help you improve your security posture. Those two systems need to talk, and you don't want that code base living on the public internet for a variety of reasons. This use case is coming up a lot at the moment and is probably familiar to a lot of people.
Matthew Gregory: That makes sense. We have a bunch of data that we are using internally and we connect to a lot of SaaS products. We're not going to replicate all of our data in every single place. Mrinal, there are a lot of different ways people set this up. Can you walk through a couple of the typical architectures for how SaaS products and their customers connect data to that SaaS product?
Mrinal Wadhwa: The typical approach is that the SaaS product exposes an API endpoint. The SaaS company tells their customer to call the API endpoint whenever they have some data to share. Some challenges emerge from that approach. First, The API call is only a reaction to something happening inside the customer. The customer has to call the API at some point because something happens. For example, a code commit has happened. So the source code management system hosted by the customer, like GitHub Enterprise, calls an API inside your SaaS product indicating that new code was committed. That can be one approach. The challenge here is that it only reacts when things are happening inside the customer environment. The other challenge is when the end customer is dealing with really sensitive information, they're concerned about these events going over the internet and the endpoint of your SaaS product that handles their private information being public on the internet.
Matthew Gregory: It's a one-to-one relationship, and I need to trigger something. Do I want to call a public endpoint if I'm trying to do something private in a one-to-one mapping? Then there's a problem for the SaaS product, which now has a public API that they need to fortify from all the threats of the entire internet.
Glenn Gillen: If I put my product manager manager hat on for a moment, there's also the fact that the communication channel exists for request and response. Whatever value you're providing has to be able to fit into that communication window. That means the payload has to have all the information you require to deliver that value, which goes to Mrinal’s point. The payload needs to have the code, if we are a scanning tool for example. And we don’t want that code transiting over the public internet. That's the whole point. So you’re in this place as the product manager where you’re asking, “How do I get our value to the customer in under a second with the limited payloads that they're willing to share with us via public API?” It's a tricky balance to have, and you end up with product features that don't work the way you intended. So you have to find a way back into the network or take the developer out of their flow. What you're often trying to do is meet someone where they are, in their workflow. But because of these restrictions, they have to log into your product to see what's happening, because we couldn't deliver our value to you in that response request cycle.
Matthew Gregory: The opposite of this is also true. You could have the customer expose their data or their process with an endpoint that they're hosting. The SaaS product can reach out to that endpoint to trigger some action, fetch data, or do analysis. How would that work?
Mrinal Wadhwa: You could tell the customer to put their source code repo on a public API endpoint on the internet and call it whenever you need to. The customer sends me an event, or I can proactively go analyze it by calling it and fetching the code or data. The problem is that customers never want to do that. It's really sensitive information that they don't want to expose, or they can't because of internal compliance or security requirements. They're unwilling to expose these endpoints on the internet. So you end up in this deadlock situation where you either need to limit your value only to things that happen or convince the customer to open an endpoint and have them set up IP whitelisting and other controls. Even in that case, things aren't safe so it takes very long to kind of navigate that set of hurdles.
Glenn Gillen: It’s limiting from a product strategy perspective as well. You're trying to continuously provide value to your customers and to build a product that is constantly making your customers better. You're naturally constrained now to being reactive to actions they're taking. You can't be proactive about anything. In the use case where you hook into a CI-CD workflow, customers change code, but not all the code all the time, so you're not always going to get events. Meanwhile, the world out there in the threat landscape is constantly changing, and if you detect, as the SaaS vendor, that a dependency has a vulnerability, how do you let your customer know? You don't have a window into that experience to create a pull request as we have with some of our dependency checks to bump a version immediately. You have to sit there and wait and hope that someone pushes a commit to the right repo so you get that window of opportunity to come back to them with an error.
Mrinal Wadhwa: That's a really good example. We can only notify them about a vulnerability if they make a change to their code base and run a CI workflow. Whereas, if we learn that a vulnerability has happened, as the SaaS vendor that is analyzing their code, and know their dependency tree the moment we learn it, we could have created a pull request if we had that other path back, but we can't. So that's a good example of a missed opportunity to add value to the end customer.
Matthew Gregory: You're both talking about a unique use case that you're zooming in on. You're presuming the data that we need to access as the SaaS product is source code. It could be an analytics engine, a security auditing tool, or a Dependabot type of source code pipeline sort of tool. What I like about this mental model is thinking about the decisions that that customer has already made. If their code is living in their own cloud or on-prem environment, that means they're not using GitHub.com, except as a private repo. They've already decided that they don't want Microsoft/GitHub to have possession of their code. That sets up a persona for the customer. What are they thinking about where they would make that decision to keep their data as close as possible?
Mrinal Wadhwa: It’s usually information that is really sensitive. It could be code, it could be customer health records. It might be a system where they are okay to allow analysis of something inside that database, but they don't want to hand over that database to a SaaS platform. There's a variety of scenarios. Typically they are large companies that are serving customers in the financial or healthcare domain and are subject to strict regulatory requirements.
Matthew Gregory: How do you think about this as a product manager, Glenn? You were the product lead on Terraform Cloud, you were connecting to customer systems, and running a SaaS product. What were you thinking about when you were fetching data from your customers? What were the concerns that you had?
Glenn Gillen: There's a bunch. We started with the reactive model. I think there's a crawl, walk, run approach to development, but the reactive to a webhook is definitely crawl. As soon as you come into contact with any medium or large-scale customer, they want you to be more proactive. And then you have the constraint of the customer not wanting it on the public internet. They have private VPCs and you're trying to manage their resources. How do we manage that? I have experience with providing IP ranges and asking customers to open their network. It's a mess for everyone involved because you don't have strong guarantees that the IP pool will remain the same. It’s a difficult product problem for our SRE or ops team, who want flexibility to change IP addresses in that range, or to fail over to a different one. Or they can’t move an IP because of how they manage it. So now you end up building an API that reports on the IP ranges. And you tell the customer, by the way, if you want to integrate you need to open your firewall to these IP ranges and also build tooling to automate it because we're gonna give you 48 hours notice of any change. The customer needs to hit the API once a day and react to it to make sure that they don't cause an outage with the integration. Whatever approach you end up taking, normally you end up in a place where you need to connect two applications but don’t have a great solution. And then you provide your customer with a bunch of network-level stuff to set up, and they go solve it, because you can't make your app talk in a way that meets their compliance requirements. So now it's the customers' problem. It's a really bad product experience, I've always hated ending up in that space. It's kind of gross.
Mrinal Wadhwa: That example illustrates the problem in the other direction as well. One side is that the customer doesn't want to expose their things on the internet. But for this type of customer with sensitive data, they also don't want to hit arbitrary public endpoints. In that example, you've told them to hit a specific public endpoint and you keep it at a specific IP. Now you’ve asked them to manage a white list of that IP, and it turns out that managing that white list turns into a nightmare. In either direction, these endpoints are public when just two businesses are talking to each other. There's no reason for everyone else on the internet to have a way to access this data. We're trying to avoid that. Both of these endpoints becoming public on the internet creates a hassle for the end customer and the product team, and it becomes a nightmare from there on out.
Glenn Gillen: One of the things I used to hire for when I was hiring product people, is empathy. The product role is ultimately one of empathy and understanding your customers. What I've always hated about these solutions, is that the customer has a very clear requirement of a specific business need that they have good reasons for having, and the solutions are deaf to that. They show no empathy at all. It's almost like saying, “That seems like a you problem. Here's how you solve it yourself. Come back to us when you've opened up your network and compromised on all of the reasons why you made this decision in the first place.”
Matthew Gregory: It ultimately comes full circle. Let's take this crawl, walk, run analogy. Maybe the product starts with just making it functional. We just need to connect the data to our product in some sort of way. Once you get that to work, you eventually get a more mature customer that won't hit or build a public. They need it to be a private, one-to-one connection. And then you give them a bunch of things they have to do to facilitate the connection. It’s on the customer to implement it since they have strict requirements for how they want to connect. If the customer won’t connect to your public endpoint, then you leave all the difficult implementation to the customer. That doesn't last very long, because it turns into a problem when your sales team can't recognize revenue or collect payment because your customer gets stuck at implementation. We have heard about a lot of companies that have deals that are blocked for up to a year, and some of these are public companies. They have gotten their product capabilities to the point where the integration is a customer problem and not built into the product. That's why I like thinking about this from a product manager's point of view. Admittedly, when you're a hammer, you see a world of nails. I'm a product manager, so this immediately jumps off the page to me. Come on, product people, you're not done yet. Make it so that when your sales team closes a deal, the next day the customer is happy. Can you imagine buying something you're super excited about and it doesn't get delivered? Or ending up with a pile of work for the next year to implement?
Glenn Gillen: You mentioned the sales cycles getting stuck, the other thing we’ve seen is what happens when the customers are multi-cloud or hybrid. If you're on AWS, quite often the solution is private link. The customer still needs to spin up infrastructure, which is what slows it down. But the next evolution is that the customer also runs things in GCP. You don't have an answer for that. It's like asking your customer to pick their region and hyperscaler when they sign up. You can't support multi-cloud because there's no common path to doing that unless you go deep into the network stack and try to connect things that way. It's turtles all the way down in terms of bad product experience. Mrinal Wadhwa: What if the customer is not in a cloud? Then there's no answer. At least with AWS, Azure, or Google, there's some answer to connectivity. But oftentimes these types of customers are still transitioning to the cloud, they're still running private data centers. So now there's no answer to that type of connectivity. With private link connectivity could take months to onboard the customer, or they never get started and then they churn. There's a need for something better.
Matthew Gregory: Let's take this one step further. The problem hasn't gone away, there's also your internal support and security team. Let's say you get customers who love your product so much they will go through extreme pain and agony and time to joy to start using your product. But now they're all wiring up their data centers to your SaaS product in completely bespoke, basically random, different ways. All of a sudden you get more mature in the security and infrastructure of your product, and you get more requests to do special things for individual customers. We are talking to someone who describes it as a cookbook of ways that their customers connect their data to their service. And now this is an ongoing liability that you need to maintain in perpetuity because it's now back to being your problem again. So we've now seen two different ways where leaving it to the customer to implement has come back at us twice.
Glenn Gillen: I've been many places where the cookbook of recipes to solve a problem ends up being this hidden risk that you don't realize as a business because your support team is so engaged in making sure customers are successful that they'll run through the cookbook. It's an objectively terrible experience, but no one talks about it anymore because you believe it is a solution. And then a customer churns a year from now, and you ask, what happened there? Well, they had a bad experience all the way through. And you ask why, why did no one tell us? You thought you had this solution. And you do some churn analysis and realize that everyone that's had the same bad experience ends up with the same result, which is you don't see them again after a year because they never got it working or it wasn't to their standards. You've just fallen short of their expectations in a big way. Mrinal Wadhwa: Also, the cookbook path is error-prone in a lot of ways. You could do all the right things and still have an error rate in that workflow. It’s bad security and bad UX along that path.
Matthew Gregory: You're always talking about vulnerability surfaces. This is a massive surface to cognitively maintain. How do you test against it? Think about all the scenario analysis and threat modeling you need to do, it massively expands in an exponential, multidimensional way the number of threats you have to worry about to protect your own SaaS products.
Mrinal Wadhwa: The cookbooks are not even being thought of as part of the product experience. They're being thought off after the fact. Oftentimes they're not even being considered and don’t go through the normal things you go through when thinking about security and vulnerability surfaces, and UX as part of building your product.
Matthew Gregory: Well, this all sounds very complicated. Let's go to the simple solution next and describe how we solve this at Ockam. Obviously, it has to be simple. It's built into our name. In a scenario where we're using Ockam, how does this change?
Mrinal Wadhwa: The primary reason it changes is because with Ockam command we can give an experience to the SaaS vendor's end customer where that customer doesn't need to change anything at the network layer. They can create end-to-end encrypted connectivity to the SaaS vendor in a bidirectional way. So at any point in time, systems inside a customer's environment can call the SaaS vendor's APIs or services, and at any point in time systems inside the SaaS product can call particular services they're authorized to call inside the customer's environment. This is now a fully proactive integration where if the product needs to engage with something private to the customer, they can do it. And the setup takes five minutes, it’s not weeks or months or years. It takes five minutes for both sides to get started. The reason it works is that instead of exposing listening endpoints from either network, we make outgoing connections to a specific endpoint and set up end-to-end encrypted relays over that endpoint. So you can set up these connections that make it so that remote services appear inside your environment, virtually adjacent to where you need to access them.
Glenn Gillen: Back to the product experience side of things, we're not breaking new ground here. Other companies have used this model where you run an agent or some aspect of your platform inside the customer account and that gives you application-level access to what you need to access. What's interesting is that it is a holistic, integrated experience. It's part of the same product experience, you told your customer to go solve this for themselves. You've given them the solution, and all they need to do is run Ockam command. We've packaged up the solution for you. It's super simple, like you said, it takes five minutes. There are plenty of companies that have taken that approach. I've done it in the past as well. But what ends up happening is before you know it, you've got a team of five or more fully staffed to run the infrastructure just to get you into the network. Building your own connectivity agent unblocks a lot of product value, but it's valuable in the long term. You take on an ongoing operational cost to keep this critical infrastructure running, but ultimately it’s undifferentiated. All you've done is allow yourself to get into the customer’s network, and that's not the business you're in. You should be focused on core product functionality.
Matthew Gregory: A lot of agents end up doing some little job, or they're a worker in that customer's environment, but that's all they do. You're still leaving all the implementation of everything that has to happen at the network layer up to the customer to connect to your SaaS service. What makes Ockam unique is we are app-to-app and have this networkless abstraction over the network. There is no IT team. There is no IP allow list, there's no VPN that needs to be set up. There's nothing that needs to be done at a network level to connect applications. You also get to keep it private because it's a one-to-one mapping from the SaaS app to the data or source code repo. So it's a one-to-one, peer-to-peer secure mapping.
Mrinal Wadhwa: People go down this track of building an agent because that's the natural progression of that crawl, walk, run analogy. You feel like the only way you can have the best product experience is to build this agent. But it's not just the agent, it’s all the infrastructure in your SaaS product to make the agent connectivity work. You have to scale it because you need to put it at a lot of customer locations, and make sure it's up all the time. And also do it in a way that your endpoints are not public on the internet, because remember the customer doesn’t want to talk to public endpoints that aren’t end-to-end encrypted. They don't want their stuff to be public. So even if you do the agent part, you are still left with the private connectivity piece that customers want. And in Ockam's case, we tackle both of those answers for you in one easy approach. You don't have to invest a lot of time and energy building all of this and then maintaining it and still not getting to the customer experience that you want to build and deliver.
Matthew Gregory: Also, as a product manager of the SaaS offering, I get one solution that I can give to all the customers. That means we can throw away the cookbook tomorrow. Stop doing all that. Get that entire team doing something productive that's offensive on the security side, instead of purely playing defense all day long. So the cookbook's gone. That second problem I talked about earlier where sales are blocked or the implementation of the solution ends up taking up to a year. In some cases, that time to value gets shrunk down to a matter of hours. Because you don't need to contact the IT team. No security team needs to get involved. We've built all of those pieces and then it's a one-size-fits-all regardless of what cloud you're in, if you're on-prem, if you're in AWS, if you're in Azure, Google, whatever you're doing, it's the same solution for any environment that this data might be living in. So this is another axis where you don't have permutations or implementation variations from customer to customer or even amongst a single customer.
Glenn Gillen: It’s interesting from a sales perspective as well. I've been in the room for a few of those where they ask how we connect to GCP, on-prem, etc. It's always an uncomfortable conversation to have where you don’t have a single solution. There are all these variables in play and like the person's already off drifting. Compare that to Ockam, where you can say, “Here’s how you connect, it’s the same regardless of your environment.” It's a five-second conversation at that point. It doesn't matter. It's the same thing wherever you are. That's exactly how you want those conversations to go. You don't want to introduce friction and let someone's mind wander about how hard it's gonna be.
Matthew Gregory: That was the thing that clicked for me about the power of Terraform seven or eight years ago. I was at Azure, we had just launched Azure resource templates, similar to AWS cloud formation. And I thought, what does this Terraform thing do? You're competing against all the clouds. All of a sudden I realized that Terraform is the universal way of writing one template and deploying it everywhere. Obviously, if you were doing anything complicated, you would go straight to Terraform. Even if you're only deploying in AWS or Azure, you would still use Terraform because you’re going to go multi-cloud at some point. We're picking the universal tool from the get-go. I remember having that ‘aha’ moment with Terraform years ago where I knew it would be huge because this is how you do infrastructure as code universally, everywhere with one tool. And we all know how that played out.
Glenn Gillen: It’s the cognitive load aspect. Knowing that we might not need this capability tomorrow, but if we need it next week, the gap I have to close is much, much smaller. It's so freeing to like, to know you already have a solution for it.
Matthew Gregory: So that takes us through how we could set up connectivity between our SaaS product to our customer's data that we need to access. We've seen the crawl, walk, run, and the pain of that journey along the way. Hopefully, we've laid out why Ockam allows you to skip straight to the end. It's the easiest, the most secure, and provides the best customer experience. As I said earlier, we are product managers and we build for that product manager that's trying to develop a product that delights customers, gives them fast time to value, and makes things simple. It's the name of our company.
curl --proto '=https' --tlsv1.2 -sSfL https://install.command.ockam.io | bash
source "$HOME/.ockam/env"
ockam enroll# Enrollment ticket for Ockam Outlet Node
ockam project ticket --expires-in 10h --usage-count 1 \
--attribute amazon-redshift-outlet \
--relay redshift \
> "outlet.ticket"
# Enrollment ticket for Ockam Inlet Node
ockam project ticket --expires-in 10h --usage-count 1 \
--attribute amazon-redshift-inlet \
> "inlet.ticket"{
"http-server-port": 23345,
"relay": "redshift",
"tcp-outlet": {
"to": "$REDSHIFT_ENDPOINT",
"allow": "amazon-redshift-inlet"
}
}{
"http-server-port": 23345,
"tcp-inlet": {
"from": "0.0.0.0:15439",
"via": "redshift",
"allow": "amazon-redshift-outlet"
}
}services:
ockam:
image: ghcr.io/build-trust/ockam
container_name: redshift-inlet
environment:
ENROLLMENT_TICKET: ${ENROLLMENT_TICKET:-}
OCKAM_LOGGING: true
OCKAM_LOG_LEVEL: info
command:
- node
- create
- --enrollment-ticket
- ${ENROLLMENT_TICKET}
- --foreground
- --configuration
- |
tcp-inlet:
via: redshift
allow: amazon-redshift-outlet
from: 127.0.0.1:15439
network_mode: host
psql-client:
image: postgres
container_name: psql-client
command: /bin/bash -c "while true; do sleep 30; done"
depends_on:
- ockam
network_mode: hostENROLLMENT_TICKET=$(cat inlet.ticket) docker-compose up -ddocker exec -it redshift-inlet /ockam node show# Connect to the container
docker exec -it psql-client /bin/bash
# Update the *_REPLACE placeholder variables
export PGUSER="PGUSER_REPLACE";
export PGPASSWORD="PGPASSWORD_REPLACE";
export PGDATABASE="PGDATABASE_REPLACE";
export PGHOST="localhost";
export PGPORT="15439";
# list tables
psql -c "\dt";
# Create a table
psql -c "CREATE TABLE __test__ (key VARCHAR(255), value VARCHAR(255));";
# Insert some data
psql -c "INSERT INTO __test__ (key, value) VALUES ('0', 'Hello');";
# Query the data
psql -c "SELECT * FROM __test__;";
# Drop table if it exists
psql -c "DROP TABLE IF EXISTS __test__;";docker compose down --volumes --remove-orphans#[derive(Encode, Decode)]
#[cbor(transparent)]
pub struct Identifier(#[cbor(n(0), with = "minicbor::bytes")] pub [u8; 20]);
/// SHA256 hash of a Change, truncated to its first 20 bytes.
#[derive(Encode, Decode)]
#[cbor(transparent)]
pub struct ChangeHash(#[cbor(n(0), with = "minicbor::bytes")] pub [u8; 20]);
#[derive(Encode, Decode)]
#[cbor(transparent)]
pub struct ChangeHistory(#[n(0)] pub Vec<Change>);
#[derive(Encode, Decode)]
pub struct Change {
#[cbor(with = "minicbor::bytes")]
#[n(0)]
pub data: Vec<u8>,
#[n(1)]
pub signature: ChangeSignature,
#[n(2)]
pub previous_signature: Option<ChangeSignature>,
}
#[derive(Encode, Decode)]
pub enum ChangeSignature {
#[n(0)]
EdDSACurve25519(#[n(0)] EdDSACurve25519Signature),
#[n(1)]
ECDSASHA256CurveP256(#[n(0)] ECDSASHA256CurveP256Signature),
}
#[derive(Encode, Decode)]
pub struct ChangeData {
#[n(0)]
pub previous_change: Option<ChangeHash>,
#[n(1)]
pub primary_public_key: PrimaryPublicKey,
#[n(2)]
pub revoke_all_purpose_keys: bool,
#[n(3)]
pub created_at: TimestampInSeconds,
#[n(4)]
pub expires_at: TimestampInSeconds,
}
#[derive(Encode, Decode)]
pub enum PrimaryPublicKey {
#[n(0)]
EdDSACurve25519(#[n(0)] EdDSACurve25519PublicKey),
#[n(1)]
ECDSASHA256CurveP256(#[n(0)] ECDSASHA256CurveP256PublicKey),
}
#[derive(Encode, Decode)]
pub struct VersionedData {
#[n(0)]
pub version: u8,
#[cbor(with = "minicbor::bytes")]
#[n(1)]
pub data: Vec<u8>,
}
#[derive(Encode, Decode)]
#[cbor(transparent)]
pub struct TimestampInSeconds(#[n(0)] pub u64);#[derive(Encode, Decode)]
pub struct PurposeKeyAttestation {
#[cbor(with = "minicbor::bytes")]
#[n(0)]
pub data: Vec<u8>,
#[n(1)]
pub signature: PurposeKeyAttestationSignature,
}
#[derive(Encode, Decode)]
pub enum PurposeKeyAttestationSignature {
#[n(0)]
EdDSACurve25519(#[n(0)] EdDSACurve25519Signature),
#[n(1)]
ECDSASHA256CurveP256(#[n(0)] ECDSASHA256CurveP256Signature),
}
#[derive(Encode, Decode)]
pub struct PurposeKeyAttestationData {
#[n(0)]
pub subject: Identifier,
#[n(1)]
pub subject_latest_change_hash: ChangeHash,
#[n(2)]
pub public_key: PurposePublicKey,
#[n(3)]
pub created_at: TimestampInSeconds,
#[n(4)]
pub expires_at: TimestampInSeconds,
}
#[derive(Encode, Decode)]
pub enum PurposePublicKey {
#[n(0)]
SecureChannelStatic(#[n(0)] X25519PublicKey),
#[n(1)]
CredentialSigning(#[n(0)] VerifyingPublicKey),
}#[derive(Encode, Decode)]
pub struct Credential {
#[cbor(with = "minicbor::bytes")]
#[n(0)]
pub data: Vec<u8>,
#[n(1)]
pub signature: CredentialSignature,
}
#[derive(Encode, Decode)]
pub enum CredentialSignature {
#[n(0)]
EdDSACurve25519(#[n(0)] EdDSACurve25519Signature),
#[n(1)]
ECDSASHA256CurveP256(#[n(0)] ECDSASHA256CurveP256Signature),
}
#[derive(Encode, Decode)]
pub struct CredentialData {
#[n(0)]
pub subject: Option<Identifier>,
#[n(1)]
pub subject_latest_change_hash: Option<ChangeHash>,
#[n(2)]
pub subject_attributes: Attributes,
#[n(3)]
pub created_at: TimestampInSeconds,
#[n(4)]
pub expires_at: TimestampInSeconds,
}
#[derive(Encode, Decode)]
#[cbor(transparent)]
pub struct CredentialSchemaIdentifier(#[n(0)] pub u64);
#[derive(Encode, Decode)]
pub struct Attributes {
#[n(0)]
pub schema: CredentialSchemaIdentifier,
#[n(1)]
pub map: BTreeMap<Vec<u8>, Vec<u8>>,
}curl --proto '=https' --tlsv1.2 -sSfL https://install.command.ockam.io | bash
source "$HOME/.ockam/env"
ockam enroll# Enrollment ticket for Ockam Outlet Node
ockam project ticket --expires-in 10h --usage-count 1 \
--attribute amazon-msk-kafka-outlet \
--relay kafka \
> "outlet.ticket"
# Enrollment ticket for Ockam Inlet Node
ockam project ticket --expires-in 10h --usage-count 1 \
--attribute amazon-msk-kafka-inlet \
> "inlet.ticket"{
"relay": "kafka",
"kafka-outlet": {
"bootstrap-server": "$BOOTSTRAP_SERVER_WITH_PORT",
"allow": "amazon-msk-kafka-inlet"
}
}
{
"kafka-inlet": {
"from": "127.0.0.1:9092",
"disable-content-encryption": true,
"avoid-publishing": true,
"allow": "amazon-msk-kafka-outlet",
"to": "/project/default/service/forward_to_kafka/secure/api"
}
}services:
ockam:
image: ghcr.io/build-trust/ockam
environment:
ENROLLMENT_TICKET: ${ENROLLMENT_TICKET:-}
OCKAM_DEVELOPER: ${OCKAM_DEVELOPER:-false}
OCKAM_LOGGING: true
OCKAM_LOG_LEVEL: info
command:
- node
- create
- --foreground
- --node-config
- |
ticket: ${ENROLLMENT_TICKET}
kafka-inlet:
from: 0.0.0.0:19092
disable-content-encryption: true
avoid-publishing: true
allow: amazon-msk-kafka-outlet
to: /project/default/service/forward_to_kafka/secure/api
network_mode: host
kafka-tools:
image: apache/kafka
container_name: kafka-tools
command: /bin/sh -c "while true; do sleep 30; done"
depends_on:
- ockam
network_mode: hostENROLLMENT_TICKET=$(cat inlet.ticket) docker-compose up -d# Exec into tools container
docker exec -it kafka-tools /bin/bash
# List topics
/opt/kafka/bin/kafka-topics.sh --list --bootstrap-server localhost:19092
# Create a topic
/opt/kafka/bin/kafka-topics.sh --create --topic test-topic --bootstrap-server localhost:19092 --partitions 1 --replication-factor 1
# Publish a message
date | /opt/kafka/bin/kafka-console-producer.sh --broker-list localhost:19092 --topic test-topic
# Read messages
/opt/kafka/bin/kafka-console-consumer.sh --bootstrap-server localhost:19092 --topic test-topic --from-beginning
Example: cluster-name.xxxx.region.redshift.amazonaws.com:5439 or workgroup.account.region.redshift-serverless.amazonaws.com:5439
Note: If you are copy pasting the Redshift Endpoint value from the AWS Console, please make sure to remove the /DATABASE_NAME at the end as it is not needed
JSON Node Configuration: Copy and paste the below configuration. Note that the configuration values match with the enrollment tickets created in the previous step. $REDSHIFT_ENDPOINT will be replaced during runtime.


Subnet ID: Select a suitable Subnet ID within the chosen VPC that has access to Amazon MSK cluster.
EC2 Instance Type: Default instance type is m6a.8xlarge because of the predictable network bandwidth of 12.5 Gbps. Adjust to a small instance type depending on your use case
Ockam Configuration
Enrollment ticket: Copy and paste the content of the outlet.ticket generated above
Amazon MSK Bootstrap Server with Port: To configure the Ockam Kafka Outlet Node, you'll need to specify the bootstrap servers for your Amazon MSK cluster. This configuration allows the Ockam Kafka Outlet Node to connect to the Kafka brokers.
Go to the MSK cluster in the AWS Management Console and select the cluster name.
In the Connectivity Summary section, select View Client information, copy the Bootstrap servers (plaintext) string with port 9092.
JSON Node Configuration: Copy and paste the below configuration. Note that the configuration values match with the enrollment tickets created in the previous step

Ockam Secure Channels are mutually authenticated and end-to-end encrypted messaging channels that guarantee data authenticity, integrity, and confidentiality.
To , applications need end-to-end guarantees of data authenticity, integrity, and confidentiality.
In previous sections, we saw how Ockam and , when combined with the ability to model and , make it possible to create end-to-end, application layer protocols in any communication topology - across networks, clouds, and protocols over many transport layer hops.
Ockam is an end-to-end protocol built on top of Ockam Routing. This cryptographic protocol guarantees data authenticity, integrity, and confidentiality over any communication topology that can be traversed with Ockam Routing.
Distributed applications that are connected in this way can communicate without the risk of spoofing, tampering, or eavesdropping attacks, irrespective of transport protocols, communication topologies, and network configuration. As application data flows across data centers, through queues and caches, via gateways and brokers -
Matthew Gregory:
Welcome to the Ockam podcast, this is going to be a fun one today. In most of our previous podcasts, we talked about the magic of Ockam. We talked about the abstractions, the user experience of Ockam, and about what you get with Ockam. In this one, we're going to show you the trick and how it all works. With me today, as usual, I have Glenn and Mrinal.
We're going to walk through how Ockam works. In previous episodes, we talked about how easy it is to use Ockam. You have two applications or an application and a database, and you want to make a secure connection between them. They're in different networks. All you have to do is install a piece of Ockam software next to the application, install a piece of Ockam software next to the database, and subscribe to Orchestrator. Magic happens, and now you have an end-to-end encrypted, mutually authenticated portal that connects your application to data.
That's it. And in fact, we've had customers say this to us before. When building Ockam into their systems, they're like, “Wait, that's it? It just works? How did that happen?”
That’s what this episode is about. Behind Portals, virtual adjacency, and networkless, let's dive into what this all means. With that, Mrinal, what do we have in this example and how are we going to walk through things here today?
Our example: connecting a remote Postgres database
Mrinal Wadhwa: We’re trying to connect things in different environments and different networks. We have to set up secure communication between them. That's our goal. To do that, Ockam provides a collection of protocols that work together to make the secure connection happen and enable end-to-end mutual trust between the two things that are talking to each other.
We're going to talk about what those protocols are and how they work together. And to do that, we'll use an example. The example we're setting up is that there are two companies, Analysis Corp and Bank Corp.
Bank Corp has a database and, Analysis Corp needs access to that database. The database is running in Bank Corp's private AWS VPC and Analysis Corp. is running in Azure, and they need to talk to this database that is at Bank Corp. This could be for several reasons, for example, Analysis Corp provides a service to Bank Corp.
So these connections need to happen. And these two networks are completely closed down. They're in different clouds, the networks are completely closed down, and we want to make the connection happen. If you look at Fig. 1, we show this end-to-end encrypted portal to Postgres.
This Postgres is sitting in Bank Corp's network, and the Postgres client is sitting in Analysis Corp’s network, and the connection happens. For the rest of this episode, we'll focus on how that green line, the end to an encrypted portal, is established and what is involved in it.
Ockam is a stack of protocols. There is a collection of protocols inside Ockam that move end-to-end encrypted data. And the stack of protocols does two things. One, move end-to-end encrypted data, from anywhere to anywhere. And two, establish trust between all the parts that are talking to each other. Let’s take a look at the Ockam collection of protocols.
At the bottom, we have nodes and workers. Ockam nodes are the pieces of software you run in a specific environment. This software can talk to other Ockam nodes that may be in another network. And Ockam nodes are written in a way that they can run in big massive cloud computers or they can run in tiny microcontrollers. They are independent of the runtime environment and are very efficient and can adapt to those environments. Inside an Ockam node are workers, and there can be millions of workers inside a single Ockam node. These are concurrent entities that have their own state and you can send messages to them. In response to those messages, those workers can change their state or they can respond to the messages with a reply. So that's what's going on inside a node: workers are talking to other workers. Those workers can be inside the same node, or workers can send messages to workers on other nodes in a different environment. They do this through a transport, which might be a TCP connection, a UDP connection, a web socket, etc.
And to send those messages, the protocol that's used is called Ockam Routing. And what Ockam Routing does is it sends those messages along, not just over a single transport connection, but it can do that over multiple hops of transport layer connections. What routing does is, every hop along the path of a message, it manipulates the routing information attached to the message.
There are two pieces of routing information attached to each message. One is called the onward route, the other is called the return route. And every hop, the message removes its address from the onward route and adds its address to the return route. This is a very simple protocol, every message carries these two pieces of metadata: an onward route (where is the message going) and a return route (where to send replies to that message). Every hop manipulates these two fields as the message moves through various hops. This very simple protocol allows us to set up lots of different types of topologies because it's sitting on top of the transport and node layers. Here we see an example of such a topology where three nodes are talking to each other. These three nodes may be in a different network and they might be going through a relay. We’ll talk more about that shortly. So far we've looked at what nodes are doing: running lots of concurrent workers. Workers on one node can send messages to workers on other nodes that may be many hops away, because of routing. And then on top of routing, we have a protocol called Secure Channels.
Secure Channels are a way to set up an end-to-end encrypted, mutually authenticated connection. It's like Signal or some of these other secure communication protocols. We use very similar primitives to set up our secure channels. They're well-proven, formally verified cryptographic primitives. In a Secure Channel, the two parties involved have cryptographic keys to authenticate each other. They do a handshake to establish a shared secret, and then they use that shared secret to encrypt messages to each other. This is a very simplified view of what goes into it because we need to make sure that all of these messages are protected against someone on the wire snooping, manipulating, or recording messages. So there's a lot of cryptography that goes into making the secure channel happen and making sure it's safe. Simply put, it's a handshake between two entities to establish a shared secret so they can start encrypting messages to each other.
What's interesting about secure channels is that it is sandwiched between two layers of routing.
The benefit of that is that secure channels can be tunneled inside other secure channels. Not only can we set up end-to-end encrypted channels from anywhere to anywhere, but we can also have multiple channels involved along the path. That way, different parties along the way can authenticate each other and have guarantees against each other. This enables end-to-end guarantees between two applications.
Finally, there are Portals which we will look at more closely at the end. What portals do is take an existing protocol like a TCP client or a TCP server, Postgres in our example, and they move that data over Ockam. It could be any Ockam topology, but they do it in a way that it's transparent to the client and the server involved. So when we're moving Kafka over Ockam, the Kafka client doesn't know about Ockam. Or when we're moving TCP over Ockam, the TCP server and client don't know anything about Ockam. That's the benefit of Portals.
At this point, we’ve taken an abstract look into these protocols that enable this end-to-end encrypted flow of data. That's not sufficient for end-to-end trust in the data. For that, we need a whole other set of pieces, involved. We looked at the bottom left corner of this picture where we have nodes and secure channels, which give us a foundation to start building trust.
To go all the way, we need cryptographic identities for every participant in the system, we need credentials and credentialing authorities (to make sure we can say who has what attributes), and an authority that can attest to those attributes. We need mechanisms to set up access controls where we can declare which specific entities, with what credentials are allowed to access a particular service or worker. We can build policies with attribute-based access controls on various things. This makes it easy to scale this trust infrastructure. Enrollment also makes it easy to scale this trust infrastructure, because you need a mechanism to bootstrap trust. That is a very hard problem. How do you, on the first go, trust somebody? What is the mechanism? Enrollment protocols are a way to bootstrap trust in a large fleet of applications or a distributed set of things.
Matthew Gregory: Mrinal, you said something really interesting there. There are a lot of pieces around cryptographic identifiers, vaults, access controls, policies, and enforcement. Could you describe how this is different from what we may have seen in the past? Where there's a credential authority, or where keys are generated and then distributed across the network. Can you explain how this stack of protocols in our trust layer is fundamentally different from what we have seen in the security space before?
Mrinal Wadhwa: Our aim with trust is that every entity involved controls its own secret keys. There is no central place that gives out secrets. Right? The benefit of that is that the secrets can be kept a lot safer. If I have control of my identity key and I keep it in a KMS, no one else has that key. It's easy to guarantee that no one can authenticate as me. However, if I create a system where some central place has my keys and it gives me my keys, then an attacker that compromises the central place can pretend to be me. The problem with that is now there is this honeypot where there are keys, not just for me, but for the entire fleet of applications at a company. That target is now really attractive for attackers, and if it gets attacked or compromised, the impact or blast radius of that target is also very big. Instead, with Ockam every entity has its own secret keys. For an attacker to compromise our entire system, they would have to go to every entity and compromise every secret in our system. It becomes very hard to enter from one place and then take over an entire system. That's the benefit of this mechanism where every entity controls their own keys. However, we still have to establish trust. All these entities have their own keys, but what is their mechanism for deciding to trust another party or not?
And that's where credentials play a role. A credential is an attestation from one entity about another entity, and it's a cryptographically signed attestation. An authority might say this entity is a member of this project. The benefit of that is that other members of the project can have an access control rule, which says if this particular entity says someone is a member of this project, then allow it to access the service. So, credentials are a mechanism to scale trust in an environment where keys are now distributed and everybody has an individual cryptographic key.
Glenn Gillen: That brings up an interesting point, Mrinal. You talked about bootstrapping trust, and the attestation in particular jumped out at me. If a credential authority says to trust something, how can you trust that message? That’s where having secure connections and cryptographically provable attestations is critical. Could you delve into that? I think that's easy to miss in what you just said.
Mrinal Wadhwa: That is why enrollment protocols are a critical piece of doing this at scale. It sounds simple to establish trust between two entities and build your system from there. But the problem is, how does that first trust get established? When you try to build systems that need trust at scale, you need to define exactly what those mechanisms are. And how does trust go from one entity to two entities to 10 entities to 10,000 entities? We need a mechanism for that. And that's what enrollment protocols are. Enrollment protocols use the same building blocks, they're a mechanism to scale this infrastructure. For example, I might start by trusting a particular credentialing authority, such as Ockam Orchestrator. Once I have that trust, I could ask Ockam Orchestrator to tell me who else I should trust. If I can establish a secure channel with Ockam Orchestrator, Ockam Orchestrator can give me some policy that says, to trust anyone who belongs to the same project as you. Then I can ask, what defines who belongs to the same project, node, or system as me? That's where trust anchors are important. My anchor might be a particular credentialing authority, and if it says someone belongs to my project, then that’s my basis for deciding who belongs to my project. With these very simple steps, we're able to go from just trusting Orchestrator, to trusting a credentialing authority, to trusting anyone who is a member of the project. And now every member of the project can run an enrollment protocol with the credentialing authority to get a credential that proves they’re a member of the project. Once this has happened, each member can trust each other. So we went from trusting one thing to trusting two things to suddenly trusting 10,000 things. But we didn't create an N-squared relationship problem. Instead, we just did one-to-one exchanges and suddenly the system could scale.
Glenn Gillen: And you've done that over secure channels, which enable it to happen in a way that can’t be tampered with. Once initial trust is established, further trust can be built on top of it, and the system scales.
Mrinal Wadhwa: Precisely. You need one starting point of trust, and then you can scale from there. Secure channels can happen from anywhere to anywhere, because of Ockam routing, we're not constrained by different points of deciding trust and setting up connections. We just need one bootstrap point and we can very quickly scale to very large systems.
Matthew Gregory: Mrinal, let's go back to the original diagram from the beginning of the podcast, where we had Analysis Corp and Bank Corp. They have a Postgres database and their analysis application. And they need to make this connection between Azure and AWS. How are we going to do this with Ockam?
Mrinal Wadhwa: To make this connection happen, both sides need to set up an Ockam node and then some magic will happen. And that's what we're going to look at: what happens to make the connection? Before we can get both sides to set up these Ockam nodes, we need to do some initial setup of our own.
At the very beginning, an administrator downloads Ockam command on their laptop and enrolls with Ockam Orchestrator. This creates a brand new Ockam Orchestrator project. A project is another Ockam node, but it's a very large, highly scalable, managed Ockam node that provides two services.
It provides a credential authority that decides who is a member of the project, and it provides a relay service that facilitates connections across various environments. So the administrator comes in, installs Ockam command on their laptop, and runs Ockam enroll. This signs them up with Ockam Orchestrator, and then a project is provisioned for them.
This project has an authority service and a relay service, but no one is talking to these services yet. Now this administrator needs to set up nodes in these two environments. There's Bank Corp and there's Analysis Corp.
Let’s say Bank Corp set up the initial Ockam Orchestrator project. Inside their network, they can set up the first Ockam node. A simple way to do that is to run Ockam enroll again inside the machine where you want to set up the Ockam node.
Since you're the administrator, the administrator is already enrolled, you can enroll again and sign up from a different machine.
But usually, this doesn't scale. If I'm the administrator of Bank Corp, I can't go to Analysis Corp’s network and enroll as an admin. We need some other mechanism. This is where we'll see our first enrollment protocol, which we call one-time-use enrollment tokens. This is the typical mechanism of scaling deployments.
So as an admin, I run Ockam Enroll. I set up an Ockam Orchestrator project. And then I generate an enrollment token and I give it to the applications I want to provision. The Bank Corp administrator generates an enrollment token and they pass it to the provisioning node inside their network.
Similarly, the Bank Corp administrator can generate a one-time use enrollment token and give it to someone at Analysis Corp to enroll in the Ockam Orchestrator project. These tokens are one-time use and they are time-limited. We can kind of control the risk profile of these tokens.
So Bank Corp sets up their node, and let's see what's going on inside that node. The first thing that happens is a cryptographic key is generated. And a cryptographic Ockam identity is generated on that machine. The secret keys of this identity are put in a vault.
This vault could be on the file system of that node, or it could be an external KMS or an HSM. All sorts of things are supported. But this cryptographic identity is generated using the enrollment token and is then enrolled with the authority inside your Ockam Orchestrator project.
This project authority then issues a credential to the entity stating that it's a member of the Bank Corp project. All of that happens when someone enrolls with an enrollment token. Once they've enrolled, they're now a member of the project and they can use the services of the project.
The next thing they do is create a TCP outlet. The TCP outlet, when it receives a message, will unwrap all the Ockam routing information, take the raw TCP part of that message, and deliver it to Postgres. This outlet is like a companion to Postgres, it's sitting next to Postgres.
The outlet could be on the same machine, it could be on a machine that's a sidecar to that machine or sidecar container, or it could be in the same network. A lot of variations are possible. Regardless of the setup, the outlet will receive messages, unwrap all the routing information, and send the TCP segment to Postgres.
That's what the outlet is doing. It's given the address of the Postgres server, which is port 5432, and it's sitting there waiting for messages. The next thing we do is create a relay at the address Postgres. We talk to the relay service in our Ockam Orchestrator project, and we tell it to create a relay for us.
This is a very important step. If we had control over the network of Bank Corp, we could simply open the Postgres database port to the Internet. We could open our firewall and expose port 5432 on the Internet, and then anyone can come from the Internet and access that port.
That would be the simple way of doing this. The problem with that is now your database is on the Internet, and unless you do a lot of things to protect it, it can very easily be compromised. You get attacked and scanned, and all sorts of things will happen. The risk of compromising your data becomes very high.
Typically IT or compliance departments at Bank Corp will not allow the database port to be exposed to the internet. If you can’t expose the database to the internet, how does Analysis Corp reach it? This is where relays are helpful. When we create a relay, it creates an outgoing TCP connection to the project node in Ockam Orchestrator. Because it is an outgoing connection, and machines inside networks make outgoing connections all the time, it's allowed. They talk to the internet, they download software, they do all sorts of things. Outgoing connections are allowed in most firewalls.
So we make an outgoing connection to the project node, and then over that outgoing TCP connection, Ockam sets up a mutually authenticated connection. The first step to do that is to decide if we trust the Ockam Orchestrator project node. We set up a mutually authenticated secure channel, which is this green part in the picture. The project presents a credential over a secure channel so that we are certain we are talking to our project.
Inside that project is the relay service. I tell the relay service that whenever messages arrive with the address ‘Postgres’, send them back to me over the TCP connection we set up.
So Bank Corp makes an outgoing TCP connection to the project, and it tells the relay service inside the project to send messages with the address ‘Postgres’ to the node inside Bank Corp’s network. When these messages arrive, the outlet unwraps the message and delivers the TCP segment to Postgres.
Let's recap what's going on here. We set up a brand new node inside Bank Corp. We created an outlet from this node to Postgres. And then we created a relay to this node inside our Orchestrator project. So we've set up half of our topology, but no one is sending messages to this relay address yet, so nothing's happening. Even in this basic setup, all of these protocols were involved. We set up a node, there were workers inside the node. We set up a TCP transport connection. We use routing to set up a secure channel with our Orchestrator project. The benefit of this stack of protocols is that the route to the Orchestrator project doesn't need to be a single hop. It can be any number of topologies. You might be running multiple private subnets, and you might need to jump through multiple subnets before you reach the Orchestrator project.
Or your Bank Corp node is in a private data center, and it might first have to go through a VPC before making external connections. All of these topologies can be set up because secure channels are sitting on top of routing. Now let's see what Analysis Corp does. They get an enrollment token. This enrollment token is used to enroll with the same Orchestrator project. When enrollment is happening, we generate a cryptographic identity. We take the secret keys of that identity and store them in a vault, which could be a KMS.Then we use that identity plus the enrollment token to talk to the authority of the project. When Analysis Corp provides their identity and credentials to the authority, the authority checks that the token is valid and gives back an attestation that the entity with this specific cryptographic identity is a member of the Bank Corp Project.
The benefit of this is that Bank Corp can distribute these enrollment tokens and allow access to any number of companies to their project. In this particular case, they gave a token to Analysis Corp and Analysis Corp now can talk to services inside Bank Corp's project.
Then Analysis Corp creates a TCP inlet, which starts listening on port 15432 locally. This inlet creates a portal to the Postgres address inside the project's relay. Under the hood, this gets translated into complex routes, but on the command line you just provide the address inside the relay, and Orchestrator will figure out the rest of the route on its own.
So, even though we wrote this very tiny command, a bunch of stuff happens. Let’s talk through what happens in layers. First, a listening TCP server is started inside that node at port 15432. This listening server is sitting there listening for raw TCP messages. It takes the raw TCP messages, wraps them in Ockam routing information, and sends them to the relay. From the relay, the message goes to the outlet of the portal on the other end. So the portal has two parts, an inlet and an outlet, and these two parts are now coming together to create the portal that we wanted to set up. The inlet is listening and will take raw TCP messages, wrap them in Ockam routing, and send them to the outlet. The outlet takes the Ockam routing messages, unwraps them, and sends the raw TCP segment to the Postgres service. That’s what the portal is doing.
In the middle is a lot of other protocol work that needs to happen to make this safe and secure. Let’s go into those layers.
The first thing that the node inside Analysis Corp does is set up a secure channel with the Orchestrator project. Over this secure channel, it sends messages to the Postgres relay. Through this Postgres relay, it sets up a second secure channel with the node that is inside Bank Corp. Analysis Corp is actually sending data through three different secure channels in this topology.
The first secure channel was set up by Bank Corp to the Orchestrator project. The second secure channel was set up by Analysis Corp to the Orchestrator project. And then a third, innermost secure channel was set up from Analysis Corp all the way, end-to-end, to Bank Corp.
This means that even though the Orchestrator project is in the middle, it can't tamper with any of the data. It can't manipulate any of the data. it can't see any of the data, it can't spoof authentication. The project is just an encrypted relay in the middle, it’s like a handover. However because both sides made outgoing TCP connections, they were able to connect to the relay and then use the relay as a mechanism to deliver messages to each other.
And they did it over an end-to-end encrypted, mutually authenticated secure channel. Hence the relay cannot tamper anything, and anyone on the Internet cannot tamper anything. Plus, the Postgres server is not exposed to the Internet. We now have an end-to-end encrypted portal that has an inlet inside AnalysisCorp and an outlet inside BankCorp. Now we can send Postgres requests through this portal. This Postgres request starts as a raw Postgres query, over TCP. It reaches the inlet and gets turned into an Ockam routing message. This Ockam routing message gets end-to-end encrypted for Bank Corp. It gets sent down this innermost channel, it goes over to the relay, the relay then delivers the message to Bank Corp, the secure channel responder there unencrypts the message, it then delivers the message to the outlet, the outlet removes all Ockam routing information, and a raw TCP segment then gets delivered to Postgres. If Postgres replies, the reply takes the same path back and it turns into raw TCP that's delivered to the Postgres client. So that's what an end-to-end encrypted portal is doing. There are a couple of things to highlight here.
Portals can take any existing protocol and carry it over Ockam. Ockam brings an array of formally proven guarantees: end-to-end encryption, mutual authentication, forward secrecy, protection from tampering, protection from key compromise and impersonation. This means your existing applications can get all of these guarantees by starting a piece of Ockam software next to your server and another little piece of software next to your client.
And it works transparently. You don't have to change any of your code, you may just have to change the port number and address your application is talking to. That's what the portal is giving us.
Glenn Gillen: I look at this picture and think about all the customer conversations I have, where they might say, “We already have end-to-end encryption, we’re using TLS everywhere.” How is this different? With TLS, if you draw this picture the Orchestrator relay might be a load balancer. The client talks to the load balancer, which does TLS on the backhaul. This is different though, right?
Mrinal Wadhwa: Yeah. Relays are kind of like load balancers. You could argue that because someone has TLS, they have end-to-end encryption. What that misses, is that using TLS with a load balancer in the middle is like using one of the Ockam secure channels, the light green one in our diagram. Remember, we have three secure channels involved. One from Analysis Corp to the project, one from Bank Corp to the project. Then a third one, which is end-to-end from Analysis Corp all the way to Bank Corp. And in TLS, if you do all the hard work, you only get the first two. Typically, people only get one. They'll expose TLS to the internet, then they’ll do the hard work of setting up certificate authorities, and make sure that the load balancer TLS server is serving TLS over the internet. And clients connect to it over TLS.
But it's usually not mutual TLS, it's one-way TLS where the server is being authenticated using TLS, but the client is being authenticated using some other mechanism, like an OAuth token. And then behind the load balancer, I've seen topologies where people do nothing.
They let the data move unencrypted, or they'll set up a second TLS connection, from the load balancer to wherever their machine is. Never is there this third, end-to-end encrypted secure channel, the innermost dark green secure channel. This means that if an attacker is able to compromise the internet-facing load-balancing server, they're able to see all the data unencrypted. If you've only set up one of the secure channels, and the attacker is anywhere inside your parameter, they're able to compromise the data or steal it.
In Ockam’s case, we've set up this end-to-end channel that only the two machines that are involved have the keys for and nothing in the middle can compromise it. This is a risk profile decision to make. If you go with that TLS setup, you have orders of magnitude more risk in the ways things can get compromised. And the blast radius is also very big. If a compromise happens, all sorts of applications get compromised. With Ockam, if every application is making an end-to-end connection with another application, and one is compromised, the attacker can only access that one application. Even compromising one is very hard because you have to precisely reach a specific place in the network to get the keys. And if those keys are in a KMS, that's hard to reach.
Glenn Gillen: The thing that you implied there is that if two companies are talking to each other, and you are using a load balancer in the middle with TLS, you only have a guarantee from Postgres to the load balancer. You have no idea what happens after that. You see this a lot with how CDNs are deployed to move TLS termination closer to their customers. That’s because there is some implicit trust that everything behind the first connection is hopefully secure. Compare that to our protocols, which are open source and have been independently tested, and provide guarantees that your data is encrypted from its source all the way to its destination.
Mrinal Wadhwa: That's precisely right. Another thing that comes up with TLS is that Analysis Corp now needs an OAuth token to get in. And the distribution of that OAuth token can get very complex. Oftentimes people will take an API token and give it to one company, and that one company then may use the token across lots of different clients, and the token may be provided over email.
There are a lot of risks involved in how those tokens are delivered. It’s doable if you have one or two clients, but if you have 10,000 clients it becomes difficult. How do you get the token to all the clients? How do you make sure all the clients have a unique token? If you give the same token to 10,000 clients, and one of the clients is compromised, then all of the tokens are compromised.
That’s why Ockam’s enrollment protocol mechanism provides a low-risk, one-time-use enrollment token that is thrown away the moment things are enrolled. Then we take the token and turn it into cryptographic credentials, and those cryptographic credentials are not bearer secrets anymore. They are much easier to manage because you don't have to keep them safe. They can only be used by someone who has the private keys of a particular identity.
To wrap up, we created this very simple green line to make this connection happen. But what we saw was, under the hood, there are a lot of pieces that worked together to make it happen in a way that is secure, safe, and works in any topology.
Another interesting point about these pieces is that they are all reusable building blocks. Ockam isn't a solution to this one specific scenario. It is a set of reusable building blocks that come together to set up secure communication in all sorts of different scenarios. In this particular case, we were making a TCP server and a TCP client, and two different private networks talk to each other.
But in a completely different scenario, we make a Kafka producer and a Kafka consumer talk to each other in a way that is end-to-end encrypted and mutually authenticated. The same building blocks make that happen as well. The same building blocks can enable end-to-end trust in highly distributed systems, such as IoT devices.
So these are reusable building blocks. And if you use our programming libraries, you can customize them to whatever your use case is. Typically, we encounter people who need TCP or Kafka connections. We made those typical scenarios very easy to use in our command line.
Glenn Gillen: To bring it full circle, our job is to make these things simple and easy to use. That's why Ockam exists. This conversation started because we were talking through the TCP example with a customer, who noted how quick and easy this is to set up. They wondered what happened behind the scenes, but they didn’t need to know to get started.
Everything we’ve talked about in this episode, you don’t actually have to know to use Ockam. That’s the point. If you want to get into the weeds, then this is the episode for you. This is the trick behind Ockam, how our magic works. Our protocols are described in detail in our documentation, and our code is open source. Anyone can build this, we’ve just made it easy to use.
Mrinal Wadhwa: In this scenario, Bank Corp probably typed 3 commands and Analysis Corp typed 2 commands. And it just worked.
Matthew Gregory: That is our ethos, to make things simple. Our mission is to make it so that every developer can create these secure connections between their applications and their data. They don't have to be network experts. They don't have to be security experts. That's why we say Ockam is networkless.
If security experts and network experts are the barrier by which we are going to move all of our data around the internet, between companies, and across networks, then we are doomed. keep all the data. We built Ockam to enable any developer with very basic engineering skills to be able to move data securely the right way and make it very hard to do the wrong thing.
So this podcast was focused on what happens under the hood. If you got to the end of this and said, “Oh gosh, that seems like a lot.” It was a lot. It took us four years and millions of dollars to build this thing so that you don't have to. If you want to try to build this yourself, our protocols are published on our doc site, have at it, and good luck.
But that's the good part. You don't have to build any of this yourself. We've already done it and we've distilled everything down to very simple, easy-to-understand primitives that anyone can use. And that's the magic of Ockam.
In contrast, traditional secure communication implementations are typically tightly coupled with transport protocols in a way that all their security is limited to the length and duration of one underlying transport connection.
For example, most TLS implementations are tightly coupled with the underlying TCP connection. If your applications data and requests travel over two TCP connection hops TCP -> TCP then all TLS guarantees break at the bridge between the two networks. This bridge, gateway or load balancer then becomes a point of weakness for application data.
To make matters worse, if you don't set up another mutually authenticated TLS connection on the second hop between the gateway and your destination server, then the entire second hop network – which may have thousands of applications and machines within it – becomes an attack vector to your application and its data. If any of these neighboring applications or machines are compromised, then your application and its data can also be easily compromised.
Traditional secure communication protocols are also unable to protect your application's data if it travels over multiple different transport protocols. They can't guarantee data authenticity or data integrity if your application's communication path is UDP -> TCP or BLE -> TCP.
Ockam Routing and Transports, when combined with the ability to model Bridges and Relays make it possible to bidirectionally exchange messages over a large variety of communication topologies: TCP -> TCP or TCP -> TCP -> TCP or BLE -> UDP -> TCP or BLE -> TCP -> TCP or TCP -> Kafka -> TCP, etc.
By layering Ockam Secure Channels over Ockam Routing, it becomes simple to provide end-to-end, application layer guarantees of data authenticity, integrity, and confidentiality in any communication topology.
Ockam Secure Channels provides the following end-to-end guarantees:
Authenticity: Each end of the channel knows that messages received on the channel must have been sent by someone who possesses the secret keys of a specific Ockam Identifier.
Integrity: Each end of the channel knows that the messages received on the channel could not have been tampered en route and are exactly what was sent by the authenticated sender at the other end of the channel.
Confidentiality: Each end of the channel knows that the contents of messages received on the channel could not have been observed en route between the sender and the receiver.
To establish the secure channel, the two ends run an authenticated key establishment protocol and then authenticate each other's Ockam Identifier by signing the transcript hash of the key establishment protocol. The cryptographic key establishment safely derives shared secrets without transporting these secrets on the wire.
Once the shared secrets are established, they are used for authenticated encryption that ensures data integrity and confidentiality of application data.
Our secure channel protocol is based on a handshake design pattern described in the Noise Protocol Framework. Designs based on this framework are widely deployed and the described patterns have formal security proofs. The specific pattern that we use in Ockam Secure Channels provides sender and receiver authentication and is resistant to key compromise impersonation attacks. It also ensures the integrity and secrecy of application data and provides strong forward secrecy.
Now that you're familiar with the basics let's create some secure channels. If you haven't already, install ockam command, run ockam enroll, and delete any nodes from previous examples.
In this example, we'll create a secure channel from Node a to node b. Every node, created with Ockam Command, starts a secure channel listener at address /service/api.
In the above example, a and b mutually authenticate using the default Ockam Identity that is generated when we create the first node. Both nodes, in this case, are using the same identity.
Once the channel is created, note above how we used the service address of the channel on a to send messages through the channel. This can be shortened to the one-liner:
The first command writes /service/d92ef0aea946ec01cdbccc5b9d3f2e16, the address of a new secure channel on a, to standard output and the second command replaces the - in the to argument with the value from standard input. Everything else works the same.
In a previous section, we learned that Bridges enable end-to-end protocols between applications in separate networks in cases where we have a bridge node that is connected to both networks. Since Ockam Secure Channels are built on top of Ockam Routing, we can establish end-to-end secure channels over a route that may include one or more bridges.
Delete any existing nodes and then try this example:
In a previous section, we also saw how Relays make it possible to establish end-to-end protocols with services operating in a remote private network without requiring a remote service to expose listening ports on an outside hostile network like the Internet.
Since Ockam Secure Channels are built on top of Ockam Routing, we can establish end-to-end secure channels over a route that may include one or more relays.
Delete any existing nodes and then try this example:
Ockam Secure Channels are built on top of Ockam Routing. But they also carry Ockam Routing messages.
Any protocol that is implemented in this way melds with and becomes a seamless part of Ockam Routing. This means that we can run any Ockam Routing based protocol through Secure Channels. This also means that we can create Secure Channels that pass through other Secure Channels.
The on-the-wire overhead of a new secure channel is only 20 bytes per message. This makes passing secure channels though other secure channels a powerful tool in many real world topologies.
Ockam Orchestrator can create and manage Elastic Encrypted Relays in the cloud within your Orchestrator project. These managed relays are designed for high availability, high throughput, and low latency.
Let's create an end-to-end secure channel through an elastic relay in your Orchestrator project.
The Project that was created when you ran ockam enroll offers an Elastic Relay Service. Delete any existing nodes and then try this new example:
Nodes a and b (the two ends) are mutually authenticated and are cryptographically guaranteed data authenticity, integrity, and confidentiality - even though their messages are traveling over the public Internet over two different TCP connections.
In a previous section, we saw how Portals make existing application protocols work over Ockam Routing without changing any code in the existing applications.
We can combine Secure Channels with Portals to create Secure Portals.
Continuing from the above example on Elastic Encrypted Relays create a Python-based web server to represent a sample web service. This web service is listening on 127.0.0.1:9000.
Then create a TCP Portal Outlet that makes 127.0.0.1:9000 available on worker address /service/outlet on b. We already have a forwarding relay for b on orchestrator /project/default at /service/forward_to_b.
We then create a TCP Portal Inlet on a that will listen for TCP connections to 127.0.0.1:6000. For every new connection, the inlet creates a portal following the --to route all the way to the outlet. As it receives TCP data, it chunks and wraps them into Ockam Routing messages and sends them along the supplied route. The outlet receives Ockam Routing messages, unwraps them to extract TCP data, and send that data along to the target web service on 127.0.0.1:9000. It all just seamlessly works.
The HTTP requests from curl, enter the inlet on a, travel to the orchestrator project node and are relayed back to b via it's forwarding relay to reach the outlet and onward to the Python-based web service. Responses take the same return route back to curl.
The TCP Inlet/Outlet works for a large number of TCP based protocols like HTTP. It is also simple to implement portals for other transport protocols. There is a growing base of Ockam Portal Add-Ons in our GitHub Repository.
Trust and authorization decisions must be anchored in some pre-existing knowledge.
Delete any existing nodes and then try this new example:
Ockam Secure Channels is an end-to-end protocol built on top of Ockam Routing. This cryptographic protocol guarantees data authenticity, integrity, and confidentiality over any communication topology that can be traversed with Ockam Routing.
Next, let's explore how we can scale mutual authentication with Ockam Credentials.

Create an Ockam Timestream InfluxDB outlet node using Cloudformation template
This guide contains instructions to launch within AWS environment, an
An Ockam Timestream InfluxDB Outlet Node within an AWS environment
An Ockam Timestream InfluxDB Inlet Node:
Within an AWS environment, or
» ockam node create a
» ockam node create b
» ockam secure-channel create --from a --to /node/b/service/api
✔︎ Secure Channel at /service/d92ef0aea946ec01cdbccc5b9d3f2e16 created successfully
From /node/a to /node/b/service/api
» ockam message send hello --from a --to /service/d92ef0aea946ec01cdbccc5b9d3f2e16/service/uppercase
HELLO» ockam secure-channel create --from a --to /node/b/service/api |
ockam message send hello --from a --to -/service/uppercase
HELLO» ockam node create a
» ockam node create bridge1 --tcp-listener-address=127.0.0.1:7000
» ockam service start hop --at bridge1
» ockam node create bridge2 --tcp-listener-address=127.0.0.1:8000
» ockam service start hop --at bridge2
» ockam node create b --tcp-listener-address=127.0.0.1:9000
» ockam tcp-connection create --from a --to 127.0.0.1:7000
» ockam tcp-connection create --from bridge1 --to 127.0.0.1:8000
» ockam tcp-connection create --from bridge2 --to 127.0.0.1:9000
» ockam message send hello --from a --to /worker/ec8d523a2b9261c7fff5d0c66abc45c9/service/hop/worker/f0ea25511025c3a262b5dbd7b357f686/service/hop/worker/dd2306d6b98e7ca57ce660750bc84a53/service/uppercase
HELLO
» ockam secure-channel create --from a --to /worker/ec8d523a2b9261c7fff5d0c66abc45c9/service/hop/worker/f0ea25511025c3a262b5dbd7b357f686/service/hop/worker/dd2306d6b98e7ca57ce660750bc84a53/service/api \
| ockam message send hello --from a --to -/service/uppercase
HELLO» ockam node create relay --tcp-listener-address=127.0.0.1:7000
» ockam node create b
» ockam relay create b --at /node/relay --to b
✔︎ Now relaying messages from /node/relay/service/34df708509a28abf3b4c1616e0b37056 → /node/b/service/forward_to_b
» ockam node create a
» ockam tcp-connection create --from a --to 127.0.0.1:7000
» ockam secure-channel create --from a --to /worker/1fb75f2e7234035461b261602a714b72/service/forward_to_b/service/api \
| ockam message send hello --from a --to -/service/uppercase
HELLO» ockam enroll
» ockam node create a
» ockam node create b
» ockam relay create b --at /project/default --to /node/a
✔︎ Now relaying messages from /project/default/service/70c63af6590869c9bf9aa5cad45d1539 → /node/a/service/forward_to_b
» ockam secure-channel create --from a --to /project/default/service/forward_to_b/service/api \
| ockam message send hello --from a --to -/service/uppercase
HELLO» python3 -m http.server --bind 127.0.0.1 9000
» ockam tcp-outlet create --at a --from /service/outlet --to 127.0.0.1:9000
» ockam secure-channel create --from a --to /project/default/service/forward_to_b/service/api \
| ockam tcp-inlet create --at a --from 127.0.0.1:6000 --to -/service/outlet
» curl --head 127.0.0.1:6000
HTTP/1.0 200 OK
...» ockam identity create i1
» ockam identity show i1 > i1.identifier
» ockam node create n1 --identity i1
» ockam identity create i2
» ockam identity show i2 > i2.identifier
» ockam node create n2 --identity i2
» ockam secure-channel-listener create l --at n2 \
--identity i2 --authorized $(cat i1.identifier)
» ockam secure-channel create \
--from n1 --to /node/n2/service/l \
--identity i1 --authorized $(cat i2.identifier) \
| ockam message send hello --from n1 --to -/service/uppercase
HELLO


Using Docker in any environment
The walkthrough demonstrates:
Running an Ockam Timestream InfluxDB Outlet node in your AWS environment that contains a private Amazon Timestream InfluxDB Database
Setting up Ockam Timestream InfluxDB inlet nodes using either AWS or Docker from any location.
Verifying secure communication between InfluxDB clients and Amazon Timestream InfluxDB Database.
Read: “How does Ockam work?” to learn about end-to-end trust establishment.
A private Amazon Timestream InfluxDB Database is created and accessible from the VPC and Subnet where the Ockam Node will be launched. You have the details of Organization, Username and Password
Security Group associated with the Amazon Timestream InfluxDBDatabase allows inbound traffic on the required port (TCP 8086) from the subnet where the Ockam Outlet Node will reside.
You have permission to subscribe and launch Cloudformation stack from AWS Marketplace on the AWS Account running Timestream InfluxDB Database.
Permission to create an "All Access" InfluxDB token to use by Ockam Node and store it in AWS Secrets Manager.
Sign up for Ockam and pick a subscription plan through the guided workflow on Ockam.io.
Run the following commands to install Ockam Command and enroll with the Ockam Orchestrator.
Completing this step creates a Project in Ockam Orchestrator
Control which identities are allowed to enroll themselves into your project by issuing unique one-time use enrollment tickets. Generate two enrollment tickets, one for the Outlet and one for the Inlet.
Use Influx CLI to create a token. For instructions, please see: Install and use the influx CLI.
Configure your CLI to use --username-password to be able to create the operator:
Find out Org ID to use as an input to cloudformation template
Create your new token.
Create influxDB token as secret within secret manager. Note the ARN of the secret.
Login to AWS Account you would like to use
Subscribe to "Ockam - Node for Amazon Timestream InfluxDB" in AWS Marketplace
Navigate to AWS Marketplace -> Manage subscriptions. Select Ockam - Node for Amazon Timestream InfluxDB from the list of subscriptions. Select Actions-> Launch Cloudformation stack
Select the Region you want to deploy and click Continue to Launch. Under Actions, select Launch Cloudformation
Create stack with the following details
Stack name: influxdb-ockam-outlet or any name you prefer
Network Configuration
NodeConfig: Copy and paste the below configuration. Note that the configuration values match with the enrollment tickets created in the previous step. INFLUX_ENDPOINT, INFLUX_ORG_ID and INFLUX_TOKEN will be replaced during runtime.
Click Next to launch the CloudFormation run.
A successful CloudFormation stack run configures the Ockam Timestream InfluxDB Outlet node on an EC2 machine.
EC2 machine mounts an EFS volume created in the same subnet. Ockam state is stored in the EFS volume.
A security group with egress access to the internet will be attached to the EC2 machine.
Connect to the EC2 machine via AWS Session Manager.
To view the log file, run sudo cat /var/log/cloud-init-output.log.
Successful run will show Ockam node setup completed successfully in the logs
To view the status of Ockam node run curl http://localhost:23345/show | jq
View the Ockam node status in CloudWatch.
Navigate to Cloudwatch -> Log Group and select influxdb-ockam-outlet-status-logs. Select the Logstream for the EC2 instance.
The Cloudformation template creates a subscription filter that sends data to a Cloudwatch alarm influxdb-ockam-outlet-OckamNodeDownAlarm.Alarm will turn green upon ockam node successfully running.
An Autoscaling group ensures atleast one EC2 instance is running at all times.
Ockam Timestream InfluxDB outlet node setup is complete. You can now create Ockam Timestream InfluxDB inlet nodes in any network to establish secure communication.
You can set up an Ockam Timestream InfluxDB Inlet Node either in AWS or locally using Docker. Here are both options:
Option 1: Setup Inlet Node Locally with Docker Compose
To set up an Inlet Node locally and interact with it outside of AWS, use Docker Compose.
Find your Ockam project id by running the command where you created the enrollment tickets and use it to create to endpoint to use for REPLACE_WITH_YOUR_PROJECT_ID
Create a file named docker-compose.yml with the following content:
Create a file named app.mjs and package.json.
Update REPLACE_WITH_* variables
Value of token doesn't matter as it will be injected with the temporary token by Ockam
Run the following command from the same location as the docker-compose.yml and the inlet.ticket to create an Ockam Timestream InfluxDB inlet that can connect to the outlet running in AWS , along with node client container
Check status of Ockam inlet node. You will see The node is UP when ockam is configured successfully and ready to accept connection
Connect to influxdb-client container and run commands
Option 2: Setup Inlet Node in AWS
Login to AWS Account you would like to use
Subscribe to "Ockam - Node" in AWS Marketplace
Navigate to AWS Marketplace -> Manage subscriptions. Select Ockam - Node from the list of subscriptions. Select Actions-> Launch Cloudformation stack
Select the Region you want to deploy and click Continue to Launch. Under Actions, select Launch Cloudformation
Create stack with below details
Stack name: influxdb-ockam-inlet or any name you prefer
Network Configuration
Select suitable values for VPC ID
Click Next to launch the CloudFormation run.
A successful CloudFormation stack run configures the Ockam inlet node on an EC2 machine.
EC2 machine mounts an EFS volume created in the same subnet. Ockam state is stored in the EFS volume.
Connect to the EC2 machine via AWS Session Manager.
To view the log file, run sudo cat /var/log/cloud-init-output.log.
Successful run will show Ockam node setup completed successfully in the logs
To view the status of Ockam node run curl http://localhost:23345/show | jq
View the Ockam node status in CloudWatch.
Navigate to Cloudwatch -> Log Group and select influxdb-ockam-inlet-status-logs. Select the Logstream for the EC2 instance.
Cloudformation template creates a subscription filter that sends data to a Cloudwatch alarm influxdb-ockam-inlet-OckamNodeDownAlarm.Alarm will turn green upon ockam node successfully running.
An Autoscaling group ensures atleast one EC2 instance is running at all times.
Find your Ockam project id and use it to create to endpoint to use for INFLUXDB_ENDPOINT
Follow testing steps in docker example above for node.js or use InfluxDB cli client with below details
Ockam Vaults store secret cryptographic keys in hardware and cloud key management systems. These keys remain behind a stricter security boundary and can be used without being revealed.
Ockam Identities, Credentials, and Secure Channels rely on cryptographic proofs of possession of specific secret keys. Ockam Vaults safely store these secret keys in cryptographic hardware and cloud key management systems.
Vaults can cryptographically sign data. We support two types of Signatures: and .
Our preferred signature scheme is EdDSA signatures using Curve 25519 which are also call Ed25519 signatures. ECDSA is only supported because as of this writing Cloud KMS services don't support Ed25519.
In addition to VerifyingPublicKeys for the above two signature schemes we also support X25519PublicKeys for ECDH in Ockam Secure Channels using .
Three rust traits - VaultForVerifyingSignatures, VaultForSigning, and VaultForSecureChannels define abstract functions that an Ockam Vault implementation can implement to support Ockam Identities, Credentials, and Secure Channels.
Identities and Credentials require VaultForVerifyingSignatures and VaultForSigning while Secure Channels require VaultForSecureChannels.
Implementations of VaultForVerifyingSignatures provide two simple and stateless functions that don't require any secrets so they can be usually provided in software.
Implementations of VaultForSigning enable using a secret signing key to sign Credentials, PurposeKeyAttestations, and Identity Change events. The signing key remains inside the tighter security boundary of a KMS or an HSM.
Implementations of VaultForSecureChannels enable using a secret X25519 key for ECDH within Ockam Secure Channels. They rely on compile time feature flags to chose between three possible combinations of primitives:
OCKAM_XX_25519_AES256_GCM_SHA256 enables Ockam_XX secure channel handshake with and SHA256. This is our current default.
OCKAM_XX_25519_AES128_GCM_SHA256 enables Ockam_XX secure channel handshake with and SHA256.
OCKAM_XX_25519_ChaChaPolyBLAKE2s enables Ockam_XX secure channel handshake with
services:
ockam:
image: ghcr.io/build-trust/ockam
container_name: influxdb-inlet
environment:
ENROLLMENT_TICKET: ${ENROLLMENT_TICKET:-}
OCKAM_DEVELOPER: ${OCKAM_DEVELOPER:-false}
OCKAM_LOGGING: true
OCKAM_LOG_LEVEL: info
command:
- node
- create
- --foreground
- --node-config
- |
ticket: ${ENROLLMENT_TICKET}
influxdb-inlet:
from: 0.0.0.0:8086
via: influxdb
allow: amazon-influxdb-outlet
tls: true
network_mode: host
node-app:
image: node:18
container_name: node-app
volumes:
- ./:/app
working_dir: /app
command: /bin/sh -c "while true; do sleep 30; done"
depends_on:
- ockam
network_mode: host
"use strict";
import { InfluxDB, Point, flux } from "@influxdata/influxdb-client";
import os from "os";
import { execSync } from "child_process";
import * as https from "https";
// Update below URL
const url = "https://influxdb-inlet.REPLACE_WITH_YOUR_PROJECT_ID.ockam.network:8086";
const token = "OCKAM_MANAGED"
const org = "REPLACE_WITH_YOUR_ORG_NAME";
const bucket = "REPLACE_WITH_YOUR_BUCKET_NAME";
const httpsAgent = new https.Agent({ rejectUnauthorized: true });
const influxDB = new InfluxDB({ url, token, transportOptions: { agent: httpsAgent } });
const writeApi = influxDB.getWriteApi(org, bucket);
async function writeData() {
const hostname = os.hostname();
let cpuLoad;
let freeDiskSpace;
try {
cpuLoad = parseFloat(execSync("uptime | awk '{print $(NF-2)}' | sed 's/,//'").toString().trim());
freeDiskSpace = parseInt(execSync("df -BG / | tail -n 1 | awk '{print $4}' | sed 's/G//'").toString().trim(), 10);
} catch (error) {
console.error("Error extracting system metrics:", error);
return;
}
if (isNaN(cpuLoad) || isNaN(freeDiskSpace)) {
console.error("Extracted metrics are NaN", { cpuLoad, freeDiskSpace });
return;
}
const point = new Point("system_metrics")
.tag("host", hostname)
.floatField("cpu_load", cpuLoad)
.intField("free_disk_space", freeDiskSpace);
console.log(`Writing point: ${point.toLineProtocol(writeApi)}`);
writeApi.writePoint(point);
await writeApi
.close()
.then(() => {
console.log("WRITE FINISHED");
})
.catch((e) => {
console.error("Write failed", e);
});
}
async function queryData() {
const queryApi = influxDB.getQueryApi(org);
const query = flux`
from(bucket: "${bucket}")
|> range(start: -1h)
|> filter(fn: (r) => r._measurement == "system_metrics")
`;
console.log("Querying data:");
queryApi.queryRows(query, {
next(row, tableMeta) {
const fieldValue = row[5];
const fieldName = row[6];
let cpuLoad = "N/A";
let freeDiskSpace = "N/A";
if (fieldName === "cpu_load") {
cpuLoad = fieldValue;
} else if (fieldName === "free_disk_space") {
freeDiskSpace = fieldValue;
}
console.log(`cpu_load=${cpuLoad}, free_disk_space=${freeDiskSpace}`);
},
error(error) {
console.error("Query failed", error);
},
complete() {
console.log(
"\nThe example run was successful 🥳.\n" +
"\nThe app connected with the database through an encrypted portal." +
"\nInserted some data into a bucket, and querried it back.\n",
);
},
});
}
writeData().then(() => {
setTimeout(() => {
queryData();
}, 3000);
});
{
"dependencies": {
"@influxdata/influxdb-client": "^1.35.0"
}
}curl --proto '=https' --tlsv1.2 -sSfL https://install.command.ockam.io | bash
source "$HOME/.ockam/env"
ockam enroll# Enrollment ticket for Ockam Outlet Node
ockam project ticket --expires-in 10h --usage-count 1 \
--attribute amazon-influxdb-outlet \
--relay influxdb \
> "outlet.ticket"
# Enrollment ticket for Ockam Inlet Node
ockam project ticket --expires-in 10h --usage-count 1 \
--attribute amazon-influxdb-inlet --tls \
> "inlet.ticket"INFLUXDB_ORG="REPLACE_WITH_ORG_NAME"
INFLUXDB_USERNAME="REPLACE_WITH_USERNAME"
INFLUXDB_PASSWORD="REPLACE_WITH_PASSWORD"
INFLUXDB_ENDPOINT="https://REPLACE_WITH_INFLUXDB_ENDPOINT:8086"
influx config create --active --config-name testconfig \
--host-url $INFLUXDB_ENDPOINT \
--org $INFLUXDB_ORG \
--username-password "$INFLUXDB_USERNAME:$INFLUXDB_PASSWORD"influx org listinflux auth create --all-access --json | jq -r .tokenSECRET_NAME="influxdb-token" #Update as necessary
INFLUXDB_TOKEN="REPLACE_WITH_TOKEN"
AWS_REGION="us-east-1"
# Create secret
aws secretsmanager create-secret \
--region $AWS_REGION \
--name $SECRET_NAME \
--description "Ockam node InfluxDB lessor token" \
--secret-string "$INFLUXDB_TOKEN"
# Get the ARN of the secret
aws secretsmanager describe-secret --secret-id $SECRET_NAME --query ARN --output text[
{
"action": "read",
"resource": {
"type": "buckets",
"orgID": "INFLUX_ORG_ID"
}
},
{
"action": "write",
"resource": {
"type": "buckets",
"orgID": "INFLUX_ORG_ID"
}
}
]
{
"relay": "influxdb",
"influxdb-outlet": {
"to": "INFLUX_ENDPOINT:8086",
"tls": true,
"allow": "amazon-influxdb-inlet",
"org-id": "INFLUX_ORG_ID",
"all-access-token": "INFLUX_TOKEN",
"leased-token-expires-in": "300",
"leased-token-permissions": "LEASED_TOKEN_PERMISSIONS"
}
}# Below command will find your ockam project id
ockam project show --jq .id ENROLLMENT_TICKET=$(cat inlet.ticket) docker-compose up -ddocker exec -it influxdb-inlet /ockam node show# Connect to the container
docker exec -it node-app /bin/bash
# Install dependencies
npm install
# Run app that writes and read the data to a bucket in private influxDB via ockam
node app.mjs
# You will see below message upon a successful run
# The example run was successful 🥳.{
"influxdb-inlet": {
"from": "0.0.0.0:8086",
"allow": "amazon-influxdb-outlet",
"via": "influxdb",
"tls": true
}
}# Below command will find your ockam project id
ockam project show --jq .id INFLUXDB_ENDPOINT="https://influxdb-inlet.REPLACE_WITH_YOUR_PROJECT_ID.ockam.network:8086"
# Need some value as influxdb client expects a value
INFLUXDB_TOKEN="OCKAM_MANAGED"
INFLUXDB_ORG="REPLACE_WITH_YOUR_ORG_NAME"
# Create config
influx config create -n testconfig -u $INFLUXDB_ENDPOINT -o $INFLUXDB_ORG -t "OCKAM_MANAGED"
# View buckets
influx bucket list// The types below that are annotated with #[derive(Encode, Decode)] are
// serialized using [CBOR](1). The various annotations and their effects on the
// encoding are defined in the [minicbor_derive](3) crate.
//
// #[derive(Encode, Decode)] on structs and enums implies #[cbor(array)]
// and CBOR [array encoding](4). The #[n(..)] annotation specifies the index
// position of the field in the CBOR encoded array.
//
// #[cbor(transparent)] annotation on structs with exactly one field forwards
// the respective encode and decode calls to the inner type, i.e. the resulting
// CBOR representation will be identical to the one of the inner type.
//
// [1]: https://www.rfc-editor.org/rfc/rfc8949.html
// [2]: https://docs.rs/minicbor/latest/minicbor
// [3]: https://docs.rs/minicbor-derive/latest/minicbor_derive/index.html
// [4]: https://docs.rs/minicbor-derive/latest/minicbor_derive/index.html#array-encoding
use minicbor::{Decode, Encode};Subnet ID: Select a suitable Subnet ID within the chosen VPC that has access to Amazon Timestream InfluxDB Database.
EC2 Instance Type: Default instance type is m6a.large Adjust instance type depending on your use case. If you would like to have predictable network bandwidth of 12.5 Gbps use m6a.8xlarge. Make sure the instance type is available in the subnet you are launching in.
Ockam Node Configuration
Enrollment ticket: Copy and paste the content of the outlet.ticket generated above
InfluxDBEndpoint: To configure the Ockam Timestream InfluxDB Outlet Node, you'll need to specify the Amazon Timestream InfluxDB Endpoint. This configuration allows the Ockam Postgres Outlet Node to connect to the database. In AWS Console, go to Timestream -> InfluxDB databases, select your influxdb database and copy "Endpoint" details
InfluxDBOrgID: Enter the Organization of InfluxDB instance.
InfluxDBTokenSecretArn: Enter the ARN of the Secret that contains the all access token.
InfluxDBLeasedTokenPermissions: JSON array of permission objects for InfluxDB leased token in the below format. Update as needed. Leave the variable INFLUX_ORG_ID as it will be replaced during runtime.
Subnet IDEC2 Instance Type: Default instance type is m6a.8xlarge because of the predictable network bandwidth of 12.5 Gbps. Adjust to a small instance type depending on your use case. Eg: m6a.large
Ockam Configuration
Enrollment ticket: Copy and paste the content of the inlet.ticket generated above
JSON Node Configuration: Copy and paste the below configuration.

/// A cryptographic signature.
#[derive(Encode, Decode)]
pub enum Signature {
/// An EdDSA signature using Curve 25519.
#[n(0)]
EdDSACurve25519(#[n(0)] EdDSACurve25519Signature),
/// An ECDSA signature using SHA-256 and Curve P-256.
#[n(1)]
ECDSASHA256CurveP256(#[n(0)] ECDSASHA256CurveP256Signature),
}
/// An EdDSA Signature using Curve25519.
///
/// - EdDSA Signature as defined [here][1].
/// - Curve25519 as defined in [here][2].
///
/// [1]: https://nvlpubs.nist.gov/nistpubs/FIPS/NIST.FIPS.186-5.pdf
/// [2]: https://nvlpubs.nist.gov/nistpubs/SpecialPublications/NIST.SP.800-186.pdf
#[derive(Encode, Decode)]
#[cbor(transparent)]
pub struct EdDSACurve25519Signature(#[cbor(n(0), with = "minicbor::bytes")] pub [u8; 64]);
/// An ECDSA Signature using SHA256 and Curve P-256.
///
/// - ECDSA Signature as defined [here][1].
/// - SHA256 as defined [here][2].
/// - Curve P-256 as defined [here][3].
///
/// [1]: https://nvlpubs.nist.gov/nistpubs/FIPS/NIST.FIPS.186-5.pdf
/// [2]: https://nvlpubs.nist.gov/nistpubs/FIPS/NIST.FIPS.180-4.pdf
/// [3]: https://nvlpubs.nist.gov/nistpubs/SpecialPublications/NIST.SP.800-186.pdf
#[derive(Encode, Decode)]
#[cbor(transparent)]
pub struct ECDSASHA256CurveP256Signature(#[cbor(n(0), with = "minicbor::bytes")] pub [u8; 64]);/// A public key for verifying signatures.
#[derive(Encode, Decode)]
pub enum VerifyingPublicKey {
/// Curve25519 Public Key for verifying EdDSA signatures.
#[n(0)]
EdDSACurve25519(#[n(0)] EdDSACurve25519PublicKey),
/// Curve P-256 Public Key for verifying ECDSA SHA256 signatures.
#[n(1)]
ECDSASHA256CurveP256(#[n(0)] ECDSASHA256CurveP256PublicKey),
}
/// A Curve25519 Public Key that is only used for EdDSA signatures.
///
/// - EdDSA Signature as defined [here][1] and [here][2].
/// - Curve25519 as defined [here][3].
///
/// [1]: https://nvlpubs.nist.gov/nistpubs/FIPS/NIST.FIPS.186-5.pdf
/// [2]: https://ed25519.cr.yp.to/papers.html
/// [2]: https://nvlpubs.nist.gov/nistpubs/SpecialPublications/NIST.SP.800-186.pdf
#[derive(Encode, Decode)]
#[cbor(transparent)]
pub struct EdDSACurve25519PublicKey(#[cbor(n(0), with = "minicbor::bytes")] pub [u8; 32]);
/// A Curve P-256 Public Key that is only used for ECDSA SHA256 signatures.
///
/// This type only supports the uncompressed form which is 65 bytes and
/// has the first byte - 0x04. The uncompressed form is defined [here][1] in
/// section 2.3.3.
///
/// - ECDSA Signature as defined [here][2].
/// - SHA256 as defined [here][3].
/// - Curve P-256 as defined [here][4].
///
/// [1]: https://www.secg.org/SEC1-Ver-1.0.pdf
/// [2]: https://nvlpubs.nist.gov/nistpubs/FIPS/NIST.FIPS.186-5.pdf
/// [3]: https://nvlpubs.nist.gov/nistpubs/FIPS/NIST.FIPS.180-4.pdf
/// [4]: https://nvlpubs.nist.gov/nistpubs/SpecialPublications/NIST.SP.800-186.pdf
#[derive(Encode, Decode)]
#[cbor(transparent)]
pub struct ECDSASHA256CurveP256PublicKey(#[cbor(n(0), with = "minicbor::bytes")] pub [u8; 65]);
/// X25519 Public Key is used for ECDH.
///
/// - X25519 as defined [here][1].
/// - Curve25519 as defined [here][2].
///
/// [1]: https://datatracker.ietf.org/doc/html/rfc7748
/// [2]: https://nvlpubs.nist.gov/nistpubs/SpecialPublications/NIST.SP.800-186.pdf
#[derive(Encode, Decode)]
#[cbor(transparent)]
pub struct X25519PublicKey(#[cbor(n(0), with = "minicbor::bytes")] pub [u8; 32]);use async_trait::async_trait;
pub struct Sha256Output([u8; 32]);
#[async_trait]
pub trait VaultForVerifyingSignatures: Send + Sync + 'static {
async fn sha256(&self, data: &[u8]) -> Result<Sha256Output>;
async fn verify_signature(
&self,
verifying_public_key: &VerifyingPublicKey,
data: &[u8],
signature: &Signature,
) -> Result<bool>;
}use ockam_core::Result;
/// A handle to a secret inside a vault.
pub struct HandleToSecret(Vec<u8>);
/// A handle to a signing secret key inside a vault.
pub enum SigningSecretKeyHandle {
/// Curve25519 key that is only used for EdDSA signatures.
EdDSACurve25519(HandleToSecret),
/// Curve P-256 key that is only used for ECDSA SHA256 signatures.
ECDSASHA256CurveP256(HandleToSecret),
}
/// An enum to represent the supported types of signing keys.
pub enum SigningKeyType {
// Curve25519 key that is only used for EdDSA signatures.
EdDSACurve25519,
/// Curve P-256 key that is only used for ECDSA SHA256 signatures.
ECDSASHA256CurveP256,
}
#[async_trait]
pub trait VaultForSigning: Send + Sync + 'static {
async fn sign(
&self,
signing_secret_key_handle: &SigningSecretKeyHandle,
data: &[u8],
) -> Result<Signature>;
async fn generate_signing_secret_key(
&self,
signing_key_type: SigningKeyType,
) -> Result<SigningSecretKeyHandle>;
async fn get_verifying_public_key(
&self,
signing_secret_key_handle: &SigningSecretKeyHandle,
) -> Result<VerifyingPublicKey>;
async fn get_secret_key_handle(
&self,
verifying_public_key: &VerifyingPublicKey,
) -> Result<SigningSecretKeyHandle>;
async fn delete_signing_secret_key(
&self,
signing_secret_key_handle: SigningSecretKeyHandle,
) -> Result<bool>;
}use cfg_if::cfg_if;
use ockam_core::compat::{collections::BTreeMap, vec::Vec};
/// A handle to X25519 secret key inside a vault.
///
/// - X25519 as defined [here][1].
/// - Curve25519 as defined [here][2].
///
/// [1]: https://datatracker.ietf.org/doc/html/rfc7748
/// [2]: https://nvlpubs.nist.gov/nistpubs/SpecialPublications/NIST.SP.800-186.pdf
pub struct X25519SecretKeyHandle(pub HandleToSecret);
pub struct SecretBufferHandle {
pub handle: HandleToSecret,
pub length: usize,
}
/// The number of hkdf outputs to produce from the hkdf function.
pub enum HKDFNumberOfOutputs {
Two,
Three,
}
cfg_if! {
if #[cfg(feature = "OCKAM_XX_25519_ChaChaPolyBLAKE2s")] {
pub struct Blake2sOutput([u8; 32]);
pub struct HashOutput(pub Blake2sOutput);
pub struct Blake2sHkdfOutput(Vec<SecretBufferHandle>);
pub struct HkdfOutput(pub Blake2sHkdfOutput);
pub struct Chacha20Poly1305SecretKeyHandle(pub HandleToSecret);
pub struct AeadSecretKeyHandle(pub Chacha20Poly1305SecretKeyHandle);
} else if #[cfg(feature = "OCKAM_XX_25519_AES128_GCM_SHA256")] {
pub struct HashOutput(pub Sha256Output);
pub struct Sha256HkdfOutput(Vec<SecretBufferHandle>);
pub struct HkdfOutput(pub Sha256HkdfOutput);
pub struct Aes128GcmSecretKeyHandle(pub HandleToSecret);
pub struct AeadSecretKeyHandle(pub Aes128GcmSecretKeyHandle);
} else {
// OCKAM_XX_25519_AES256_GCM_SHA256
pub struct HashOutput(pub Sha256Output);
pub struct Sha256HkdfOutput(Vec<SecretBufferHandle>);
pub struct HkdfOutput(pub Sha256HkdfOutput);
pub struct Aes256GcmSecretKeyHandle(pub HandleToSecret);
pub struct AeadSecretKeyHandle(pub Aes256GcmSecretKeyHandle);
}
}
#[async_trait]
pub trait VaultForSecureChannels: Send + Sync + 'static {
/// [1]: http://www.noiseprotocol.org/noise.html#dh-functions
async fn dh(
&self,
secret_key_handle: &X25519SecretKeyHandle,
peer_public_key: &X25519PublicKey,
) -> Result<SecretBufferHandle>;
/// [1]: http://www.noiseprotocol.org/noise.html#hash-functions
async fn hash(&self, data: &[u8]) -> Result<HashOutput>;
/// [1]: http://www.noiseprotocol.org/noise.html#hash-functions
async fn hkdf(
&self,
salt: &SecretBufferHandle,
input_key_material: Option<&SecretBufferHandle>,
number_of_outputs: HKDFNumberOfOutputs,
) -> Result<HkdfOutput>;
/// AEAD Encrypt
/// [1]: http://www.noiseprotocol.org/noise.html#cipher-functions
async fn encrypt(
&self,
secret_key_handle: &AeadSecretKeyHandle,
plain_text: &[u8],
nonce: &[u8],
aad: &[u8],
) -> Result<Vec<u8>>;
/// AEAD Decrypt
/// [1]: http://www.noiseprotocol.org/noise.html#cipher-functions
async fn decrypt(
&self,
secret_key_handle: &AeadSecretKeyHandle,
cipher_text: &[u8],
nonce: &[u8],
aad: &[u8],
) -> Result<Vec<u8>>;
async fn generate_ephemeral_x25519_secret_key(&self) -> Result<X25519SecretKeyHandle>;
async fn delete_ephemeral_x25519_secret_key(
&self,
secret_key_handle: X25519SecretKeyHandle,
) -> Result<bool>;
async fn get_x25519_public_key(
&self,
secret_key_handle: &X25519SecretKeyHandle,
) -> Result<X25519PublicKey>;
async fn get_x25519_secret_key_handle(
&self,
public_key: &X25519PublicKey,
) -> Result<X25519SecretKeyHandle>;
async fn import_secret_buffer(&self, buffer: Vec<u8>) -> Result<SecretBufferHandle>;
async fn delete_secret_buffer(&self, secret_buffer_handle: SecretBufferHandle) -> Result<bool>;
async fn convert_secret_buffer_to_aead_key(
&self,
secret_buffer_handle: SecretBufferHandle,
) -> Result<AeadSecretKeyHandle>;
async fn delete_aead_secret_key(&self, secret_key_handle: AeadSecretKeyHandle) -> Result<bool>;
}Scale mutual trust using lightweight, short-lived, revokable, attribute-based credentials.
Ockam Secure Channels enable you to setup mutually authenticated and end-to-end encrypted communication. Once a channel is established, it has the following guarantees:
Authenticity: Each end of the channel knows that messages received on the channel must have been sent by someone who possesses the secret keys of specific Ockam Cryptographic Identifier.
Integrity: Each end of the channel knows that the messages received on the channel could not have been tapered en-route and are exactly what was sent by the authenticated sender at the other end of the channel.
Confidentiality: Each end of the channel knows that the contents of messages received on the channel could not have been observed en-route between the sender and the receiver.
These guarantees however don't automatically imply trust. They don't tell us if a particular sender is trusted to inform us about a particular topic or if the sender is authorized to get a response to a particular request.
One way to create trust and authorize requests would be to use Access Control Lists (ACLs), where every receiver of messages would have a preconfigured list of identifiers that are trusted to inform about a certain topic or trigger certain requests. This approach works but doesn't scale very well. It becomes very cumbersome to manage mutual trust if you have more that a few nodes communicating with each other.
Another, and significantly more scalable, approach is to use Ockam Credentials combined with Attribute Based Access Control (ABAC). In this setup every participant starts off by trusting a single Credential Issuer to be the authority on the attributes of an Identifier. This authority issues cryptographically signed credentials to attest to these attributes. Participants can then exchange and authenticate each others’ credentials to collect authenticated attributes about an identifier. Every participant uses these authenticated attributes to make authorization decisions based on attribute-based access control policies.
Let’s walk through an example of setting up ABAC using cryptographically verifiable credentials.
To get started please create the initial and define an . We'll also need the hex crate for this example so add that to your Cargo.toml using cargo add :
Any Ockam Identity can issue Credentials. As a first step we’ll create a credential issuer that will act as an authority for our example application:
This issuer, knows a predefined list of identifiers that are member of an application’s production cluster.
In a later guide, we'll explore how Ockam enables you to define various pluggable Enrollment Protocols to decide who should be issued credentials. For this example we'll assume that this list is known in advance.
cargo add hextouch examples/06-credential-exchange-issuer.rs// examples/06-credentials-exchange-issuer.rs
use ockam::access_control::AllowAll;
use ockam::access_control::IdentityIdAccessControl;
use ockam::compat::collections::BTreeMap;
use ockam::compat::sync::Arc;
use ockam::identity::utils::now;
use ockam::identity::SecureChannelListenerOptions;
use ockam::identity::{Identifier, Vault};
use ockam::tcp::{TcpListenerOptions, TcpTransportExtension};
use ockam::vault::{EdDSACurve25519SecretKey, SigningSecret, SoftwareVaultForSigning};
use ockam::{Context, Node, Result};
use ockam_api::authenticator::credential_issuer::CredentialIssuerWorker;
use ockam_api::authenticator::{AuthorityMembersRepository, AuthorityMembersSqlxDatabase, PreTrustedIdentity};
use ockam_api::DefaultAddress;
#[ockam::node]
async fn main(ctx: Context) -> Result<()> {
let identity_vault = SoftwareVaultForSigning::create().await?;
// Import the signing secret key to the Vault
let secret = identity_vault
.import_key(SigningSecret::EdDSACurve25519(EdDSACurve25519SecretKey::new(
hex::decode("0127359911708ef4de9adaaf27c357501473c4a10a5326a69c1f7f874a0cd82e")
.unwrap()
.try_into()
.unwrap(),
)))
.await?;
// Create a default Vault but use the signing vault with our secret in it
let mut vault = Vault::create().await?;
vault.identity_vault = identity_vault;
let node = Node::builder().await?.with_vault(vault).build(&ctx)?;
let issuer_identity = hex::decode("81825837830101583285f68200815820afbca9cf5d440147450f9f0d0a038a337b3fe5c17086163f2c54509558b62ef4f41a654cf97d1a7818fc7d8200815840650c4c939b96142546559aed99c52b64aa8a2f7b242b46534f7f8d0c5cc083d2c97210b93e9bca990e9cb9301acc2b634ffb80be314025f9adc870713e6fde0d").unwrap();
let issuer = node.import_private_identity(None, &issuer_identity, &secret).await?;
println!("issuer identifier {}", issuer);
// Tell the credential issuer about a set of public identifiers that are
// known, in advance, to be members of the production cluster.
let known_identifiers = vec![
Identifier::try_from("Ie70dc5545d64724880257acb32b8851e7dd1dd57076838991bc343165df71bfe")?, // Client Identifier
Identifier::try_from("Ife42b412ecdb7fda4421bd5046e33c1017671ce7a320c3342814f0b99df9ab60")?, // Server Identifier
];
let members = Arc::new(AuthorityMembersSqlxDatabase::create().await?);
// Tell this credential issuer about the attributes to include in credentials
// that will be issued to each of the above known_identifiers, after and only
// if, they authenticate with their corresponding latest private key.
//
// Since this issuer knows that the above identifiers are for members of the
// production cluster, it will issue a credential that attests to the attribute
// set: [{cluster, production}] for all identifiers in the above list.
//
// For a different application this attested attribute set can be different and
// distinct for each identifier, but for this example we'll keep things simple.
let credential_issuer = CredentialIssuerWorker::new(
members.clone(),
node.identities_attributes(),
node.credentials(),
&issuer,
"test".to_string(),
None,
None,
true,
);
let mut pre_trusted_identities = BTreeMap::<Identifier, PreTrustedIdentity>::new();
let attributes = PreTrustedIdentity::new(
[(b"cluster".to_vec(), b"production".to_vec())].into(),
now()?,
None,
issuer.clone(),
);
for identifier in &known_identifiers {
pre_trusted_identities.insert(identifier.clone(), attributes.clone());
}
members
.bootstrap_pre_trusted_members(&issuer, &pre_trusted_identities.into())
.await?;
let tcp_listener_options = TcpListenerOptions::new();
let sc_listener_options =
SecureChannelListenerOptions::new().as_consumer(&tcp_listener_options.spawner_flow_control_id());
let sc_listener_flow_control_id = sc_listener_options.spawner_flow_control_id();
// Start a secure channel listener that only allows channels where the identity
// at the other end of the channel can authenticate with the latest private key
// corresponding to one of the above known public identifiers.
node.create_secure_channel_listener(&issuer, DefaultAddress::SECURE_CHANNEL_LISTENER, sc_listener_options)?;
// Start a credential issuer worker that will only accept incoming requests from
// authenticated secure channels with our known public identifiers.
let allow_known = IdentityIdAccessControl::new(known_identifiers);
node.flow_controls()
.add_consumer(&DefaultAddress::CREDENTIAL_ISSUER.into(), &sc_listener_flow_control_id);
node.start_worker_with_access_control(
DefaultAddress::CREDENTIAL_ISSUER,
credential_issuer,
allow_known,
AllowAll,
)?;
// Initialize TCP Transport, create a TCP listener, and wait for connections.
let tcp = node.create_tcp_transport()?;
tcp.listen("127.0.0.1:5000", tcp_listener_options).await?;
// Don't call node.shutdown() here so this node runs forever.
println!("issuer started");
Ok(())
}
cargo run --example 06-credential-exchange-issuertouch examples/06-credential-exchange-server.rs// examples/06-credentials-exchange-server.rs
// This node starts a tcp listener, a secure channel listener, and an echoer worker.
// It then runs forever waiting for messages.
use hello_ockam::Echoer;
use ockam::abac::{IncomingAbac, OutgoingAbac};
use ockam::identity::{SecureChannelListenerOptions, Vault};
use ockam::tcp::{TcpListenerOptions, TcpTransportExtension};
use ockam::vault::{EdDSACurve25519SecretKey, SigningSecret, SoftwareVaultForSigning};
use ockam::{Context, Node, Result};
use ockam_api::enroll::enrollment::Enrollment;
use ockam_api::nodes::NodeManager;
use ockam_api::DefaultAddress;
use ockam_multiaddr::MultiAddr;
#[ockam::node]
async fn main(ctx: Context) -> Result<()> {
let identity_vault = SoftwareVaultForSigning::create().await?;
// Import the signing secret key to the Vault
let secret = identity_vault
.import_key(SigningSecret::EdDSACurve25519(EdDSACurve25519SecretKey::new(
hex::decode("5FB3663DF8405379981462BABED7507E3D53A8D061188105E3ADBD70E0A74B8A")
.unwrap()
.try_into()
.unwrap(),
)))
.await?;
// Create a default Vault but use the signing vault with our secret in it
let mut vault = Vault::create().await?;
vault.identity_vault = identity_vault;
let node = Node::builder().await?.with_vault(vault).build(&ctx)?;
// Initialize the TCP Transport
let tcp = node.create_tcp_transport()?;
// Create an Identity representing the server
// Load an identity corresponding to the following public identifier
// Ife42b412ecdb7fda4421bd5046e33c1017671ce7a320c3342814f0b99df9ab60
//
// We're hard coding this specific identity because its public identifier is known
// to the credential issuer as a member of the production cluster.
let change_history = hex::decode("81825837830101583285f682008158201d387ce453816d91159740a55e9a62ad3b58be9ecf7ef08760c42c0d885b6c2ef41a654cf9681a7818fc688200815840dc10ba498655dac0ebab81c6e1af45f465408ddd612842f10a6ced53c06d4562117e14d656be85685aa5bfbd5e5ede6f0ecf5eb41c19a5594e7a25b7a42c5c07").unwrap();
let server = node.import_private_identity(None, &change_history, &secret).await?;
let issuer_identity = "81825837830101583285f68200815820afbca9cf5d440147450f9f0d0a038a337b3fe5c17086163f2c54509558b62ef4f41a654cf97d1a7818fc7d8200815840650c4c939b96142546559aed99c52b64aa8a2f7b242b46534f7f8d0c5cc083d2c97210b93e9bca990e9cb9301acc2b634ffb80be314025f9adc870713e6fde0d";
let issuer = node.import_identity_hex(None, issuer_identity).await?;
// Connect with the credential issuer and authenticate using the latest private
// key of this program's hardcoded identity.
//
// The credential issuer already knows the public identifier of this identity
// as a member of the production cluster so it returns a signed credential
// attesting to that knowledge.
let authority_node = NodeManager::authority_node_client(
tcp.clone(),
node.secure_channels().clone(),
&issuer,
&MultiAddr::try_from("/dnsaddr/localhost/tcp/5000/secure/api").unwrap(),
&server,
None,
)
.await?;
let credential = authority_node.issue_credential(node.context()).await.unwrap();
// Verify that the received credential has indeed be signed by the issuer.
// The issuer identity must be provided out-of-band from a trusted source
// and match the identity used to start the issuer node
node.credentials()
.credentials_verification()
.verify_credential(Some(&server), &[issuer.clone()], &credential)
.await?;
// Start an echoer worker that will only accept incoming requests from
// identities that have authenticated credentials issued by the above credential
// issuer. These credentials must also attest that requesting identity is
// a member of the production cluster.
let tcp_listener_options = TcpListenerOptions::new();
let sc_listener_options = SecureChannelListenerOptions::new()
.with_authority(issuer.clone())
.with_credential(credential)?
.as_consumer(&tcp_listener_options.spawner_flow_control_id());
node.flow_controls().add_consumer(
&DefaultAddress::ECHO_SERVICE.into(),
&sc_listener_options.spawner_flow_control_id(),
);
let allow_production_incoming = IncomingAbac::create_name_value(
node.identities_attributes(),
Some(issuer.clone()),
"cluster",
"production",
);
let allow_production_outgoing = OutgoingAbac::create_name_value(
ctx.get_router_context(),
node.identities_attributes(),
Some(issuer),
"cluster",
"production",
)?;
node.start_worker_with_access_control(
DefaultAddress::ECHO_SERVICE,
Echoer,
allow_production_incoming,
allow_production_outgoing,
)?;
// Start a secure channel listener that only allows channels with
// authenticated identities.
node.create_secure_channel_listener(&server, DefaultAddress::SECURE_CHANNEL_LISTENER, sc_listener_options)?;
// Create a TCP listener and wait for incoming connections
tcp.listen("127.0.0.1:4000", tcp_listener_options).await?;
// Don't call node.shutdown() here so this node runs forever.
println!("server started");
Ok(())
}
cargo run --example 06-credential-exchange-servertouch examples/06-credential-exchange-client.rs// examples/06-credentials-exchange-client.rs
use ockam::identity::{SecureChannelOptions, Vault};
use ockam::tcp::TcpConnectionOptions;
use ockam::vault::{EdDSACurve25519SecretKey, SigningSecret, SoftwareVaultForSigning};
use ockam::{route, Context, Node, Result};
use ockam_api::enroll::enrollment::Enrollment;
use ockam_api::nodes::NodeManager;
use ockam_api::DefaultAddress;
use ockam_multiaddr::MultiAddr;
use ockam_transport_tcp::TcpTransportExtension;
#[ockam::node]
async fn main(ctx: Context) -> Result<()> {
let identity_vault = SoftwareVaultForSigning::create().await?;
// Import the signing secret key to the Vault
let secret = identity_vault
.import_key(SigningSecret::EdDSACurve25519(EdDSACurve25519SecretKey::new(
hex::decode("31FF4E1CD55F17735A633FBAB4B838CF88D1252D164735CB3185A6E315438C2C")
.unwrap()
.try_into()
.unwrap(),
)))
.await?;
// Create a default Vault but use the signing vault with our secret in it
let mut vault = Vault::create().await?;
vault.identity_vault = identity_vault;
let mut node = Node::builder().await?.with_vault(vault).build(&ctx)?;
// Initialize the TCP Transport
let tcp = node.create_tcp_transport()?;
// Create an Identity representing the client
// We preload the client vault with a change history and secret key corresponding to the identifier
// Ie70dc5545d64724880257acb32b8851e7dd1dd57076838991bc343165df71bfe
// which is an identifier known to the credential issuer, with some preset attributes
//
// We're hard coding this specific identity because its public identifier is known
// to the credential issuer as a member of the production cluster.
let change_history = hex::decode("81825837830101583285f68200815820530d1c2e9822433b679a66a60b9c2ed47c370cd0ce51cbe1a7ad847b5835a963f41a654cf98e1a7818fc8e820081584085054457d079a67778f235a90fa1b926d676bad4b1063cec3c1b869950beb01d22f930591897f761c2247938ce1d8871119488db35fb362727748407885a1608").unwrap();
let client = node.import_private_identity(None, &change_history, &secret).await?;
println!("issuer identifier {}", client);
// Connect to the authority node and ask that node to create a
// credential for the client.
let issuer_identity = "81825837830101583285f68200815820afbca9cf5d440147450f9f0d0a038a337b3fe5c17086163f2c54509558b62ef4f41a654cf97d1a7818fc7d8200815840650c4c939b96142546559aed99c52b64aa8a2f7b242b46534f7f8d0c5cc083d2c97210b93e9bca990e9cb9301acc2b634ffb80be314025f9adc870713e6fde0d";
let issuer = node.import_identity_hex(None, issuer_identity).await?;
// The authority node already knows the public identifier of the client
// as a member of the production cluster so it returns a signed credential
// attesting to that knowledge.
let authority_node = NodeManager::authority_node_client(
tcp.clone(),
node.secure_channels().clone(),
&issuer,
&MultiAddr::try_from("/dnsaddr/localhost/tcp/5000/secure/api")?,
&client,
None,
)
.await?;
let credential = authority_node.issue_credential(node.context()).await.unwrap();
// Verify that the received credential has indeed be signed by the issuer.
// The issuer identity must be provided out-of-band from a trusted source
// and match the identity used to start the issuer node
node.credentials()
.credentials_verification()
.verify_credential(Some(&client), &[issuer.clone()], &credential)
.await?;
// Create a secure channel to the node that is running the Echoer service.
let server_connection = tcp.connect("127.0.0.1:4000", TcpConnectionOptions::new()).await?;
let channel = node
.create_secure_channel(
&client,
route![server_connection, DefaultAddress::SECURE_CHANNEL_LISTENER],
SecureChannelOptions::new()
.with_authority(issuer.clone())
.with_credential(credential)?,
)
.await?;
// Send a message to the worker at address "echoer".
// Wait to receive a reply and print it.
let reply: String = node
.send_and_receive(
route![channel, DefaultAddress::ECHO_SERVICE],
"Hello Ockam!".to_string(),
)
.await?;
println!("Received: {}", reply); // should print "Hello Ockam!"
node.shutdown().await
}
cargo run --example 06-credential-exchange-clientMatthew Gregory: On today's episode, we want to dive into some technology and get into the good stuff. So we thought we'd go through a couple of common ways that people connect applications and distributed systems. You have to presume that we live in a world where applications and data are distributed across clouds. And when I say clouds, I use that in the broadest way possible. Snowflake is a cloud, a windmill or a Tesla is a cloud, it's whatever that environment is. It's running applications.
We were talking to the solutions engineer at the Google Cloud conference, and we were describing distributed applications, and his pushback was: why don't we just run everything in the same VPC, problem solved.
Good luck with that. We're a pretty small company, our infrastructure is pretty simple. We have things connected all over the place, right? It's a funny retort, that people could pull that off. Running everything inside one box.
Glenn Gillen: It just doesn't happen in the real world these days. Does it?
Matthew Gregory: Exactly. You're going to want to run data lakes like Snowflake and have them manage your data. You're going to want to do analytics with Datadog.
Enterprises have multi-cloud and on-prem systems. People are still moving to the cloud. They're just not lifting and shifting the whole infrastructure.
Mrinal Wadhwa: I think people experience the internet from their own perspectives, social media is not the same for everybody. Similar people view the cloud through whatever infrastructure or application they are managing and how widely it distributes. Most company's applications and systems tend to be across clouds. Oftentimes you're communicating across companies, you're communicating to systems that might live in a different geography all the time. So things are distributed and becoming more so.
Glenn Gillen: I got sucked into that a little bit myself. Working at AWS, even when customers told you they were all in AWS, the reality is that there's a lot of their workload running in AWS but there are still people in an office somewhere that need to connect to those things. Or remotely from cafes and home these days. So there are still multiple environments that need to be connected in some way. Being in a single cloud is not an observed reality, except in anything but the smallest mom-and-pop shop setups.
Matthew Gregory: Okay, so let's switch over to this base case here.
What I've set up is a very simple architecture, we have two different clouds or two different pieces of infrastructure. In one of them, we have a VPC or a network boundary, and inside that we have three different machines. In the other cloud, we also have a network boundary, another VPC, and two databases.
What we need to do is we need to connect one of these machines to one of these databases so that the applications inside the machine can connect to the database. We'll go through three different ways you could make this connectivity happen.
First, we'll talk about how we could set this up with A VPN. We'll also talk about how we could set this up with a reverse proxy, and then we will talk about how we could set this up with Ockam. And what you get is the difference between each of them. We'll start with the VPN.
In this one, what we are doing is we're setting up a new network that encapsulates. One of the machines is on the left and the database is on the right. And with this virtual network boundary, we can now move data from our database to the machine and back and forth because they're now inside the same boundary. Glenn, you have a really good mental model for what's happening here, and could you talk a bit about how you think about virtualizations in the cloud world?
Glenn Gillen: If you scale this problem down to something that was physically in the same spot, one of the solutions you would do here is put a network card into both machines and you'd attach them via cable, or connect two routers, assuming they're in different networks, you'd find a way to physically plug those things into each other.
And that's ultimately what a VPN is doing, but at the software layer. You install a virtual network interface, and then you're running essentially a virtual cable between those two points. I've always found that to be a useful way to think about this. You are connecting things so that they can then get access to each other, whether it be two networks, two routers, two machines, whatever it is.
There are a bunch of similar properties between connecting things in the physical world and connecting those two networks.
Mrinal Wadhwa: I think that's a really good way to think about it. If you look at it from the perspective of each machine involved in a VPN, that machine effectively becomes connected to a virtual network interface card, right? As you were describing, Glenn.
Now what happens is that the machine has a virtual IP on this network interface card. And it has a physical IP on some other network. Now effectively, what you have is two IP ranges or two networks connected to a single machine.
So effectively this machine becomes a little router. As long as someone can figure out a way to traverse these routes, they can jump networks using a VPN. What you've got looks a lot like physically connecting the machine that's running that database to a machine in another network. These two are now virtually connected at the machine level.
Matthew Gregory: That brings up a question. If we go back to the first diagram, we had two networks that were physically disconnected from each other, so there was no way for something in the left environment to engage with the right environment. We need to move data between these networks, so we need to connect them in some way. So we created this third virtual network. Now we have two machines that are not part of this VPN and a database that's not part of this VPN but are part of the same network that the machine and the database that are inside the VPN are connected to. Mrinal, what can happen in those scenarios?
Mrinal Wadhwa: The key thing is that there are now three networks and all three of them have connectivity between them, right? Because those two machines are in two networks each, what we've got now are these three overlapping networks that are connected to each other.
What that effectively means is even though we intended to connect one machine to one database, what we've got is the ability for machines in one of the networks to potentially reach the database in the other network. Because there are now connections between these three networks, we must think about all the controls to make sure this cannot happen, and make sure there are no bugs in the programs that are making these connections. Effectively what we've got is three overlapping networks acting like one network.
Matthew Gregory: For the point of illustration, I created a more complicated version. This diagram is trying to articulate the reality that we live in where there are multiple clouds, with multiple networks, with multiple machines. I've added a bunch of other clouds, networks, and machines to this topology. This is very indicative of a particular customer that we're working with. They deploy machines into scientific environments, and they want those machines to be able to write data to their data cloud.
One of the problems that they have is, as they describe it, the networks look like Swiss cheese. They have this very simple topology where they're trying to add a machine to a network and have it write to another network, but they have no control over the network. They don't know what other VPNs exist in the network. So they're just trying to do this one-to-one connection, but they're deploying a machine into an environment where anything could be happening there.
Glenn Gillen: There's a bit of a disconnect when you start talking about VPNs because people mentally segment the network and this virtual thing over the top of the network. But essentially it's just more of the network. You end up back at the same place as though you were plugging all those things in. And if you're plugging those things in, you'd be much more aware of the Swiss cheese you've created for yourself by giving all these different things access to your network.
Matthew Gregory: That's right. That's a great segway into the next diagram, which is what you get when you start connecting things with VPNs.
You'll notice that there is no concept of infrastructure or clouds in this. Essentially what we have is one big network with a bunch of machines and databases, they're all connected with a cable, to use that virtual metaphor of connections.
What we are getting is this one big network with all the machines connected to each other via other machines.
Mrinal Wadhwa: And because all these things are now connected and you have this problem of potential lateral movement, what's useful to think about is, how is this all working?
The way it's working is there is a VPN server somewhere on the internet, and every participant in a VPN makes an outgoing connection to that server. They may do various approaches to NAT traversal in that setting, but they make this connection to this central server. And over that, there's usually some sort of security protocol like IPSec or WireGuard that then sets up these secure channels over this network layer path. So you've got IPSec or WireGuard, which sets up a secure connection between the participants and the machine. And then over this secure connection is a virtual IP network.
Because you have this virtual IP network, any attacker tooling or any scan tooling that can operate on the IP level, where it can scan all the IPs available in a particular network is now tooling an attacker might be able to leverage to map out this network. They can find lateral movement points, and attack things that you weren't intending to connect because they're available at the IP layer. Even though you intended to create one connection, other machines or databases might be reachable over the IP network.
So an attacker who compromises one machine can run scans and attacks to try and compromise another part of the network even though your focus was just this connection. Keep that picture in mind. There's a way of routing packets around, on top of that, there is a secure channel, and on top of that, there's a full virtual IP network that's created with a VPN.
Matthew Gregory: In fact, you'll notice I added this little red machine over here. This is a machine, for this illustration, that has malicious code running on it that wants to do bad things in the network. This is a good opportunity to bring up one of the topics we talk about when thinking about secure by design, the concept of starting with all the doors open or all the doors shut. And what we have here with this VPN diagram is a world where all the doors are open. If we think we might end up with malicious code in one machine, we have to do something on the other machines to try to prevent traversal of our virtual network, and an attacker doing something malicious in this other machine where our customer data might be living.
Glenn Gillen: I first got introduced to concepts similar to this when I was building highly reliable distributed systems and the human processes around that as well. Either you are designing systems and processes where everything needs to go right, or are designing them in a way where multiple things have to go wrong.
That's secure by design philosophy. Are you dependent on everyone getting everything right all of the time for your system to be secure? Or does it require multiple points of failure for things to break? If you start from a place where everything has to go wrong and then you're hosed, you are naturally by design in a much more secure place. I didn't appreciate this until I joined Ockam, but a common VPN use case in places I've worked is as follows: I want to do some ad hoc reporting on something. We have a data warehouse, a Postgres service, or something that I need to access that we don't want on the internet.
Often a VPN connection is how you connect to that thing. We just took that for granted, that's just the way you did things, they're the tools you're familiar with. And it wasn't until, you know, speaking to you both ultimately that I thought it was a little bit nuts.
If you take that scenario where I want to access this database, and what we do is run this big virtual cable from your machine into the network where this database runs. That's not how you do it in the real world, no one would realistically run a cable into that database.
But that's what we do, we do it virtually because it's quick and easy. We're familiar with it. But then you get into this place where now we need to lock down the firewall rules and the access control. We've opened up this big pipe and now we need to do a dozen things to make sure we've closed it back down, just to solve for that one particular connection. I just wanted to access a Postgres process that was running on one machine, but you've opened up the world to me and now you're having to do all this work to close it back down.
Matthew Gregory: Another way to put it is, we want a machine to be able to access some data. So we're going to create a virtual network between the two, so we can pass things back and forth. But we keep doing this again and again. And add more and more complexity to the point that we've connected everything, but now we need 15 other security products to start locking things down. This is the metaphor "start closing all the doors." Just walk around the RSA conference. There are 50 things you can go by to fix the VPN nightmare that you've created for yourself.
The question that this begs is, is there just a better base assumption? We think there is, and we'll get, we'll get to that, we are saving it for the end. But let's move on to another common topology here, let's talk about reverse proxies. These are very common, they've been around forever. All the cloud providers have them, CloudFlare has a reverse proxy, and ngrok has a reverse proxy. It's a very common way to connect things, maybe equally as common as VPNs.
Glenn, why don't you run through what's happening in a reverse proxy?
Glenn Gillen: For the common database access use case I just mentioned, a VPN solution works fine when you've got people who need access. But if that's a valuable asset for a company that you need to share across teams, across different departments, quite often you won't want to give direct access to that thing.
One thing you might do is put a private API in front of the database to give the business or other developers and the organization access to this data in a consistent manner. Now you're running something else that's closer, a reverse proxy, be it a private API or a load balancer. That lets that database effectively get exposed to the internet, you now have an interface that's publicly accessible to some part of the internet.
There are rules that you can put in place to try to scope it back down again. We're back into that VPN story; we've put something private onto the internet and we're using a dozen different things to try and scope it back down and restrict access because we don't want to put the actual database on the public internet.
Decades of best practices taught us that that's probably not a good posture to take. There are many reasons why you want to do that. You're introducing this choke point, essentially.
Mrinal Wadhwa: That's right. Because we don't want to expose the database server directly on the internet, we add this middle layer, which is a good way to do things like load balancing and achieve high availability because you can switch the connection when you bring up a new version of the database or a redundant copy of the database and so forth.
From a security standpoint, it is effectively still exposing the database to the internet. It can be attacked in all sorts of ways because you've now opened this big wide dangerous door. And then what people do is put in all sorts of controls. You might put in some authentication tokens, you might do TLS in the process, but now you're trying to close those doors down. And that comes with a set of challenges that you must now tackle.
Matthew Gregory: This might be the most open door. If we go back to our first diagram, we have a machine that needs to access some data. Let's presume it's the only machine on planet Earth that needs to access this data. The most open thing that you could do would be to expose your entire database to the wide world of the internet. And then you have to start adding restrictions again.
The RSA conference and the vendors there will sell you 50 different solutions for how to undo this and start closing the doors. Every other day we see customer data that's being leaked out of cloud vendors and it highlights that you don't want to expose your database to the public internet and just hope that you've put enough guardrails in place.
Glenn Gillen: One of the other things I would run into when I was a developer was, quite often you're working on a feature branch or something that I want to share with a colleague, a remote company, or someone who's in a different office, or not on the same network as me.
If I'm at home trying to share something, I've got a static IP at the moment. How do you tell them how to access it? Do you set up a port forward on your router? It's a real pain.
And so quite often what you'd reach for is a managed reverse proxy service where you run it, connect it to the development process that's on my machine, that's serving the web pages that I'm editing. And you'd let someone into your local box that way.
But, as you pointed out there, I've put that thing on the public internet. That's the whole point of what I tried to do there is, I've shared this on the public internet. How am I restricting any other random person from accessing that? Well, now I have to put other controls in place to make sure that I'm scoping the world down to just the individual that I want to access it.
Mrinal Wadhwa: And you might have a valid case for putting things on the internet, right? If you're hosting a website that should be accessible to the world and is production-ready. Then, you want a door exposed to the internet. That's by design.
But if you have a database as a service oftentimes they'll give you an address to the database on the internet, and that's not desirable. There are maybe 5-10 clients in your application that need to get to the database. There's no reason for that database to be a public endpoint on the internet. However, oftentimes it is.
So, there's a place for reverse proxies, it's usually in a scenario where you intentionally want to expose an endpoint to the internet because lots of people need to reach that endpoint. In that case, it makes sense to have a load balancer or a reverse proxy exposed.
Matthew Gregory: That's exactly right. Let's move on to the next variation of this, which is what we're seeing in the Kubernetes ecosystem. Glenn, why don't you take this one?
Glenn Gillen: Let's say you're running pods or clusters of Kubernetes. You have a bunch of microservices that are running somewhere that are serving your business. There's usually a control plane or private APIs there that you need to share across clouds, regions, teams, across other services. And you run into the same problem. You're now in a space where you have to solve for connectivity. How do I get access to the operator? How do I get access to the administrative functions? How do I just make those microservices available?
You very quickly get pushed into a place where you put a reverse proxy in front of your cluster. Now, depending on how it's set up, you have what should have been private clusters available with a public IP address, and all of the problems that come with that. And now you're back to figuring out what our controls are.
What are we putting in place to make sure that we're scoping back access again? This isn't meant to be public, but it kind of is.
Mrinal Wadhwa: Another thing that happens in this case is that you want security end-to-end on these data flows, right? Let's say I have a client application running in Azure and I want to access a microservice in my Kubernetes cluster in Google Cloud. If you use a reverse proxy to make this connection happen, oftentimes your TLS connection is terminated at the reverse proxy.
If you are running the reverse proxy, maybe that's okay, but if a third party is running the reverse proxy, now your application is exposed to the risk of that service provider and how they might be attacked.
Sometimes people put in the work to establish a second TLS connection back from the reverse proxy, which then is mutually authenticated and encrypted all the way back to your Kubernetes cluster. But usually, because that part is complex, people will leave out that part. So you have one TLS connection that is internet-facing, but as soon as the traffic enters behind the reverse proxy, nothing is protecting it.
Even when you have something protecting it, you still have TLS terminating inside the reverse proxy. And now your traffic is vulnerable at that middle point where it's being handed over from one TCP connection to the other one. There are no protections around it.
The right way to do it would be to come up with a mechanism that would allow this connectivity to happen in a way that limits access only to the intended client applications. And it does it in a way that doesn't expose my microservices to all sorts of attacks that may come from the internet.
Glenn Gillen: One assumption people make with managed services is implicitly trusting vendors with all of their data.
It's not about the trust you have in that vendor. Are you building a system where everything has to go right for you to be secure? Or are you building a system where multiple things have to go wrong? Maybe the hyperscalers are at the scale where you've delegated so much trust that it's fine. But you're not trying to protect yourself from a wayward employee who's decided to be nefarious and go and look at your data. You're trying to protect yourself from well-intentioned companies that thought they had a really good security posture, but all it took was one breach and their entire customer base has been exposed.
And that's the risk there is. It's not that you don't trust them to do TLS properly, or you don't trust their employees. If they get breached and someone gets access to that reverse proxy, your data is plain text. It's transferring through that and that's not in your control anymore.
The way TLS works is that the encryption is only good for the length of the TCP connection and that handoff point is a vulnerability spot for you.
Mrinal Wadhwa: Oftentimes people miss the fact that when the data is plain text, not only is it vulnerable to theft, it's vulnerable to manipulation. There was some news about Russian attackers sitting inside the Ukraine telecom infrastructure a few days ago. And they were sitting there for years.
Theft of data is scary, but if an attacker is sitting inside someone's infrastructure, they can also manipulate the data as it's flowing, and that can oftentimes have more catastrophic effects than theft. It's worth thinking about how data integrity is guaranteed end to end.
Glenn Gillen: I'm fascinated about this at the moment because I think as an industry we've been so focused on privacy and exposure because it's embarrassing and there's been so much of it over the past couple of years. But especially with this move to AI training models, I think with integrity we're a little bit asleep at the wheel. People are so focused on making sure they don't get exposed.
They haven't put deep thought into the considerations around what would happen if people were just sitting there for two years manipulating the data. Would you have even noticed? What's the long-term strategic impact on the business when you realize that the data lake that you've invested all that money in is just polluted with noise and you didn't realize it? You have no way to fix that.
Matthew Gregory: I have a very specific example here. I was talking to someone, a vendor that has big wind farms and they made the point that their data isn't that special and it doesn't need to be protected because it's just wind speed information that's coming from the wind farm to the data center. And this is effectively public information. There is no real privacy concern. If you just wander out in the field and put up a handheld anemometer, you could look at say it's blowing 18 knots out here. Why would we need to protect that data?
Well, my response was, if I have access to the data as it's moving from the wind farm to the data center, and I change the wind speed from 18 and invert the numbers and make it 81, what does your data center do with that information? Well, it shuts down the wind farm because it thinks that it's exceeded the velocity for safe operating conditions. So it stops the wind farm. So here's a good example of how manipulating data can cause massive destruction from a business point of view, even though this data is essentially public. Wind speed is not something that needs to be kept private, but it's something that you need to rely on to make smart business decisions. In this case, whether or not the wind farm should be operating.
Mrinal Wadhwa: That example is really interesting, Matt. Because you said the data center shuts down the wind farm. My next question is, how does that instruction to shut down operate? I bet it's going over the same channel, which means if I can manipulate data on the channel, I can give the wind farm the instruction to shut down, right?
So that's why you need data integrity. People don't think through this type of impact enough, I feel.
Matthew Gregory: When I think of reverse proxy, I essentially have this diagram in mind. I had an application that was running in my cloud environment, running in a private network, and I wanted to give access to the rest of the world.
Virtually what I have done is I have moved an application that was safe inside of my cloud, inside of my network, and I have virtually moved it to the edge of the cloud and made it available on the internet. That's my model of a reverse proxy, which is a great use case for Ockam.io or any website.
It's running in a safe environment inside Vercel, but they need to make it available so that everyone listening to the podcast can go to Ockam.io at any time that they want to access our website.
A reverse proxy in that case probably looks like a load balancer. That's a perfect use case for taking something in a secure, private environment and moving it to the edge of the internet so that everyone can access it.
This is my mental model for what's happening in a reverse proxy, our private machine can go out to the internet, traverse the internet, and find this service publicly available on the internet.
Mrinal Wadhwa: Which is great when you want everybody on the internet to get to it, but if the goal was to allow a specific set of clients to get to it then we're opening too big of a door.
Matthew Gregory: We're opening the biggest door, everyone. We're starting with infinity and trying to get down to something finite. It's not an easy problem to solve.
Let's move on to how this changes with Ockam. Mrinal, why don't you walk us through what we've done with Ockam and where this paradigm shift is? And what I'll introduce in this diagram is this new concept of the application inside the box.
When you start thinking about Ockam you have to think at the application layer. Why don't you describe what we've done here and how this diagram looks a lot different than the previous diagrams we've shown?
Mrinal Wadhwa: With Ockam we think in terms of connecting applications. At Ockam's core is a set of protocols to do very similar things that we talked about in the case of a VPN. We have a routing layer that routes information across various machines at the application layer.
And then we have a secure channel implementation that allows us to set up end-to-end encrypted, mutually authenticated connections. The place where we're different from a VPN is that over that secure channel, we do not set up a virtual IP network. There is no virtual IP overlay network with Ockam.
Instead, there are two things you could do. You can pull the Ockam library into the application, and send a message to another application that is also using the Ockam library. And do that over an encrypted, mutually authenticated connection. In that scenario, these two applications become virtually connected and they're not connected to anything else. They only mutually authenticate each other and they only trust each other to send themselves messages.
But oftentimes, changing your application's code and pulling in a new library is a bigger project to take on. It may be sufficient to run Ockam next to your application and our building block for that we call Ockam portals.
In that scenario, what happens is we take your remote application, and we run a portal outlet next to it. So next to the database we run a portal outlet. Next to your database client, which is an application, we run an Ockam portal inlet. That portal is a single point-to-point virtual TCP connection over that secure end-to-end encrypted connection we established before.
Instead of creating a virtual IP network like a VPN, we create a virtual point-to-point TCP connection between two things that are running next to your application server and your application client. So your remote database server then starts appearing on localhost next to your database client application on the other side.
So your client code doesn't need to change. Your database code doesn't need to change. But effectively, what ends up happening is that the remote database appears on localhost next to the application that needs to access it.
And all the communication that's happening to that remote database is happening over this end-to-end encrypted, mutually authenticated secure channel.
Matthew Gregory: We're living in this world of virtual concepts and we have this concept at Ockam called virtual adjacency. Effectively what we have done is we've taken a database that's running somewhere else and virtually moved it directly next to the application that needs to access that data, and we make it available on localhost to that application. So virtually we're kind of getting back to this monolithic approach and Glenn, maybe you can describe why that's a benefit.
Glenn Gillen: That was one of my realizations, especially as a reformed developer. It always surprises me how complicated it is when you want to get two things to talk that aren't in the same network. You've got an RDS Postgres instance running in one place, and then you've got a Lambda function or a container running somewhere else that you want to access that database.
I know what to do in that scenario. It's a dozen different things I need to configure in Terraform to set up security groups and all the other things to make that happen. It's a lot of work. We've evolved into this over time and there are good reasons for that.
I wouldn't trade the reliability, availability, and scale benefits you get from doing that. But the sacrifice is the simplicity of having everything in one box that you scaled vertically if you ever needed to, and everything lived on that.
Your database, your web server, it was all there. And then you'd eventually pull the database out to something else. It was still on the same network, but things were kind of easy. It was a simple mental model to get your head around.
You don't have to worry about the dozen things that you need to configure in Terraform to make it work. It's a smaller surface area for you to consider the risk implications as well. You protect the boundary of that one box and things are good.
There are two things I love about this virtual adjacency concept once I got a taste for what it was. One, it's a simple mental model as a development construct. You just access localhosts. The way I access that database and all the bits that have to happen for the database to be able to talk to my app have been abstracted away. From a vulnerability surface perspective as well, it's now simplified. I only have to worry about the ends of those two things. I don't have to worry about every single thing in between that I have to get right for it to be secure.
As long as I can make sure that only those two things can talk to each other, we're good. I've solved my security problem. It's bringing back the benefits you had from that simplicity without sacrificing all the other benefits we've gotten from the cloud over the past couple of decades.
Matthew Gregory: Mrinal, tell us a little bit about the difference in how applications are isolated with Ockam versus that scenario we talked about with VPNs. Because with VPNs we talked about two machines in the same network, but now we're talking about an application running inside of a machine with a virtualized adjacency to a remote database. How do we have to think about security in that network, where we have this data that's now been moved over into this other machine? How should we be thinking about that?
Mrinal Wadhwa: To pull on something Glenn said earlier, there is no virtual cable connecting the machine that has the application to the machine that is running the database at the IP level. Those two machines are not on the same network. In this model, all that's possible is a single TCP connection to the database. That's it, right?
So because there is no connection at the IP level, not only are these two machines not on the same network but I can't laterally move from one virtual IP network into another one by doing scans and finding ways to jump around. Because there is no IP network for me to jump around in, there are no scanning tools I can run there.
What I can do is make a TCP connection to the database server, and only that database server. So the benefit from the point of view of the side that's running the database service here is that the application clients and anything else that might be local to the network where the application client is, can't enter this network at all.
From the point of view of the application client, what's nice is that it doesn't need to think in terms of remote names to remote IPs to resolve. It's all just localhost. So you have a localhost address at 127.0.0.1, and you have a port and you make connections to it as if the database was a single process running on that same machine. So it simplifies how connectivity happens there.
Behind the scenes, we are still making the connection happen. To do that we're doing all the things a VPN would be doing, which is we're routing the network, handing data over from one TCP connection to another TCP connection, we're doing NAT traversal in various ways. And very similar to the more modern VPNs that use WireGuard, we're also using a Noise Protocol framework-based secure channel that sets up this end-to-end encrypted channel. But all of that, you as the application developer don't have to worry about.
All of that just works. You run a command next to your database to start the portal outlet. You run another command next to your application client to start the portal inlet. You've got this end-to-end encrypted, mutually authenticated portal, and both sides are not exposed to each other's weaknesses and only this one TCP connection can pass through.
Matthew Gregory: I think we skim over this a lot where we talk about Ockam being simple, and there's not that much else to think about. And the reason we can say that is because we're starting with the doors closed. In a door's open environment, you may have connected things with the VPN or reverse proxy, but there's a whole world of problems and hurt coming your way.
You've created a whole work list of trying to figure out how to shut all the doors and then monitor to make sure the right doors are shut and which ones are open. But the simplicity comes from that Ockam is starting from a default doors closed point of view, and then opening up exactly and only what is needed to do the very specific job that that application needs to do. So it ends there.
Mrinal Wadhwa: A really interesting point is that there is no door. It's not a matter of opening the door or closing the door. There is no door from this app to this database, it just doesn't exist. There is no path that can be taken to traverse this. Whereas if you had an IP layer connection, you can traverse the network to figure out what's going on over here in that other network.
That's the advantage here, the door doesn't exist.
Matthew Gregory: This example becomes stark when you're talking about sharing data between two different companies. Say you're a SaaS product and you need access to data that exists at your customer. This is a perfect use case where you want to give explicit access to only the data that the SaaS application needs and absolutely nothing else inside that network or any other processes that might go on in that network.
Glenn Gillen: How we got here as an industry is because of the gradual evolution of the way we used to do things. I've talked about the virtual cable, we've taken things that were familiar to us and physical and then turned them into virtual things that we can do. This is how you end up in a place where you're connecting networks to solve these problems. There are absolutely still cases where that's exactly what you want to do, but there's also a whole bunch of cases where we're using that tool, but it's the wrong tool for the job.
We never wanted to connect the two networks between those things. What you wanted to do was connect applications. That's what we've been wanting to do for decades, but we haven't had the right tools and we've made the best with the tools we've had. That's the mindset shift here.
Let's give you better tools that map to what modern needs are, rather than forcing you to shoehorn the existing approach into what you're trying to achieve.
Mrinal Wadhwa: That's a really good point. The example Matt was talking about was a SaaS application wanting to reach some data source inside a customer's environment. At no point does someone want their SaaS vendor in their VPC, that's never the intent. But effectively, that's what we end up creating.
If you look at how various integrations to SaaS vendors work, we end up giving them access to the VPC with specific roles inside the VPC and so forth. And then we get into this exercise of, how do we control their access inside the VPC. But we don't really want that. What we want to give them is access to a particular service in our VPC so that they can make very specific queries on that service.
Instead what they end up with usually is broad access into my network, which I have to control and protect in various ways. People do all sorts of things around this. We'll not expose it to the internet, we'll try to do some sort of private connectivity, or we'll expose it to the internet, but we'll set up some firewall rules that only allow very specific IPs to enter.
And then if those IPs change, you have to do those rules again. Or if the SaaS service is running in AWS, we'll have to IP allow a very vast range, right? All sorts of problems emerge from the fact that we end up connecting networks when we intend to just connect apps together.
Glenn Gillen: We've seen this multiple times where, for your operational overhead, you've tried to simplify your infrastructure by running a decent chunk of things in a single VPC. You have some data store and now the SaaS vendor wants access to that, but it's too big of a thing to access.
Wouldn't it be great if we had the workload they need to access in a separate VPC? So early on in your journey, you're forcing teams to have this perfect foresight into all the different permutations, or over-engineer isolation, just in case there's some future state where you might need to get someone access to something. And then you jump through all these hoops around transit, VPCs, and all this other machinery you put around your environment to close the doors to some extent and isolate stuff. Then it gets more complicated if you are on GCP and the SaaS vendor is on AWS, how do you connect there?
You can't use cloud-native tools. There's never a single solution, and if you're multi-cloud, it's a complicated mess with a dozen different ways to do it depending on which combination of things we need to solve for this particular vendor. It's too much to think about. You can't hold it in your head, and as soon as you can't hold it in your head, that in and of itself is a risk. Who understands the full picture?
Mrinal Wadhwa: Every time I've seen those types of topologies, usually if you talk to the people managing that infrastructure, they say they would like more segmentation, but it's too complex to segment given we have a bunch of stuff running. Usually that platform team or that IT team will say no to such a request.
And they're coming from the right place, because they're looking at the risk and going, if we let this happen, bad things could happen. But the person who needs that connectivity to get some business value either gives up and doesn't adopt the SaaS product, or they escalate and they go over that administrator's head and get the connection, but now effectively have caused the risk to enter the company. So you end up with not enough segmentation, and you're exposed to this attack or this vector from various sorts of hackers and things like that.
It gets complicated very quickly because you have to have a perfect plan when you don't know what the future state will be. Or you try to incrementally deal with it and end up with a lot of complexity in that topology.
Matthew Gregory: Let's go back to where we started. We could listen to that solutions architect at Google Cloud and run our entire enterprise in one VPC and Google Cloud, right? Kidding aside, I saved one thing for last because this is a little bit of a mind-bender. When we describe this concept of virtual adjacency, we have our remote database running virtually like its own localhost right next to our application because of Ockam command. There's another way to consume Ockam and this is even more in the direction of a monolith. We can use the Ockam library, which we use to build Ockam command. And in this scenario, that database looks like a function call inside our application.
So we're getting into this monolith model in this abstraction because we're using the library and we're building Ockam directly into our application. This is another cool way of using Ockam for anyone who wants to use the library instead of Ockam command. This escalates the level of security and the perimeter down to the application itself. The architecture here is pretty neat.
Mrinal Wadhwa: There are tradeoffs between the two approaches.
If you use Ockam as a library and integrate it into your application, it's a little bit more work. It's not very complex. You'll notice our library examples are 20-30 lines of code. It's not complex to do this. In those 20-30 lines you get these end-to-end encrypted, mutually authenticated connections with attribute-based access control on top.
It's fairly straightforward but does require you to change your application code. But if you do it, then the two applications that you want to communicate will become virtually connected only to each other.
The remote database in our earlier examples doesn't become exposed on localhost to everything else on the machine. It is only available to the client application. And that's a nice benefit that you get if you're willing to make the trade-off of actually changing your code.
If you're not willing to make that trade-off, or you have a set of protocols that the application client and server already speak that you don't want to change, then, in that case, you can use Ockam command with Ockam portals. That way, you don't have to change anything. We just take your TCP connection, we carry it over the Ockam end-to-end secure channel. So both of these approaches have their own set of tradeoffs.
Glenn Gillen: Application can mean a lot of things to different people, some people will refer to an entire microservice cluster as an application.
But my mental model for this is process to process secure connectivity. When we go back to my example of using a VPN to connect to a Postgres database, that's not what I ever wanted. I wanted the Postgres PSQL command on my local machine to be able to connect to the Postgres process on some other machine.
That's all I needed to do, but I use VPNs to do it. So it's not application in some big sense, it's a fine-grain level of connectivity that gets established with Ockam.
Mrinal Wadhwa: If you're using the Ockam library, that specific application process is talking to a remote application process somewhere else. As long as both of these speak the Ockam protocol by using the Ockam library, they can mutually authenticate only with each other, and then there are no other environmental components that are exposed.
It doesn't matter which machine they're running on, there is no way to get out of the application process. That's the granular application process to application process connectivity.
In the case of a VPN, you're creating this virtual IP network and your remote application is somewhere in that IP network that may be spread across hundreds or thousands of machines. Whereas in the case of a reverse proxy, you're taking a remote thing, putting it on the internet, and your client is just reaching out to something on the internet.
In the case of an Ockam TCP portal created using Ockam command, we're taking a remote thing and making it available on localhost next to your application client process.
If you use the Ockam programming library, we're taking a remote thing and putting it inside your application process, and you just call a function to access that remote thing. That's the levels of difference that end up getting created in different approaches here.
Matthew Gregory: Let me wrap up with that point.
When we think about what we get when we're using a VPN, a reverse proxy, or Ockam, we're getting different architectural diagrams. When you look at the glossy brochures of VPNs, reverse proxies, and Ockam, they start to sound pretty similar, but when you look at what you get, they're radically different.
And let's review. With the VPN, you're connecting a bunch of machines to a bunch of other machines and putting them all on the same network. That is the goal of a VPN, to have one network with all the machines in it. When we use a reverse proxy, we are taking a local service and making it available to everyone on the internet. If you want to run a webpage and have everyone on the internet access it, you want to run it on your local laptop and keep your laptop on so it's available all the time. Reverse proxy is a great way to do that.
And then with Ockam, what we're doing is taking applications that are running remotely and making them virtually look like they're all adjacent to each other, very similar to a monolith.
When you break them down and look at them from the virtual mental model, they're quite different from each other and they have different purposes, all of which are valid. It depends on what you want to do with each of them.
Ockam Secure Channels are mutually authenticated and end-to-end encrypted messaging channels that guarantee data authenticity, integrity, and confidentiality.
Ockam Routing and Transports, combined with the ability to model Bridges and Relays, make it possible to run end-to-end, application layer protocols in a variety of communication topologies - across many network connection hops and protocols boundaries.
Ockam Secure Channels is an end-to-end protocol built on top of Ockam Routing. This cryptographic protocol guarantees data authenticity, integrity, and confidentiality over any communication topology that can be traversed with Ockam Routing.
A secure channel has two participants (ends). A participant that starts a Listener and creates dedicated Responders whenever a new protocol session is initiated. Another participant, called the Initiator, initiates the protocol with a Listener.
Running this protocol requires a stateful exchange of multiple messages and having a worker and routing system allows Ockam to hide the complexity of creating and maintaining a secure channel behind two simple functions:
Let's see this in action before we dive into the protocol. The following example is similar to the earlier multi hop routing example but this this time the echoer is accessed through and end-to-end secure channel.
Run the responder in a separate terminal tab and keep it running:
Run the middle node in a separate terminal tab and keep it running:
Run the initiator:
Using SecureChannelListenerOptions and SecureChannelOptions, each participant is initialized with with the following initial state:
An Ockam Identifier that will be used as the Ockam Identity of this secure channel participant. Access to a Vault that contains the primary secret key for this Identifier is not required during the creation of the secure channel. We assume that a PurposeKeyAttestation for a SecureChannelStatic has already been created.
The SecureChannelStatic purpose key and access to its secret inside a Vault. This vault should be an implementation of the VaultForSecureChannels and VaultForVerifyingSignatures traits described earlier.
A Trust Context and Access Controls, that are used for authorization.
The Listener runs on the specified Worker address and the Initiator knows a Route to reach the Listener. The Listener starts new Responder workers dedicated to each protocol session that is started by any Initiator.
The Initiator uses the above described initial state to begin a handshake with the Listener. The Listener initializes and starts a Responder in response to the first message from an initiator.
This handshake is based on the described in the . The security properties of the messages in the XX pattern and their payload have been studied and describe at the following locations - , , , .
Each participant maintains the following variables:
s, e: The local participant's static and ephemeral key pairs.
rs, re: The remote participant's static and ephemeral public keys (which may be empty).
h: A handshake transcript hash that hashes all the data that's been sent and received.
As described in the section on VaultForSecureChannels, we rely on compile time feature flags to chose between three possible combinations of primitives:
OCKAM_XX_25519_AES256_GCM_SHA256 enables Ockam_XX secure channel handshake with and SHA256. This is our current default.
OCKAM_XX_25519_AES128_GCM_SHA256 enables Ockam_XX secure channel handshake with and SHA256.
OCKAM_XX_25519_ChaChaPolyBLAKE2s enables Ockam_XX secure channel handshake with
This is a completely compile time choice for the purpose of studying performance of the various options in different runtime environments. We intentionally have no negotiation of primitives in the handshake. All participants in a live systems are deployed with the same compile time choice of secure channels primitives.
The s variable is initialized with SecureChannelStatic of this participant and the functions described in VaultForSecureChannels and VaultForVerifyingSignatures are used to run the handshake as follows:
At any point if there is error in decrypting the incoming data, the participant simply exits the protocols without signaling any failure to the other participant.
After the second message in the handshake is received by the Initiator, the initiator that the Responder possesses the secret keys of rs, the remote SecureChannelStatic. The payload of the second message contains serialized IdentityAndCredentials data of the Responder. The Initiator deserializes and verifies the this data structure:
It verifies the chain of signatures on the change history. It checks that the expires_at timestamp on the latest change is greater than now.
It checks that the public_key in the PurposeKeyAttestation is the same as the rs that has been authenticated. It checks that the PurposeKeyAttestation subject is the Identifier whose change history was presented. It verifies that the primary public key in the latest change has correctly signed the PurposeKeyAttestation for the SecureChannelStatic. It checks that the expires_at timestamp on the PurposeKeyAttestation is greater than now
After the third message in the handshake is received by the Responder, the responder that the Initiator possesses the secret keys of rs, the remote SecureChannelStatic. The payload of the second message contains serialized IdentityAndCredentials data of the Initiator. The Responder, similar to the initiator, deserializes and verifies the this data structure.
At this point both sides have mutually authenticated the each other's rs, Ockam Identifier, and Credentials by one or more Issuers about this Identifier.
Each participant in a Secure Channel is initialized with a Trust Context and Access Controls.
The simple form of mutual authorization is achieved by defining an Access Control that only allows the SecureChannel handshake to complete if the remote participant authenticates with a specific Ockam Identifier. Both participants have pre-existing knowledge of each other's Ockam Identifier.
A more scalable form of mutual authorization is achieved by specifying a Trust Context where each participant must present a specific type of credential issued by a specific Credential Issuer. Both participants have pre-existing knowledge of Ockam Identifier of this Credential Issuer (Authority).
After performing the the XX handshake, peers have agreed on a pair of symmetric encryption keys they will use to encrypt data on the channel, one for each direction.
Rekeying is the process of periodically updating the symmetric key in use (refer to the ).
With each direction of the secure channel, we associate a nonce variable. It holds a 64 bit unsigned integer. That integer is prepended to each ciphertext and the nonce variable is increased by 1 when the message is sent.
This nonce allows us to count the number of sent messages and define a series of contiguous buckets of messages where each bucket is of size N. N is a constant value known by both the initiator and the responder. We can then associate an encryption key to each bucket, and decide to create a new symmetric key once we need to send a message corresponding to the next bucket.
This approach implies that we don't need to communicate a "Rekey" operation between the secure channel parties. They both know that they need to perform rekeying every N messages.
In the previous figure:
Messages 0 to N-1 are encrypted with k0 (the initial key agreed during the handshake).
Messages N to 2N-1 with k1, etc.
.
In the most simple scenario, the encryptor keeps track of the last nonce it generated, and increments it by one each time it generates a new message. While the decryptor keeps track of the nonce it is expecting to receive next, and increments it every time it receives a valid message:
However this simple approach doesn't work at the level of Ockam Secure Channels, since there is no message delivery guarantees offered. For example, this can happen when using a transport protocol like UDP. This means that:
Packets can be completely lost.
Packets can be delayed/reordered.
Packets can be repeated.
This introduces a complication to the rekeying operation since the encryptor and the decryptor must agree on the nonce to use for every message on the channel.
In order to allow for out-of-order delivery each secure channel message includes the nonce that was used to encrypt it. The encryptor side keeps incrementing the nonce by 1 each time it generates a new message and prepends this nonce to the message.
Then the decryptor extracts this nonce from the message and uses it as part of the decryption operation.
With the nonce being part of the transmitted message, the synchronization problem is solved. Even if messages are lost or arrive out-of-order, the decryptor can still process them.
But other important difficulties arise:
Since the nonce is part of the message and transmitted in plaintext, how can the decryptor protect itself against duplicate packets / replay attacks? Even if the decryptor keeps track of every nonce ever received (and accepted) during the channel's lifetime, this is a problem for long-lived channels since it would require a prohibitive amount of memory to keep track of all the nonces used.
Even keeping track of all the nonces would be problematic since this would mean being able to decrypt old messages with old keys. This defeats Forward Secrecy, which is a protection against the possible decryption of previous messages, which is precisely what we are trying to achieve with the rekeying process.
Moreover, since each K is derived from the previous one, let's say an attacker sends a forged message with a nonce far in the future (than the one the decryptor is currently expecting). This would force the decryptor to perform a time-consuming series of rekey()
Both of these problems are solved by the introduction of a sliding valid window of nonces that the decryptor will accept.
The decryptor keeps track of the largest accepted nonce received so far on the channel.
It defines an interval around it for nonces that it will accept.
Messages with nonces outside of this window are discarded.
In the following example:
The decryptor uses a valid window of size 10.
Given that the largest nonce it has accepted so far is 13, the decryptor can accept packets with nonces between 8 and 18.
Nonces outside of that interval will be discarded without any further processing.
When the decryptor receives a message with nonce = 14 (an allowed value), we try to decrypt the message. If the decryption succeeds, we accept the nonce and advance the window:
Note that the set of already-seen nonces is bounded in size. This size is (at most) half the valid window size.
Since the valid window is always centered on the highest received nonce, the nonces we track will always fall between the lower part of the window and that nonce. If we receive a nonce greater than the nonce at the window center, the whole window will have a new center and will move further along.
On the flip side, if at this point, the missing message with nonce 8 was received, it will be rejected, even if it was the valid one that was emitted by the sender, but delayed in the network. That message is effectively lost, it is too out-of-order to be handled.
Now suppose the next message received has nonce 12. It will be accepted, but the window won't move forward as it is less than the current maximum nonce accepted:
Here's another caveat. What happens if, let's say, messages 15 to 20 where lost? Then the channel is effectively stuck: no matter if it receives the next messages (21, 22, ...) , the decryptor will reject them all because they will also be out of the valid window. At this point, the secure channel will need to be re-established.
The encryptor and decryptor implement both of the following in a similar manner:
Rekeying interval (which defines the key buckets).
Key deriving algorithm. The current rekeying interval size is 32.
However, the concept of valid window is entirely up to the decryptor to implement. This only has to do with how tolerant to out-of-order packets the communication will be. The encryptor side is not aware nor affected by this choice.
In our Elixir implementation of secure channels, the valid window is tied to the choice of how often to rekey. If the current k in use is kn (the k that corresponds to the maximum nonce accepted so far) the valid window is defined as nonces falling into the kn-1 , kn or kn+1 buckets.
Our Rust version is similar but defines a window of 32 positions around the expected nonce.
Ockam Routing and Transports enable other Ockam protocols to provide end-to-end guarantees like trust, security, privacy, reliable delivery, and ordering at the application layer.
Data, within modern applications, routinely flows over complex, multi-hop, multi-protocol routes before reaching its end destination. It’s common for application layer requests and data to move across network boundaries, beyond data centers, via shared or public networks, through queues and caches, from gateways and brokers to reach remote services and other distributed parts of an application.
Our goal is to enable end-to-end application layer guarantees in any communication topology. For example Ockam can provide end-to-end guarantees of data authenticity, integrity, and confidentiality in any of the above communication topologies.
In contrast, traditional secure communication protocol implementations are typically tightly coupled with transport protocols in a way that all their security is limited to the length and duration of the underlying transport connections.
For example, most TLS implementations are coupled to the underlying TCP connection. If your application’s data and requests travel over two TCP connection hops TCP -> TCP
IdentityAndCredentials data structure that contains:The complete ChangeHistory of the Identity of this participant.
A purpose key attestation, issued by the Identity of this participant, attesting to a SecureChannelStatic purpose key. This must be the same SecureChannelStatic that the participant can access the secret for inside a vault.
Zero or more Credentials and corresponding PurposeKeyAttestations that can be used to verify the signature on the credential and tie a CredentialSigning verification key to the Ockam Identifier of the Credential Issuer.
ck: A chaining key that hashes all previous DH outputs. Once the handshake completes, the chaining key will be used to derive the encryption keys for transport messages.
k, n: An encryption key k (which may be empty) and a counter-based nonce n. Whenever a new DH output causes a new ck to be calculated, a new k is also calculated. The key k and nonce n are used to encrypt static public keys and handshake payloads. Encryption with k uses some AEAD cipher mode and uses the current h value as associated data which is covered by the AEAD authentication. Encryption of static public keys and payloads provides some confidentiality and key confirmation during the handshake phase.
For each included credential in verifies:
That subject of the credential is the Identifier whose change history was presented.
That the expires_at timestamp of the Credential is greater than now.
That the credential is correctly signed by the purpose key in the PurposeKeyAttestation included with the Credential as part of the corresponding CredentialAndPurposeKeyAttestation.
That expires_at timestamp of the PurposeKeyAttestation is greater than now.
K


/// Creates a secure channel listener and waits for messages from secure channel Initiator.
pub async fn create_secure_channel_listener(
&self,
identifier: &Identifier,
address: impl Into<Address>,
options: impl Into<SecureChannelListenerOptions>,
) -> Result<SecureChannelListener> { ... }
/// Initiates the protocol to create a secure channel with a secure channel Listener.
pub async fn create_secure_channel(
&self,
identifier: &Identifier,
route_to_a_secure_channel_listener: impl Into<Route>,
options: impl Into<SecureChannelOptions>,
) -> Result<SecureChannel> { ... }// examples/05-secure-channel-over-two-transport-hops-responder.rs
// This node starts a tcp listener, a secure channel listener, and an echoer worker.
// It then runs forever waiting for messages.
use hello_ockam::Echoer;
use ockam::identity::SecureChannelListenerOptions;
use ockam::tcp::{TcpListenerOptions, TcpTransportExtension};
use ockam::{node, Context, Result};
#[ockam::node]
async fn main(ctx: Context) -> Result<()> {
// Create a node with default implementations
let node = node(ctx).await?;
// Initialize the TCP Transport.
let tcp = node.create_tcp_transport()?;
node.start_worker("echoer", Echoer)?;
let bob = node.create_identity().await?;
// Create a TCP listener and wait for incoming connections.
let listener = tcp.listen("127.0.0.1:4000", TcpListenerOptions::new()).await?;
// Create a secure channel listener for Bob that will wait for requests to
// initiate an Authenticated Key Exchange.
let secure_channel_listener = node.create_secure_channel_listener(
&bob,
"bob_listener",
SecureChannelListenerOptions::new().as_consumer(listener.flow_control_id()),
)?;
// Allow access to the Echoer via Secure Channels
node.flow_controls()
.add_consumer(&"echoer".into(), secure_channel_listener.flow_control_id());
// Don't call node.shutdown() here so this node runs forever.
Ok(())
}
// examples/05-secure-channel-over-two-transport-hops-middle.rs
// This node creates a tcp connection to a node at 127.0.0.1:4000
// Starts a relay worker to forward messages to 127.0.0.1:4000
// Starts a tcp listener at 127.0.0.1:3000
// It then runs forever waiting to route messages.
use hello_ockam::Relay;
use ockam::tcp::{TcpConnectionOptions, TcpListenerOptions, TcpTransportExtension};
use ockam::{node, route, Context, Result};
#[ockam::node]
async fn main(ctx: Context) -> Result<()> {
// Create a node with default implementations
let node = node(ctx).await?;
// Initialize the TCP Transport
let tcp = node.create_tcp_transport()?;
// Create a TCP connection to Bob.
let connection_to_bob = tcp.connect("127.0.0.1:4000", TcpConnectionOptions::new()).await?;
// Start a Relay to forward messages to Bob using the TCP connection.
node.start_worker("forward_to_bob", Relay::new(route![connection_to_bob]))?;
// Create a TCP listener and wait for incoming connections.
let listener = tcp.listen("127.0.0.1:3000", TcpListenerOptions::new()).await?;
node.flow_controls()
.add_consumer(&"forward_to_bob".into(), listener.flow_control_id());
// Don't call node.shutdown() here so this node runs forever.
Ok(())
}
// examples/05-secure-channel-over-two-transport-hops-initiator.rs
// This node creates an end-to-end encrypted secure channel over two tcp transport hops.
// It then routes a message, to a worker on a different node, through this encrypted channel.
use ockam::identity::SecureChannelOptions;
use ockam::tcp::{TcpConnectionOptions, TcpTransportExtension};
use ockam::{node, route, Context, Result};
#[ockam::node]
async fn main(ctx: Context) -> Result<()> {
// Create a node with default implementations
let mut node = node(ctx).await?;
// Create an Identity to represent Alice.
let alice = node.create_identity().await?;
// Create a TCP connection to the middle node.
let tcp = node.create_tcp_transport()?;
let connection_to_middle_node = tcp.connect("localhost:3000", TcpConnectionOptions::new()).await?;
// Connect to a secure channel listener and perform a handshake.
let r = route![connection_to_middle_node, "forward_to_bob", "bob_listener"];
let channel = node
.create_secure_channel(&alice, r, SecureChannelOptions::new())
.await?;
// Send a message to the echoer worker via the channel.
// Wait to receive a reply and print it.
let reply: String = node
.send_and_receive(route![channel, "echoer"], "Hello Ockam!".to_string())
.await?;
println!("App Received: {}", reply); // should print "Hello Ockam!"
// Stop all workers, stop the node, cleanup and return.
node.shutdown().await
}
cargo run --example 05-secure-channel-over-two-transport-hops-respondercargo run --example 05-secure-channel-over-two-transport-hops-middlecargo run --example 05-secure-channel-over-two-transport-hops-initiator#[derive(Encode, Decode)]
pub struct IdentityAndCredentials {
#[n(0)] pub change_history: ChangeHistory,
#[n(1)] pub purpose_key_attestation: PurposeKeyAttestation,
#[n(2)] pub credentials: Vec<CredentialAndPurposeKeyAttestation>,
}
#[derive(Encode, Decode)]
pub struct CredentialAndPurposeKeyAttestation {
#[n(0)] pub credential: Credential,
#[n(1)] pub purpose_key_attestation: PurposeKeyAttestation,
}Traditional secure communication protocols are also unable to protect your application’s data if it travels over multiple different transport protocols. They can’t guarantee data authenticity or data integrity if your application’s communication path is UDP -> TCP or BLE -> TCP.
Ockam Routing is a simple and lightweight message based protocol that makes it possible to bidirectionally exchange message over a large variety of communication topologies: TCP -> TCP or TCP -> TCP -> TCP or BLE -> UDP -> TCP or BLE -> TCP -> TCP or TCP -> Kafka -> TCP and more.
By layering Ockam Secure Channels and other protocols over Ockam Routing, we can provide end-to-end guarantees over arbitrary transport topologies.
So far, we've created an "echoer" worker in our node, sent it a message, and received a reply. This worker was a simple one hop away from our "app" worker.
To achieve this, messages carry with them two metadata fields: onward_route and return_route, where a route is a list of addresses.
To get a sense of how that works, let's route a message over two hops.
Sender:
Needs to know the route to a destination, makes that route the onward_route of a new message
Makes its own address the return_route of the new message
Hop:
Removes its own address from beginning of onward_route
Adds its own address to beginning of return_route
Replier:
Makes return_route of incoming message, onward_route of outgoing message
Makes its own address the return_route of the new message
For demonstration, we'll create a simple worker, called Hop, that takes every incoming message and forwards it to the next address in the onward_route of that message.
Just before forwarding the message, Hop's handle message function will:
Print the message
Remove its own address (first address) from the onward_route, by calling step()
Insert its own address as the first address in the return_route by calling prepend()
Create a new file at:
Add the following code to this file:
To make this Hop type accessible to our main program, export it from src/lib.rs by adding the following to it:
We'll also use the Echoer worker that we created in the previous example. So make sure that it stays exported from src/lib.rs.
Next, let's create our main "app" worker.
In the code below we start an Echoer worker at address "echoer" and a Hop worker at address "h1". Then, we send a message along the h1 => echoer route by passing route!["h1", "echoer"] to send(..).
Create a new file at:
Add the following code to this file:
To run this new node program:
Note the message flow and how routing information is manipulated as the message travels.
Routing is not limited to one or two hops, we can easily create routes with many hops. Let's try that in a quick example:
This time we'll create multiple hop workers between the "app" and the "echoer" and route our message through them.
Create a new file at:
Add the following code to this file:
To run this new node program:
Note the message flow.
An Ockam Transport is a plugin for Ockam Routing. It moves Ockam Routing messages using a specific transport protocol like TCP, UDP, WebSockets, Bluetooth etc.
In previous examples, we routed messages locally within one node. Routing messages over transport layer connections looks very similar.
Create a new file at:
Add the following code to this file:
Create a new file at:
Add the following code to this file:
Run the responder in a separate terminal tab and keep it running:
Run the initiator:
Note the message flow.
For demonstration, we'll create another worker, called Relay, that takes every incoming message and forwards it to the predefined address.
Just before forwarding the message, Relay's handle message function will:
Print the message
Remove its own address (first address) from the onward_route, by calling step()
Insert predefined address as the first address in the onward_route by calling prepend()
Create a new file at:
Add the following code to this file:
To make this Relay type accessible to our main program, export it from src/lib.rs by adding the following to it:
Create a new file at:
Add the following code to this file:
Create a new file at:
Add the following code to this file:
Create a new file at:
Add the following code to this file:
Run the responder in a separate terminal tab and keep it running:
Run the middle node in a separate terminal tab and keep it running:
Run the initiator:
Note how the message is routed.

Ockam Routing and Transports enable higher level protocols that provide end-to-end guarantees to messages traveling across many network connection hops and protocols boundaries.
Ockam Routing is a simple and lightweight message-based protocol that makes it possible to bidirectionally exchange messages over a large variety of communication topologies.
Ockam Transports adapt Ockam Routing to various transport protocols like TCP, UDP, WebSockets, Bluetooth etc.
By layering Ockam Secure Channels and other higher level protocols over Ockam Routing, it is possible to build systems that provide end-to-end guarantees over arbitrary transport topologies that span many networks, connections, gateways, queues, and clouds.
touch src/hop.rs// src/hop.rs
use ockam::{Any, Context, Result, Routed, Worker};
pub struct Hop;
#[ockam::worker]
impl Worker for Hop {
type Context = Context;
type Message = Any;
/// This handle function takes any incoming message and forwards
/// it to the next hop in it's onward route
async fn handle_message(&mut self, ctx: &mut Context, msg: Routed<Any>) -> Result<()> {
println!("Address: {}, Received: {:?}", ctx.primary_address(), msg);
// Send the message to the next worker on its onward_route
ctx.forward(msg.into_local_message().step_forward(ctx.primary_address().clone())?)
.await
}
}
mod hop;
pub use hop::*;touch examples/03-routing.rs// examples/03-routing.rs
// This node routes a message.
use hello_ockam::{Echoer, Hop};
use ockam::{node, route, Context, Result};
#[ockam::node]
async fn main(ctx: Context) -> Result<()> {
// Create a node with default implementations
let mut node = node(ctx).await?;
// Start a worker, of type Echoer, at address "echoer"
node.start_worker("echoer", Echoer)?;
// Start a worker, of type Hop, at address "h1"
node.start_worker("h1", Hop)?;
// Send a message to the worker at address "echoer",
// via the worker at address "h1"
node.send(route!["h1", "echoer"], "Hello Ockam!".to_string()).await?;
// Wait to receive a reply and print it.
let reply = node.receive::<String>().await?;
println!("App Received: {}", reply.into_body()?); // should print "Hello Ockam!"
// Stop all workers, stop the node, cleanup and return.
node.shutdown().await
}
cargo run --example 03-routingtouch examples/03-routing-many-hops.rs// examples/03-routing-many-hops.rs
// This node routes a message through many hops.
use hello_ockam::{Echoer, Hop};
use ockam::{node, route, Context, Result};
#[ockam::node]
async fn main(ctx: Context) -> Result<()> {
// Create a node with default implementations
let mut node = node(ctx).await?;
// Start an Echoer worker at address "echoer"
node.start_worker("echoer", Echoer)?;
// Start 3 hop workers at addresses "h1", "h2" and "h3".
node.start_worker("h1", Hop)?;
node.start_worker("h2", Hop)?;
node.start_worker("h3", Hop)?;
// Send a message to the echoer worker via the "h1", "h2", and "h3" workers
let r = route!["h1", "h2", "h3", "echoer"];
node.send(r, "Hello Ockam!".to_string()).await?;
// Wait to receive a reply and print it.
let reply = node.receive::<String>().await?;
println!("App Received: {}", reply.into_body()?); // should print "Hello Ockam!"
// Stop all workers, stop the node, cleanup and return.
node.shutdown().await
}
cargo run --example 03-routing-many-hopstouch examples/04-routing-over-transport-responder.rs// examples/04-routing-over-transport-responder.rs
// This node starts a tcp listener and an echoer worker.
// It then runs forever waiting for messages.
use hello_ockam::Echoer;
use ockam::tcp::{TcpListenerOptions, TcpTransportExtension};
use ockam::{node, Context, Result};
#[ockam::node]
async fn main(ctx: Context) -> Result<()> {
// Create a node with default implementations
let node = node(ctx).await?;
// Initialize the TCP Transport
let tcp = node.create_tcp_transport()?;
// Create an echoer worker
node.start_worker("echoer", Echoer)?;
// Create a TCP listener and wait for incoming connections.
let listener = tcp.listen("127.0.0.1:4000", TcpListenerOptions::new()).await?;
// Allow access to the Echoer via TCP connections from the TCP listener
node.flow_controls()
.add_consumer(&"echoer".into(), listener.flow_control_id());
// Don't call node.shutdown() here so this node runs forever.
Ok(())
}
touch examples/04-routing-over-transport-initiator.rs// examples/04-routing-over-transport-initiator.rs
// This node routes a message, to a worker on a different node, over the tcp transport.
use ockam::tcp::{TcpConnectionOptions, TcpTransportExtension};
use ockam::{node, route, Context, Result};
#[ockam::node]
async fn main(ctx: Context) -> Result<()> {
// Create a node with default implementations
let mut node = node(ctx).await?;
// Initialize the TCP Transport.
let tcp = node.create_tcp_transport()?;
// Create a TCP connection to a different node.
let connection_to_responder = tcp.connect("localhost:4000", TcpConnectionOptions::new()).await?;
// Send a message to the "echoer" worker on a different node, over a tcp transport.
// Wait to receive a reply and print it.
let r = route![connection_to_responder, "echoer"];
let reply: String = node.send_and_receive(r, "Hello Ockam!".to_string()).await?;
println!("App Received: {}", reply); // should print "Hello Ockam!"
// Stop all workers, stop the node, cleanup and return.
node.shutdown().await
}
cargo run --example 04-routing-over-transport-respondercargo run --example 04-routing-over-transport-initiatortouch src/relay.rs// src/relay.rs
use ockam::{Any, Context, Result, Route, Routed, Worker};
pub struct Relay {
route: Route,
}
impl Relay {
pub fn new(route: impl Into<Route>) -> Self {
let route = route.into();
if route.is_empty() {
panic!("Relay can't forward messages to an empty route");
}
Self { route }
}
}
#[ockam::worker]
impl Worker for Relay {
type Context = Context;
type Message = Any;
/// This handle function takes any incoming message and forwards
/// it to the next hop in it's onward route
async fn handle_message(&mut self, ctx: &mut Context, msg: Routed<Any>) -> Result<()> {
println!("Address: {}, Received: {:?}", ctx.primary_address(), msg);
let next_on_route = self.route.next()?.clone();
// Some type conversion
let mut local_message = msg.into_local_message();
local_message = local_message.pop_front_onward_route()?;
local_message = local_message.prepend_front_onward_route(self.route.clone()); // Prepend predefined route to the onward_route
let prev_hop = local_message.return_route().next()?.clone();
if let Some(info) = ctx
.flow_controls()
.find_flow_control_with_producer_address(&next_on_route)
{
ctx.flow_controls().add_consumer(&prev_hop, info.flow_control_id());
}
if let Some(info) = ctx.flow_controls().find_flow_control_with_producer_address(&prev_hop) {
ctx.flow_controls().add_consumer(&next_on_route, info.flow_control_id());
}
// Send the message on its onward_route
ctx.forward(local_message).await
}
}
mod relay;
pub use relay::*;touch examples/04-routing-over-transport-two-hops-responder.rs// examples/04-routing-over-transport-two-hops-responder.rs
// This node starts a tcp listener and an echoer worker.
// It then runs forever waiting for messages.
use hello_ockam::Echoer;
use ockam::tcp::{TcpListenerOptions, TcpTransportExtension};
use ockam::{node, Context, Result};
#[ockam::node]
async fn main(ctx: Context) -> Result<()> {
// Create a node with default implementations
let node = node(ctx).await?;
// Initialize the TCP Transport
let tcp = node.create_tcp_transport()?;
// Create an echoer worker
node.start_worker("echoer", Echoer)?;
// Create a TCP listener and wait for incoming connections.
let listener = tcp.listen("127.0.0.1:4000", TcpListenerOptions::new()).await?;
// Allow access to the Echoer via TCP connections from the TCP listener
node.flow_controls()
.add_consumer(&"echoer".into(), listener.flow_control_id());
// Don't call node.shutdown() here so this node runs forever.
Ok(())
}
touch examples/04-routing-over-transport-two-hops-middle.rs// examples/04-routing-over-transport-two-hops-middle.rs
// This node creates a tcp connection to a node at 127.0.0.1:4000
// Starts a relay worker to forward messages to 127.0.0.1:4000
// Starts a tcp listener at 127.0.0.1:3000
// It then runs forever waiting to route messages.
use hello_ockam::Relay;
use ockam::tcp::{TcpConnectionOptions, TcpListenerOptions, TcpTransportExtension};
use ockam::{node, Context, Result};
#[ockam::node]
async fn main(ctx: Context) -> Result<()> {
// Create a node with default implementations
let node = node(ctx).await?;
// Initialize the TCP Transport
let tcp = node.create_tcp_transport()?;
// Create a TCP connection to the responder node.
let connection_to_responder = tcp.connect("127.0.0.1:4000", TcpConnectionOptions::new()).await?;
// Create and start a Relay worker
node.start_worker("forward_to_responder", Relay::new(connection_to_responder))?;
// Create a TCP listener and wait for incoming connections.
let listener = tcp.listen("127.0.0.1:3000", TcpListenerOptions::new()).await?;
// Allow access to the Relay via TCP connections from the TCP listener
node.flow_controls()
.add_consumer(&"forward_to_responder".into(), listener.flow_control_id());
// Don't call node.shutdown() here so this node runs forever.
Ok(())
}
touch examples/04-routing-over-transport-two-hops-initiator.rs// examples/04-routing-over-transport-two-hops-initiator.rs
// This node routes a message, to a worker on a different node, over two tcp transport hops.
use ockam::tcp::{TcpConnectionOptions, TcpTransportExtension};
use ockam::{node, route, Context, Result};
#[ockam::node]
async fn main(ctx: Context) -> Result<()> {
// Create a node with default implementations
let mut node = node(ctx).await?;
// Initialize the TCP Transport
let tcp = node.create_tcp_transport()?;
// Create a TCP connection to the middle node.
let connection_to_middle_node = tcp.connect("localhost:3000", TcpConnectionOptions::new()).await?;
// Send a message to the "echoer" worker, on a different node, over two tcp hops.
// Wait to receive a reply and print it.
let r = route![connection_to_middle_node, "forward_to_responder", "echoer"];
let reply: String = node.send_and_receive(r, "Hello Ockam!".to_string()).await?;
println!("App Received: {}", reply); // should print "Hello Ockam!"
// Stop all workers, stop the node, cleanup and return.
node.shutdown().await
}
cargo run --example 04-routing-over-transport-two-hops-respondercargo run --example 04-routing-over-transport-two-hops-middlecargo run --example 04-routing-over-transport-two-hops-initiator


Ockam Routing Protocol messages carry with them two metadata fields: an onward_route and a return_route. A route is an ordered list of addresses describing the path a message should travel. This information is carried with the message in compact binary form.
Pay close attention to the Sender, Hop, and Replier rules in the sequence diagrams below. Note how onward_route and return_route are handled as the message travels.
The above was one message hop. We may extend this to two hops:
This very simple protocol extends to any number of hops:
So far, we've created an "echoer" worker in our node, sent it a message, and received a reply. This worker was a simple one hop away from our "app" worker.
To achieve this, messages carry with them two metadata fields: onward_route and return_route, where a route is a list of addresses.
To get a sense of how that works, let's route a message over two hops.
For demonstration, we'll create a simple worker, called Hop, that takes every incoming message and forwards it to the next address in the onward_route of that message.
Just before forwarding the message, Hop's handle message function will:
Print the message
Remove its own address (first address) from the onward_route, by calling step()
Insert its own address as the first address in the return_route by calling prepend()
Next, let's create our main "app" worker.
In the code below we start an Echoer worker at address "echoer" and a Hop worker at address "h1". Then, we send a message along the h1 => echoer route by passing route!["h1", "echoer"] to send(..).
To run this new node program:
Similarly, we can also route the message via many hop workers:
To run this new node program:
An Ockam Transport is a plugin for Ockam Routing. It moves Ockam Routing messages using a specific transport protocol like TCP, UDP, WebSockets, Bluetooth etc.
In previous examples, we routed messages locally within one node. Routing messages over transport layer connections looks very similar.
Let's try the TcpTransport, we'll need to create two nodes: a responder and an initiator.
Run the responder in a separate terminal tab and keep it running:
Run the initiator:
A common real world topology is a transport bridge.
Node n1 wishes to access a service on node n3, but it can't directly connect to n3. This can happen for many reasons, maybe because n3 is in a separate IP subnet, or it could be that the communication from n1 to n2 uses UDP while from n2 to n3 uses TCP or other similar constraints. The topology makes n2 a bridge or gateway between these two separate networks.
We can setup this topology with Ockam Routing as follows:
Relay worker
We'll create a worker, called Relay, that takes every incoming message and forwards it to the predefined address.
Run the responder in a separate terminal tab and keep it running:
Run the middle node in a separate terminal tab and keep it running:
Run the initiator:
It is common, however, to encounter communication topologies where the machine that provides a service is unwilling or is not allowed to open a listening port or expose a bridge node to other networks. This is a common security best practice in enterprise environments, home networks, OT networks, and VPCs across clouds. Application developers may not have control over these choices from the infrastructure / operations layer. This is where relays are useful.
Relays make it possible to establish end-to-end protocols with services operating in a remote private network, without requiring a remote service to expose listening ports to an outside hostile network like the Internet.
Ockam Routing messages when transported over the wire have the following structure. TransportMessage is serialized using BARE Encoding. We intend to transition to CBOR in the near future since we already use CBOR for other protocols built on top of Ockam Routing.
Each transport type has a conventional value. TCP has transport type 1. UDP has transport type 2 etc. Node local messages have transport type 0.
As message moves within a node it gathers additional metadata in structure like LocalMessage and RelayMessage that are used for a node's internal operation.
Each Worker has one or more addresses that it uses to send and receive messages. We assign each Address an Incoming Access Control and an Outgoing Access Control.
Concrete instances of these traits inspect a message's onward_route, return_route, metadata etc. along with other node local state to decide if a message should be allowed to be sent or received. Incoming Access Control filters which messages reach an address while Outgoing Access Control decides which messages can be sent.
In our threat model, we assume that Workers within a Node are not malicious against each other. If programmed correctly they intend no harm.
However, there are certain types of Workers that forward messages that were created on other nodes. We don't implicitly trust other Ockam Nodes so messages from them can be dangerous. Such workers that can receive messages from another node are implemented with an Outgoing Access Control that denies all messages by default.
For example, a TCP Transport Listener spawns TCP Receivers for every new TCP connection. These receivers are implemented with an Outgoing Access Control that denies all messages, by default, from entering the node that is running the receiver. We can then explicitly allow messages to flow to a specific addresses.
In the middle node example above, we do this by explicitly allowing flow of messages from the TCP Receivers (spawned by TCP Transport Listener) to the forward_to_responder worker.

// src/hop.rs
use ockam::{Any, Context, Result, Routed, Worker};
pub struct Hop;
#[ockam::worker]
impl Worker for Hop {
type Context = Context;
type Message = Any;
/// This handle function takes any incoming message and forwards
/// it to the next hop in it's onward route
async fn handle_message(&mut self, ctx: &mut Context, msg: Routed<Any>) -> Result<()> {
println!("Address: {}, Received: {:?}", ctx.primary_address(), msg);
// Send the message to the next worker on its onward_route
ctx.forward(msg.into_local_message().step_forward(ctx.primary_address().clone())?)
.await
}
}
// examples/03-routing.rs
// This node routes a message.
use hello_ockam::{Echoer, Hop};
use ockam::{node, route, Context, Result};
#[ockam::node]
async fn main(ctx: Context) -> Result<()> {
// Create a node with default implementations
let mut node = node(ctx).await?;
// Start a worker, of type Echoer, at address "echoer"
node.start_worker("echoer", Echoer)?;
// Start a worker, of type Hop, at address "h1"
node.start_worker("h1", Hop)?;
// Send a message to the worker at address "echoer",
// via the worker at address "h1"
node.send(route!["h1", "echoer"], "Hello Ockam!".to_string()).await?;
// Wait to receive a reply and print it.
let reply = node.receive::<String>().await?;
println!("App Received: {}", reply.into_body()?); // should print "Hello Ockam!"
// Stop all workers, stop the node, cleanup and return.
node.shutdown().await
}
cargo run --example 03-routing// examples/03-routing-many-hops.rs
// This node routes a message through many hops.
use hello_ockam::{Echoer, Hop};
use ockam::{node, route, Context, Result};
#[ockam::node]
async fn main(ctx: Context) -> Result<()> {
// Create a node with default implementations
let mut node = node(ctx).await?;
// Start an Echoer worker at address "echoer"
node.start_worker("echoer", Echoer)?;
// Start 3 hop workers at addresses "h1", "h2" and "h3".
node.start_worker("h1", Hop)?;
node.start_worker("h2", Hop)?;
node.start_worker("h3", Hop)?;
// Send a message to the echoer worker via the "h1", "h2", and "h3" workers
let r = route!["h1", "h2", "h3", "echoer"];
node.send(r, "Hello Ockam!".to_string()).await?;
// Wait to receive a reply and print it.
let reply = node.receive::<String>().await?;
println!("App Received: {}", reply.into_body()?); // should print "Hello Ockam!"
// Stop all workers, stop the node, cleanup and return.
node.shutdown().await
}
cargo run --example 03-routing-many-hops// examples/04-routing-over-transport-responder.rs
// This node starts a tcp listener and an echoer worker.
// It then runs forever waiting for messages.
use hello_ockam::Echoer;
use ockam::tcp::{TcpListenerOptions, TcpTransportExtension};
use ockam::{node, Context, Result};
#[ockam::node]
async fn main(ctx: Context) -> Result<()> {
// Create a node with default implementations
let node = node(ctx).await?;
// Initialize the TCP Transport
let tcp = node.create_tcp_transport()?;
// Create an echoer worker
node.start_worker("echoer", Echoer)?;
// Create a TCP listener and wait for incoming connections.
let listener = tcp.listen("127.0.0.1:4000", TcpListenerOptions::new()).await?;
// Allow access to the Echoer via TCP connections from the TCP listener
node.flow_controls()
.add_consumer(&"echoer".into(), listener.flow_control_id());
// Don't call node.shutdown() here so this node runs forever.
Ok(())
}
// examples/04-routing-over-transport-initiator.rs
// This node routes a message, to a worker on a different node, over the tcp transport.
use ockam::tcp::{TcpConnectionOptions, TcpTransportExtension};
use ockam::{node, route, Context, Result};
#[ockam::node]
async fn main(ctx: Context) -> Result<()> {
// Create a node with default implementations
let mut node = node(ctx).await?;
// Initialize the TCP Transport.
let tcp = node.create_tcp_transport()?;
// Create a TCP connection to a different node.
let connection_to_responder = tcp.connect("localhost:4000", TcpConnectionOptions::new()).await?;
// Send a message to the "echoer" worker on a different node, over a tcp transport.
// Wait to receive a reply and print it.
let r = route![connection_to_responder, "echoer"];
let reply: String = node.send_and_receive(r, "Hello Ockam!".to_string()).await?;
println!("App Received: {}", reply); // should print "Hello Ockam!"
// Stop all workers, stop the node, cleanup and return.
node.shutdown().await
}
cargo run --example 04-routing-over-transport-respondercargo run --example 04-routing-over-transport-initiator// examples/04-routing-over-transport-two-hops-responder.rs
// This node starts a tcp listener and an echoer worker.
// It then runs forever waiting for messages.
use hello_ockam::Echoer;
use ockam::tcp::{TcpListenerOptions, TcpTransportExtension};
use ockam::{node, Context, Result};
#[ockam::node]
async fn main(ctx: Context) -> Result<()> {
// Create a node with default implementations
let node = node(ctx).await?;
// Initialize the TCP Transport
let tcp = node.create_tcp_transport()?;
// Create an echoer worker
node.start_worker("echoer", Echoer)?;
// Create a TCP listener and wait for incoming connections.
let listener = tcp.listen("127.0.0.1:4000", TcpListenerOptions::new()).await?;
// Allow access to the Echoer via TCP connections from the TCP listener
node.flow_controls()
.add_consumer(&"echoer".into(), listener.flow_control_id());
// Don't call node.shutdown() here so this node runs forever.
Ok(())
}
// src/relay.rs
use ockam::{Any, Context, Result, Route, Routed, Worker};
pub struct Relay {
route: Route,
}
impl Relay {
pub fn new(route: impl Into<Route>) -> Self {
let route = route.into();
if route.is_empty() {
panic!("Relay can't forward messages to an empty route");
}
Self { route }
}
}
#[ockam::worker]
impl Worker for Relay {
type Context = Context;
type Message = Any;
/// This handle function takes any incoming message and forwards
/// it to the next hop in it's onward route
async fn handle_message(&mut self, ctx: &mut Context, msg: Routed<Any>) -> Result<()> {
println!("Address: {}, Received: {:?}", ctx.primary_address(), msg);
let next_on_route = self.route.next()?.clone();
// Some type conversion
let mut local_message = msg.into_local_message();
local_message = local_message.pop_front_onward_route()?;
local_message = local_message.prepend_front_onward_route(self.route.clone()); // Prepend predefined route to the onward_route
let prev_hop = local_message.return_route().next()?.clone();
if let Some(info) = ctx
.flow_controls()
.find_flow_control_with_producer_address(&next_on_route)
{
ctx.flow_controls().add_consumer(&prev_hop, info.flow_control_id());
}
if let Some(info) = ctx.flow_controls().find_flow_control_with_producer_address(&prev_hop) {
ctx.flow_controls().add_consumer(&next_on_route, info.flow_control_id());
}
// Send the message on its onward_route
ctx.forward(local_message).await
}
}
// examples/04-routing-over-transport-two-hops-middle.rs
// This node creates a tcp connection to a node at 127.0.0.1:4000
// Starts a relay worker to forward messages to 127.0.0.1:4000
// Starts a tcp listener at 127.0.0.1:3000
// It then runs forever waiting to route messages.
use hello_ockam::Relay;
use ockam::tcp::{TcpConnectionOptions, TcpListenerOptions, TcpTransportExtension};
use ockam::{node, Context, Result};
#[ockam::node]
async fn main(ctx: Context) -> Result<()> {
// Create a node with default implementations
let node = node(ctx).await?;
// Initialize the TCP Transport
let tcp = node.create_tcp_transport()?;
// Create a TCP connection to the responder node.
let connection_to_responder = tcp.connect("127.0.0.1:4000", TcpConnectionOptions::new()).await?;
// Create and start a Relay worker
node.start_worker("forward_to_responder", Relay::new(connection_to_responder))?;
// Create a TCP listener and wait for incoming connections.
let listener = tcp.listen("127.0.0.1:3000", TcpListenerOptions::new()).await?;
// Allow access to the Relay via TCP connections from the TCP listener
node.flow_controls()
.add_consumer(&"forward_to_responder".into(), listener.flow_control_id());
// Don't call node.shutdown() here so this node runs forever.
Ok(())
}
// examples/04-routing-over-transport-two-hops-initiator.rs
// This node routes a message, to a worker on a different node, over two tcp transport hops.
use ockam::tcp::{TcpConnectionOptions, TcpTransportExtension};
use ockam::{node, route, Context, Result};
#[ockam::node]
async fn main(ctx: Context) -> Result<()> {
// Create a node with default implementations
let mut node = node(ctx).await?;
// Initialize the TCP Transport
let tcp = node.create_tcp_transport()?;
// Create a TCP connection to the middle node.
let connection_to_middle_node = tcp.connect("localhost:3000", TcpConnectionOptions::new()).await?;
// Send a message to the "echoer" worker, on a different node, over two tcp hops.
// Wait to receive a reply and print it.
let r = route![connection_to_middle_node, "forward_to_responder", "echoer"];
let reply: String = node.send_and_receive(r, "Hello Ockam!".to_string()).await?;
println!("App Received: {}", reply); // should print "Hello Ockam!"
// Stop all workers, stop the node, cleanup and return.
node.shutdown().await
}
cargo run --example 04-routing-over-transport-two-hops-respondercargo run --example 04-routing-over-transport-two-hops-middlecargo run --example 04-routing-over-transport-two-hops-initiatorpub struct TransportMessage {
pub version: u8,
pub onward_route: Route,
pub return_route: Route,
pub payload: Vec<u8>,
}
pub struct Route {
addresses: VecDeque<Address>
}
pub struct Address {
transport_type: TransportType,
transport_protocol_address: Vec<u8>,
}
pub struct TransportType(u8);#[async_trait]
pub trait IncomingAccessControl: Debug + Send + Sync + 'static {
/// Return true if the message is allowed to pass, and false if not.
async fn is_authorized(&self, relay_msg: &RelayMessage) -> Result<bool>;
}
#[async_trait]
pub trait OutgoingAccessControl: Debug + Send + Sync + 'static {
/// Return true if the message is allowed to pass, and false if not.
async fn is_authorized(&self, relay_msg: &RelayMessage) -> Result<bool>;
}// Create a TCP listener and wait for incoming connections.
let listener = tcp.listen("127.0.0.1:3000", TcpListenerOptions::new()).await?;
// Allow access to the Forwarder via TCP connections from the TCP listener
node.flow_controls()
.add_consumer("forward_to_responder", listener.flow_control_id());


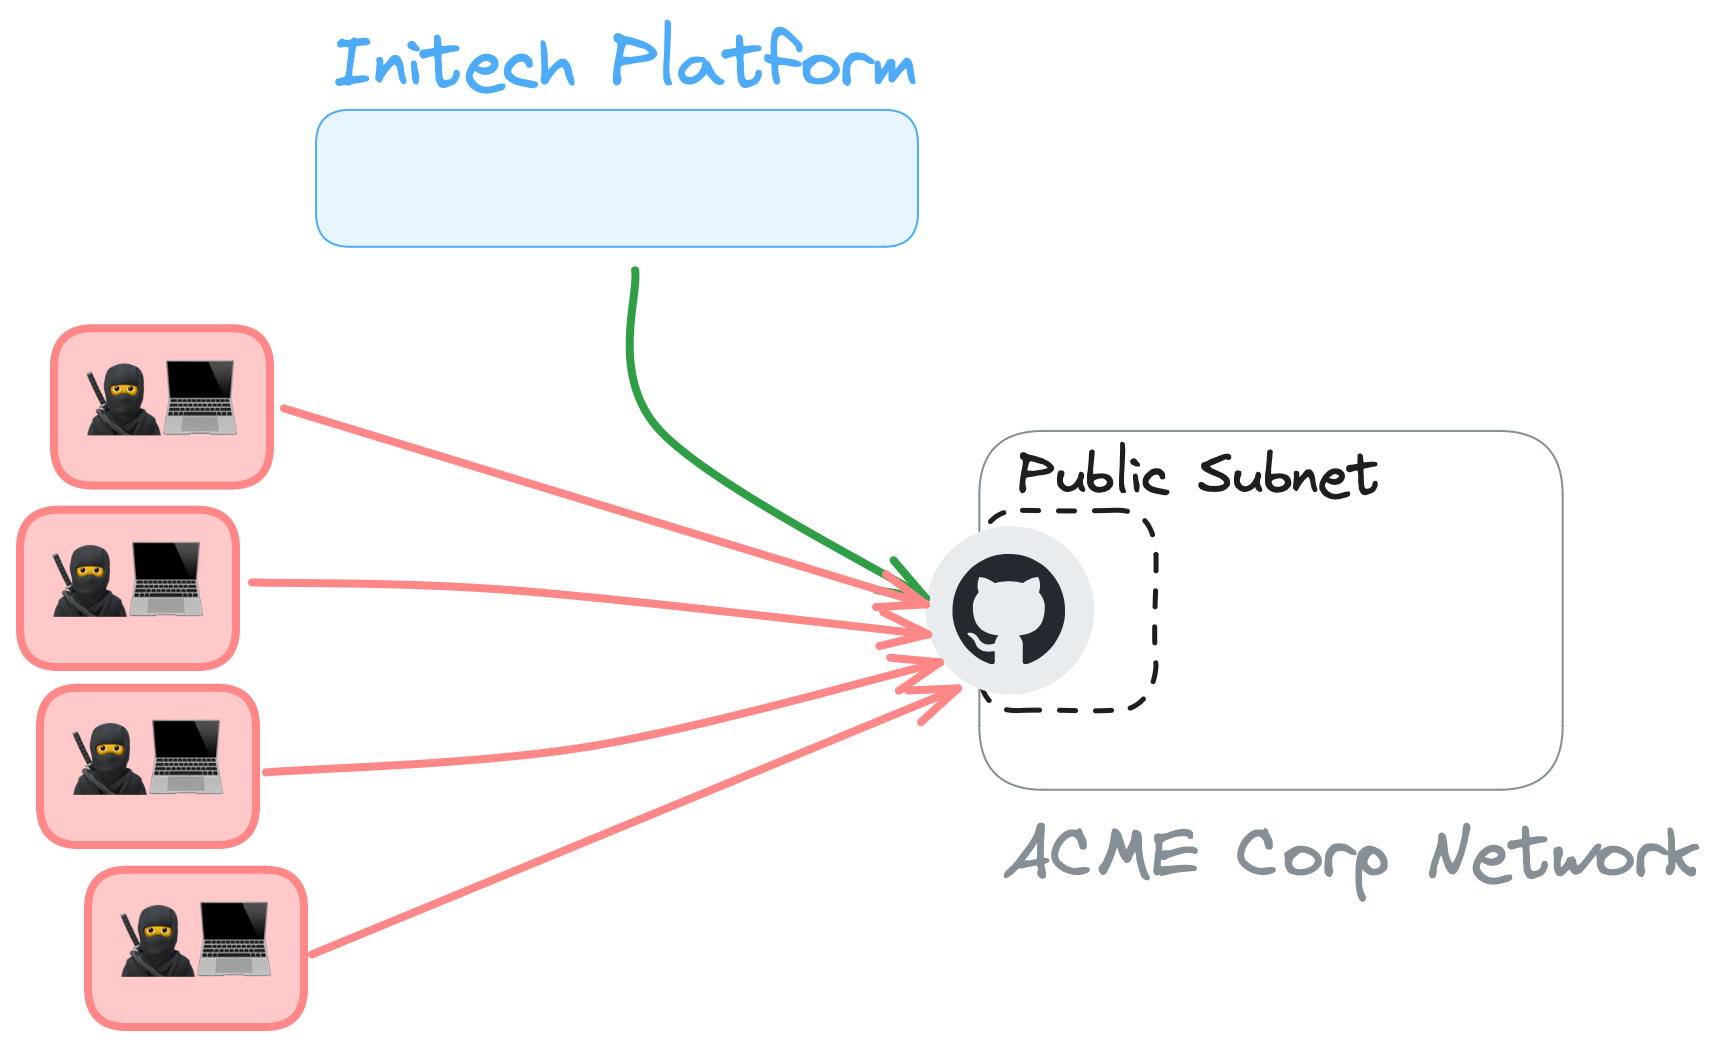